Tuesday 31 May 2011

Happiness Held is the Seed, Happiness Held is the Flower...

Good morning everyone! No work for me today as it is halfterm! I'm just off to the garage to get the brakes fixed on my card, but before i do i just want to share with you a card that i made using the fabulous 'Growing Green' stampset, as well as the 'Happiness Shared' set for the sentiment:


I have used 'Not Quite Navy' (from the 'Regals' collection for the cardbase. I then used some DSP from the 'Springtime Vintage' papers, which i have edged with the 'Eyelet Border Punch'. I then cut a square of 'Baja Breeze' card, and using 'Baja Breeze' and 'Not Quite Navy' ink randomly stamped the rose stamp from the 'Growing Green' Set.! I bordered this on 'Whisper White' cardstock. Then on a scrap piece of 'Whisper White'. I accidentally stuck this wonky, but actually liked this layout, so kept it!! I stamped another rose in 'Not Quite Navy' and then coloured it in using 'Blender Pens'. Using 'Dimensionals' i attached this to the card. The sentiment is from the 'Happiness Shared' stampset and bordered on 'Baja Breeze.

Another card without the 'Big Shot' in sight!! Although i can't believe how reliant i have become on it, i seem to use it all the time! It's definitely the best piece of crafty kit i own!! It seems quite strange not using it on a card!

Have a fab day everyone! Thanks for visiting!

Monday 30 May 2011

Zesty Colour Combo!

Happy Bank Holiday Monday everyone! What beautiful weather it is, much more summery than i was expecting and i guess the weather is totally reflected in the card that i want to share with you today!

I have completely dedicated today for crafting, hubby is at work so i can make as much mess as i want!!! The first thing i did this morning was log on the Cupcake Craft Challenges to see what this weeks challenge is! This week it is 'Zesty Colour Combo' in other words you have to create a card using the following colours: orange, green, yellow and white. So i decided to make the challenge my first crafty make of the day, here you go:

I have created a beautiful tri-fold card. The cardbase is 'Old Olive' and the panels have been made with 'Daffodil Delight' and 'Tangerine Tango' cardstock, some of which has been run through the 'Big Shot' with the 'Vintage Wallpaper Embossing Folder'.

Here's a close up of the front of the card:

The daisies have been created with the 'Flower Daisies Die' using 'Whisper White', 'Tangerine Tango' and 'Daffodil Delight' card. An 'Old Olive' 'Designer Button' has been placed in the centre to coordinate. the daisy is layered on shape that has been created using the 'Top Note Die' and the 'Big Shot'. You basically keep rotating the card on the die to create the effect. (I will try and post a tutorial on how to create this shape soon - you may need to remind me!) I have also placed some beautiful butterflies created from some scraps of 'Brights DSP' and the 'Beautiful Wings Embosslits Die'. I have placed a few 'Basic Rhinestones' on the butterflies for a bit of bling effect! The ribbon featured is 'Old Olive' 'Grosgrain Ribbon'.

Here's the card in it's open form:

The sentiment featured in this card is from the 'Cheers and Wishes' stampset, which i have punched out using the 'Decorative Label Punch'.

I just love this card!! A lovely bright creation to get me in a summery mood. Let's hope the sunshine continues through halfterm!!

Whilst you're here visiting, why not check out my blogcandy!!  Have a fab day and please check back tomorrow for another crafty make! xx

Sunday 29 May 2011

Shock Horror... a card made without the BigShot!!

Hi all! Hope you are all having a fab bank holiday weekend! I have had a lovely day, i've been out for lunch today with my Nan, sister Jamie and my cousin Kirsty! I had planned to get some crafting done today but so far that hasn't happened, but i guess i've got a whole week to get plenty done!

Recently every card or project that i have made has used the wonderful 'Big Shot', however i don't want to neglect those of you who haven't (yet) treated themselves to a die cutting machine... so today i have a non-bigshot card to share with you:


I have used the 'resist emboss' technique to create this card. I started off with a piece of 'Very Vanilla' cardstock, and 'Versamarked' the 'medallion' stamp on to it. I then sprinkled some 'clear embossing power' on and heat embossed it. I then used a 'Sponge Dauber' and some 'Rich Razzleberry ink to sponge all over the image and embellished the image with some 'Basic Pearls'. I mounted this onto the 'Whisper White' card and then mounted all of it onto the 'Early Espresso' cardbase. I finished off this card with a strip of 'Early Espresso' card, which i edged with the 'Eyelet Border Punch' and then ran it through the 'Crimper' a little piece of 'Silver Elastic Cord'.

I'm really pleased with this card - i'd love to know what you think. Please leave a comment. Have a fab bank holiday Monday.xxx

Saturday 28 May 2011

A Milk Carton Birdhouse!

Woo hoo! It's the weekend and the start of my halfterm!! Today i want to share with you a little project i made sometime ago. I popped this project on my display table during my mini catalogue launch party and it recieved a lot of attention!! So here is a little birdhouse made with the (Stampin' Up exclusive) 'Mini Milk Carton Bigz L Die' and the 'Top Note Die'. Here it is:

I firstly ran some 'Pear Pizzazz' card stock through the 'Big Shot' using the 'Mini Milk Carton Die', before constructing it i punched a circle out of one side using the '1-3/4" Circle Punch and placed some acetate behind it to create a window. I then constructed the milk carton. To construct the roof i placed a piece of 'Rose Red' through the 'Big Shot' using the 'Top Note Die'. The then trimmed two ends off of the top note and folded it in half. I placed some yummy sweets into the milk carton before attaching this to the top of the milk carton using some red sticky tape. There you go bird house complete! Simple really! For this project i used the 'Two-Step bird Punch' to decorate it. I punched the bird out of some 'Soft Suede' card (and used a 'Sponge Dauber' and some 'Soft Suede' ink to add some texture) then using a little scrap of 'Daffodil Delight' made his beak. (You could of course use the lovely owl punch or the beautiful bird stamp from the 'Nature Walk' set instead.)

I hope you like this crafty make! I have to say i'm totally in love with my 'Big Shot'. I really don't know how i survived without it!! The Stampin' Up! 'Big Shot' comes with a three year warranty. There's also a whole range of dies which are exclusive to 'Stampin' Up! Why not check them out in the Mini Catalogue (an electronic copy of this catty can be found on the right hand side of my blog.) Email me to find out more about the 'Big Shot' deal i'm running for my customers this month: amyjtidd@gmail.com

Hope you have a fab weekend!

Friday 27 May 2011

DCM Challenge: Passion for Fashion

Hi all, back again as promised with another 'Top Note' handbag design. Here it is:


I'm entering this card in the 'Daring Cardmakers' Challenge - which this weeks theme is : Passion for fashion! It's an exciting dare this week because it has been sponsored by 'imagine that' and there is a prize up for grabs!!

This card was made in exactly the same way as yesterdays card, so i'm not going to insult your intelligence by going through how to make this card again, check yesterdays post for details! The only difference to yesterdays card is the direction that i folded the 'Top Note' to make a different size bag! I also used a 'Corner Rounder' to shape the card, and embellished with some 'Basic Rhinestones'.

I hope over the last few weeks i have inspired you to use some of your products in different ways! If you love the 'Top Note' Die as much as i do then why not treat yourself and make an order!! Email me over your order: amyjtidd@gmail.com

Tomorrow i have yet another project using to 'Top Note' as well as the wonderful Stampin' Up! exclusive 'Milk Carton Die'.

Right, i'm off to have a big glass of wine and celebrate the start of halfterm! Have a wonderful evening! xxx

Thursday 26 May 2011

A Top Note Hand Bag Card!

Hi all! Those of you who are regular followers of my blog will know that recently i have been experimenting quite a lot with my new 'Top Note Die'. I have seen several cards online using the 'Top Note' to create little hand bags! As soon as i saw these cards i just knew i HAD to give this type of card a go! Here is my take on this design:


I used 'Wild Wasabi' card stock for the card base. The handbag has been made out of the beautiful 'Springtime Vintage' DSP which i ran through the 'Big Shot' using the 'Top Note Die'. The great thing about Stampin' Up! DSP is that it is double sided. So to create the handbag all i needed to do was fold the 'Top Note' about a third of the way. I used my 'Crop-a-Dile' to create two holes and used some lovely 'Rose Red' 'Seaming Ribbon' to make the bag handles. I placed a 'Rose Red' 'Designer Button' to create the handbag fastener and placed a 'Basic Rhinestone' in the centre of the button. The sentiment is from the 'Something to Celebrate' Level 2 hostess set, inked in 'Rose Red' on 'Very Vanilla' card stock and then mounted on some 'Rose Red'.

This card i made for my good friend Fiona, it's her birthday today so i hope this card found its way to her safely! Have a fab day Fi!

Check back tomorrow for another variation of this card...

Wednesday 25 May 2011

Top Note GiftCard Holder!

I have recently purchased an exclusive Stampin' Up! 'Top Note Die and i'm addicted to using it!! 'Today i want to share with you a giftcard holder that i made, here it is:


To make this project you need to run some 'Poppy Parade' cardstock through the 'Big Shot' using the 'Top Note Die'. You need three 'Top Notes' in total. The owl has been created using the lovely 'Owl Punch' and scraps of 'Early Espresso', 'Bashful Blue' and 'Whisper White'. I constructed the owl and mounted him onto 'Whisper White' card, mounted on to 'Early Espresso'. (The hearts also come from the 'Owl Punch'.) I layered two 'Top Notes' together and then punched a hole in the top lefthand corner using my 'Crop-A-Dile' and then used a piece of 'Early Espresso' 'Satin Ribbon' to tie them together. Once you have done that you're ready to create the inside...


You now need to chop the third 'Top Note' in half and run some 'Red Sticky Strip' along three sides and then attach to the back 'Top note', this will create a place for you to slot in a gift card, gift voucher or money.

I'm often quite reluctant to give someone a gift voucher as i feel it lacks a personal touch, but now problem solved!!

Tuesday 24 May 2011

Cupcake Craft Challenge: Bookworm

Hi all! Here's my 'Cupcake Craft Challenge' entry. The theme this week is: Bookworm. You have to make a card with a book theme or a bookmark. I decided to adapt a previous bookmark i made using the 'Flower Daisies #2 Die' instead.

I ran some 'Whisper White' and 'Daffodil Delight' cardstock through the 'Big Shot' several times using the 'Flower Daisies #2 Die' and then layered up the daisy shapes to create the flower, using 'Sticky Red Tape' to stick them all together. I then threaded some 'linen thread' through a 'Certainly Celery' 'Designer Button' and stuck that in the centre. Here's a close up of the beautiful flower:


To complete the bookmark i punched out a '1-3/4" Circle punch', stuck that on the back, then using 'Red Sticky Tape' attached some 'Pear Pizzazz' 'Seaming Ribbon' to the back and then sandwiched the ribbon between another punched circle. Here's the bookmark minus the book:


I hope you like this project. I value your comments! xxx

Monday 23 May 2011

DCM Challenge: Chasing Cars

I'm back today with my entry for this weeks Daring Cardmakers Challenge, which was quite literally a challenge this week!! I didn't find it easy! The challenge was to create a card based on the Snow Patrol song 'Chasing Cars'... Well, i didn't know where to start, after analysing the lyrics for quite some time i decided to create a card based on the lyrics "Let's waste time." So here it is (sorry about the poor picture quality):


The cardstock used for the base is 'Soft Suede', which i ran through the 'Big Shot' using my 'Vintage Wallpaper Embossing Folder'. I used the 'Sense of Time' stampset and slightly 'Sponge Daubed' over the image using 'Soft Suede' ink to create an antique effect, mounting the clock image on 'Crumb Cake' and then 'Early Espresso' card. The sentiment reads 'An unhurried sense of time is in itself a form of wealth', which i feel fits perfectly with the sentiment of the Snow Patrol song. I have also used some 'Early Espresso' ' Satin Ribbon' which i have gathered for added effect.

A very tough challenge this week!! Thanks Daring Cardmakers for pushing my creative boundries!!

Sunday 22 May 2011

Two Reasons To Celebrate: My First Blog Award! and My Dad and Step-Mums Anniversary

Hi all, just to warn you that todays post is going to be a long one!! I have two reasons to celebrate today! Firstly i have been awarded my very first blog award by the lovely Stephanie-Emma (The author of the fabulous craft blog: Crafty Boots.) Here it is:


Conditions of receiving this award are, that i have to mention the person who gave me the award (Stephanie-Emma), tell you 7 things about myself and then i get the privilege of passing on the award to up to 7 other bloggers!! So here you go things about me:
  1. I'm married to my lovely hubby and we will be celebrating our first wedding anniversary on July 17th.
  2. Unfortunately i'm not going to be in the country on July 17th - i'll be in Tanzania - I'm going there for the whole of July (Don't worry i'm already busy crafting and loading up scheduled posts to keep you going whilst i'm away!)
  3. I currently don't have a craft room, so have completely taken over our dining room table on a permanent basis!
  4. I have always been crafty, but have been serious about it for the last five or so years.
  5. I became a Stampin' Up! demonstrator in February and love sharing their products with others!
  6. Unfortunately crafting is not my full-time job (although i would love it to be) i'm actually a college lecturer!
  7. I have two lovely cats - Dewey and Crazy!
Here's the seven people i would like to pass on the award to:
  1. Julie H - http://the-crafty-bug.blogspot.com/
  2. Diane - http://crafty-ducks.blogspot.com/
  3. Cate - http://blueangelcrafts.blogspot.com/
  4. Katie - http://deepbluecrafting.co.uk/
Secondly, today is my Dad and Step-Mum's wedding anniversary!! 7 years today!! They are actually on holiday in Malta to celebrate (lucky them!). They have taken my nan with them, so i popped their wedding anniversary card in her luggage so she can give it to them today!! Here's the card i made for them, i hope they like it:


The cardbase is 'Rose Red' (I think this colour is quickly becoming my most favourite colour!) and i have run the card through the 'Big Shot' using the 'Elegant Bouquet Embossing Folder', the flowers of which have been embellished with some 'Basic Rhinestones'. I created a flower out of some strips of 'Rose Red' and 'Pretty in Pink' cardstock edged with the 'Eyelet Border Punch'. I then ran it through the 'Crimper' and then turned it into a flower, placing a subtles 'Designer Button' in the centre! The sentiment is from the Level 2 hostess kit 'Something to Celebrate' set.

 I really hope they like the card and have a lovely day!! Happy Anniversary - Love youxxx

Saturday 21 May 2011

Happy Wedding Day Rob and Iwona!!

Today is our friends Rob and Iwona's wedding day!! So today i want to share with you a little present that i have made to give them to remember their big day...


I have made them a 'mini book' (i got this idea from a craft retreat that i assisted at which was run by my upline Cate) but as always i have put my own crafty touch on it! The 'outer' was created from a piece of 'Very Vanilla' cardstock which i lined with the wonderfully elegant 'Love Letters DSP', i have used 'Red Riding Hood' cardstock, edged with the 'Eyelet Border' to create a spine for this mini book. I create the bride and groom hearts using the 'Heart Punch'. I ran the bride heart through the 'Big Shot' with the 'Vintage Wallpaper Embossing Folder'. They have been embellised with 'Basic Pearls' and 'Basic Rhinestones. I glued these onto a 'Red Riding Hood' 'Top Note' and the sentiment is from the Level 3 'Occasional Quotes' stampset in 'Whisper White' ink.

Here's a sneaky peek inside:


For the centre i used a piece of retired DSP (10"x10") folded into four. The hearts have been created using the 'Heart Punch' and run through the 'Vintage Wallpaper Embossing Folder' and here's it completely folded out...


Again i have used some lovely 'Love Letters DSP', edged with the 'Eyelet Border Punch'. I hope the happy couple will love this gift and that they use it to place some cherished pictures or mementos of their big day!

Congratulations once again Rob and Iwona!! Hope you have an amazing day! I'm already looking forward to the big Polish wedding in October!!!

Friday 20 May 2011

Happy Birthday Dad!

Today is my Dad's birthday. He's not in the country to celebrate, as he is off sunning himself in Malta!! I'm so jealous! I have given my Dad the 'Celebrate' bunting card that i featured on my blog on the 11th May. I hope he likes it.

I have decided today to post a birthday card to fit in with my birthday dedication to my dad, here it is:


It was my turn to design a project for our weekly craft club and this is the card that i came up with. I was looking for a way to use some of the Stampin' Up! products differently, so here i used my 'Big Shot' to cut out a 'Top Note' Die and then spun it on a right angle and ran it through the 'Big Shot' again to create a square shape. I used the 'Decorative Label Punch' in a similar way to create the smaller shapes. I'm really really please with this design! For the background i used the' En Francais' stamp, and on the smaller squares i used the 'Artistic Etchings' set. You may notice that i used some 'Basic Rhinestones' to embellish the crowns. The sentiment is from the 'Cheers and Wishes' stampset, stamped with 'Whisper White' ink. As i had already made this card in blue i demonstrated the card using pink cardstock instead, heres the result:


It's always fun to come up with alternative ways to use punches and dies, i'm so pleased with the end result and all the ladies that attend craft club seemed very happy with their creations and every one of them put their own touch on the design!!

Have a fabulous weekend!! xxx

Thursday 19 May 2011

Strength and Hope Tag

Hi all, hope you are well! I've been a bit poorly but on the mend now... i really should be working but needed a break from lesson planning and mock marking so decided to write this blog post...

 I have recieved some interest about the 'Strength and Hope' stampset after featuring it on my blog the other day, so i thought that i would share with you another project made using this stunning set. This is a little something i made last week at our weekly craft club at work and it's a project especially for you Glitter Geeks:


I've quite simply used a luggage tag (available from any good stationary shop) and using 'Crumb Cake' ink stamped the swirly design from the 'Strength and Hope' set directly onto it. The Butterfly's have been stamped using 'Baja Breeze' ink onto 'Whisper White' card and then cut out. I have used some 'Basic Pearls' to embellish them. I then used my '2-way Glue Pen' to draw all over the butterfly and then applied liberally 'Dazzling Diamond' glitter. Unfortunately the camera hasn't picked up the glitter very well but trust me lots and lots has been used! I simply used 'Dimensionals' to raise and adhese the butterflies to the tag.

I love buying and giving presents. I personally take a lot of enjoyment from wrapping up the presents and making them look all lovely for the recipient. I often use the lovely DSP from Stampin' Up! to wrap up little gifts and when i do i always try to make a coordinating gift tag!!

Wednesday 18 May 2011

Because I Care

Hi all! Another quick post tonight...  just want to share with you a card i made to send to my manager, who has been off work for the last few weeks. I just wanted to send him a little card to let him know that i'm thinking of him. So here it is:


I had started off with the 'Always Artichoke' card as my base with the intention of making a masculine card... but i didn't quite achieve that! But any how i hope he still like's it!

I used 'Springtime Vintage DSP' and ontop of that placed some 'Very Vanilla' cardstock which i have edged with some 'Always Artichoke' ink appliued with a 'Sponge Dauber'. The beautiful flowers have been cut out of another piece of the 'Springtime Vintage DSP' - i just love this effect and it's another great way of using the DSP! The sentiment is from the Level 2 hostess set 'Because i Care' and the foilage has been created using a stamp from the 'Vintage Vogue' set.  I then used the 'Decorative Label Punch' to punch it out. To create the border around the sentiment. I punched out a couple of 'Decorative Labels' and then chopped them in half and then used them to mount the sentiment!

Tuesday 17 May 2011

Life is Like a Butterfly!

I just loved the Daring Cardmakers Challenge this week, i couldn't resist making something else along that theme! So here is a second entry to the challenge made with the beautiful (and charitable) 'Strength and Hope' stampset from Stampin' Up!


I used 'Crumb Cake' cardstock for the cardbase and stamped the beautiful butterfly in 'Crumb Cake' ink. I then embellished the butterfly with some 'Basic Pearls'. I also used some 'Greenhouse Gala DSP' on this card. The word sentiment has been printed using 'Crumb Cake' ink on 'Whisper White' card and them mounted on 'Baja Breeze'. A lovely simple card, that would be an ideal Get Well Soon card or maybe a Thank You card.

The 'Strength and Hope' stampset can be purchased in both clear and woodmounted and for every set sold £1 will be donated to The Breast Cancer Research Foundation. There are four stamps in this set, here they are:
If you would like to purchase this beautiful set or any other Stampin' Up! goodies then drop me an email: amyjtidd@gmail.com 

Thanks again to Daring Cardmakers for a wonderful challenge and to everyone visiting, commenting and following my blog!!

I have also decided to enter this card into the Cupcake Craft Challenge, this week their theme is 'in the garden'. I've got the challenge 'bug' ... haha get it... bug!! xx

Monday 16 May 2011

Owl Always Love You!

Can't believe it is Monday again!! It's been pretty busy as it was the last day of AS Level teaching today and now they have gone on study leave until June. We've also been sitting A2 mocks... so have quite a few of them to mark. I'm getting through it all by reminding myself that there is only two weeks left until May halfterm!

Today i want to share a card i made using the new 'Owl Punch' from the 'mini catalogue'. I just love this punch, you can do so much with it. Here's todays card:


Now, you probably have already noticed that these colours are not colours that i would regularly use. I'm trying really hard to craft out of my comfort zone and so used a Stampin' Up! 'Colour Coach' to help me experiment with different colour combo's. The colours used for this card are 'Crumb Cake', 'More Mustard' and 'Bravo Burgundy' and i have to say i really love the way these colours work together!! The Owls have been punch out of scraps of 'Early Espresso', 'More Mustard', 'Bravo Burgundy', 'Crumb Cake' and 'Whisper White'. I have created the wings from the 'Scallop Circle Punch'. Using punches makes a card make much quicker and is a fab way of using up all those scraps of cardstock. Why not have a look at the range of punches that Stampin' Up! has to offer - they can be found mainly on pages 104 - 106 of the main catalogue, but there also a few lovely ones in the new mini catalogue. (Including the owl!)

You could use any sentiment on this card, but i'm quite the fan of punny cards and so decided to be brave and hand write a sentiment and overall i'm very pleased with the result!!

Sunday 15 May 2011

Darling Bugs of May!

Hi all, i hope you are all having a fab weekend! Mine has been quite chilled! Yesterday i went to a 'duck race' with my friend Lucy - which was a new experience and then i had a lovely visit from my sister Jamie and cousin Kirsty.  My hubby was out on another stag do last night and my friend Suz came round to watch the eurovision and we had a pig out on chinese takeaway, washed down with wine and peach schnapps and cherry 7up (we accidently order cherry 7up rather than regular - but it actually worked quite well!!) Anyway today i'm just having fun crafting!!

Today i want to share with you my entry into the Daring Cardmakers Challenge, which this week is 'The Darling BUGS of May!' I was quite excited about this one, and may even enter more than one card this week as i love the theme so much!! Here's my card:


The card base is 'Wild Wasabi', on that I used the same colour ink and the leave stamp from the 'Happiness Shared' set. The ladybird has been created from two 'Top Note' Dies - using 'Basic Black' and 'Real Red' cardstock. (I have only recently brought this - it's a Stampin' Up! exclusive Die - and it SO versatile - keep checking out my blog to see all the different things you can do with the 'Top Note'! The ladybirds dots have been punched using the '1/2" Circle Punch' and have been raised with 'Dimensionals'. His head has been created with the '1-3/4" Circle Punch', his eyes with scraps of 'Whisper White' and the '1/2" Circle Punch' and i've used the eye circle from 'Owl Punch' to craete the centre of this bugs eyes!!

I think this card is worthy of going to the Ugly Bug Ball, but i'd love to know what you think!!! Thanks for visiting my blog!

Saturday 14 May 2011

Plane & Simple - Thankyou!

I have purchased lots of new card and designer papers, but before i open them up i have set myself the task of using up all my bits and pieces. I had a couple of kits left over from my mini catalogue launch party last month (If you missed out and would like me to send you a mini catalogue to browse through please drop me an email with your mailing address) so i made a quick card, along similar lines to my demo card!! Here it is:

As you can see it uses the 'Plane & Simple' stamp set and it is a very simple card. A simple 'Whisper White' card base, some 'Tempting Turquoise' 'DSP. The Plane has been inked in 'Tempting Turquoise' on 'Whisper White' card and then mounted on 'Tempting Turquoise'. The 'thank you' sentiment is also from the 'Plane & Simple' set.

It's always nice to have a couple of quick projects up your sleeve, just in case you have to make a card in a hurry!! Just with a change of sentiment it's a card for all purposes!

Friday 13 May 2011

Decorative Label Pillow Box!!

Hiya everyone!! What a crazy day in blogger land! 'Blogger' has been out of action for a while ... luckily it hasn't affected my posts, but it looks like a couple of your lovely comments have gone missing... which is a shame.

Anyway, just a quick post today! A little 'pillow box' made with my 'Big Shot'.


The cardstock used here is 'Crumb Cake', before constructing it, i firstly stamped the template, with the 'Bella Toile' background stamp and 'Crumb Cake' ink. I then punched a window out of it using the 'Decorative Label Punch' and stuck a piece of acetate over it using 'Red Sticky Tape'. The box was then constructed and finished with a little piece of 'Early Espresso' 'Satin Ribbon'. I think this would be a perfect little box for a wedding favour, or to place a couple of yummy chocs in as a table gift at a dinner party!! A very quick, but elegant make!!

Thursday 12 May 2011

For All You Bookworms!!

Hello all! Today i want to share with you a lovely bookmark that i CASE'd from Dawn Griffiths website: dawnsstampinthoughts which is a wonderful website with fab tutorials! Here it is:


The flowers have been created using 'Certainly Celery' cardstock, a 'Big Shot' and the 'Bigz L Fun Flowers Die', i have 'Sponge Daubed' the edges with 'Early Espresso' ink and then constructed with 'Dimensionals'. Here's a close up:


You will see a 'Certainly Celery' 'Designer Button' has been placed in the middle, it has some 'Linen Thread' threaded through the middle. I have also used the 'Tiny Tag Punch'. I have used some 'Early Espresso' 'Satin ribbon' to create the bookmark! Here's the bookmark without the stunning 'mini catalogue' model!!


I think this would be a lovely crafty creation to make and give as a gift. Maybe if you're giving the gift of a book you could make one of these to make the gift more personal!! I know i certainly will be from now on!!!

Wednesday 11 May 2011

Let's Celebrate!!

Good afternoon everyone! I hope you are all coping with this 5 day working week! I'm already shattered!!

Today i feel like celebrating!! I started this blog in mid March, and have managed (so far) to post a crafty project everyday!! and to my amazement i have an amazing 32 followers!! woo hoo! Thanks to every single one of you for your support! Here's my card to celebrate!!


This card is CASE'd from Andrea Walfords blog and was quite a quick make!! The cardbase is 'Real Red', i have then used some 'DSP' from the 'Brights' collection and some 'Whisper White' card. The bunting has been created using the '1-3/8" Circle Punch' in a variety of 'Brights DSP', i folded them in half and then stuck these down with 'SNAIL adhesive'. I have used some 'Linen Thread'. The 'celebrate' sentiment is from the Level 2 'Something to Celebrate' hostess set (i have used 'Real Red' ink) and as always i have used my 'Stamp-a-ma-jig' to line up the 'celebrate!' sentiments up perfectly!!

This card would make a perfect birthday invitation or party acceptance, or even a birthday card and is a great way of using up all those little scraps of DSP you simply can't bear to throw away!!!

Tuesday 10 May 2011

A Gate-Fold Card For You...

I'm back again with another card design ... this type of card is referred to as a 'Gate-Fold Card'. Here it is:


The cardbase used here is 'Very Vanilla'. i have also used 'Red Riding Hood' cardstock from the 'Regals' collection.  I have also used the beautiful 'Love Letters DSP'. I have stamped the flower from the 'Happiness Shared' stampset in 'Early Espresso' and then used my 'Blender Pens' to colour in the flower (with 'Red Riding Hood' ink) and leaves (with 'Always Artichoke' ink).

The 'for you' sentiment is actually from the 'i'm here for you' stamp (from the 'Occassional Quotes' set). I used an 'Early Espresso' 'Stampin' Write Marker' to colour in just the 'for you...'  Thats the great thing about the markers you can select parts of stamps to use! It makes your stampsets even more versatile!! I used the 1/2" Circle Punch to create the corners indents. I've also used some lovely 'Early Espresso' 'Satin Ribbon' on this card!! I just love this ribbon!!

Here's an open shot of the card:


If you would like to make a card like this, why not book a workshop, invite a few friends around for a craft tutorial!! Contact me for more details: amyjtidd@gmail.com

Monday 9 May 2011

DCM Challenge - Flowers for May!!

Hiya all! Today i want to share with you a card i have submitted to the Daring Card Makers challenge, which this week was 'Flowers for May', you basically had to create a card which either had Hawthorn flowers or Lily of the Valley... I don't possess a stamp with either of these flowers and was adamant that i was going to use Stampin' Up! products so i improvised and this is what i came up with...


I used my 'Big Shot' and the 'Elegant Bouquet Embossing Folder' to emboss my cardbase. I then used 'Whisper White' ink and a 'Sponge Dauber' to create the Hawthorn flowers. I then used my 'Daffodil Delight' 'Stampin' Write Marker'. I then used some 'Rose Red' ink and a 'Blender Pen' to create the detail on the flower. The butterfly has been created using the 'Big Shot' and the 'Beautiful Butterfly Die'. I 'Sponge Daubed' the butterfly with some 'Whisper White' ink, and used some 'Basic Pearls' to create the body of the butterfly! The 'because i care' sentiment is from the level 1 hostess set of the same name, inked in 'Rose Red' and punched out using the 'Decorative Label Punch'. The card is finished off with some 'Rose Red' 'Seaming ribbon'. I hope you like!!

If you like what you see i would love for you to check out some of my other posts, and maybe even sign up as a follower! (I post a new crafty project everyday!!) xxx

Sunday 8 May 2011

My first Tri-Shutter Card!!

Hi all! I have had another fab weekend!! My hubby has been away on a stag weekend, of course i have missed him, but it has meant that i have been able to go out and have a lot of fun with my friends! Last night i went out for a lovely meal and cocktails with my two good friends Suzanne and Lucy! Even though we were only going into town we glammed up and it was all very fun! I was particularly happy that i was ID'd getting into the pub!! woo hoo!!! Retail therapy + good food + amazing cocktails + good friends + a little bit of crafting = one FAB weekend!!!

Anyway, back to the crafting... those of you who have been following my blog for a while will know that i have been trying really hard to craft beyond my comfort zone and experiment with new designs, colours, layouts etc.

I have seen lots of Tri-Shutter Cards on Splitcoaststampers and other craft blogs and decided that i must give one of these cards a try! I used a wonderful YouTube tutorial from Splitcoaststampers to guide me through... here's my attempt (and i have to say i'm very very pleased with the final result!!):


I have used 'Crumb Cake' cardstock for the cardbase. I have used a selection of 'Springtime Vintage DSP' mounted onto 'Always Artichoke' cardstock. I have embellished the card with some butterflies cut using my 'Big Shot' and the 'Beautiful Wings Embosslit Die', some 'Basic Pearls'. I have also used my 'Eyelet Border Punch' and my 'Paper Piercing Tool' on this project. Here's a picture of this card in it's closed form:


The quote is from the 'Occasional Quotes' Level 3 hostess set, inked in 'Always Artichoke' onto 'Very Vanilla' cardstock. I drew around a button lid to create the large circle, used a 'Sponge Dauber' to age the edges and then mounted this onto 'Always Artichoke' cardstock.

I really love this style of card and will definately be making some more cards like this!! I have shown a few friends and they appeared very impressed with my design!!

I'd also like to take this opportunity to welcome some new 'crafty thinkers' to my blog!! I'm very excited that i now have 31 regular followers!! So a big hello to my newest followers: Paramour.d and Lya Thomas!! If you like what you see, please spread the word to all your crafty friends!!!

Saturday 7 May 2011

Feeling Fruity??

Hey all, Just a quick post today to share some cute little 'Pillow Boxes' that we made last week at our weekly craft club at work! These little boxes were designed by Cate (my upline). They are made quite simply by cutting out 'Pillow Boxes' out of 'Whisper White' cardstock using the 'Big Shot'. We then used a range of inkpads and 'Stampin' Write Markers' to stamp lots of fruits from the 'Tart & Tangy' stampset!! On one of the boxes we punched out an oval using the 'Oval Punch' and then the hole was covered in acetate to make a window! We then constructed the boxes and tied some 'Daffodil Delight' ribbon around them and most importantly filled them with yummy sweets!!


I love our weekly craft club! It's a great forum to share ideas!! Why not try and set up something similar at your own workplace? It's a great way of meeting and socialising with colleagues!!

Friday 6 May 2011

Snip and Tuck

Hi all, today i want to share with you card that i made using a tutorial from Julie Davison's blog. Check it out! This card is refered to as a 'Snip and Tuck' Card. I think it would be a perfect card style to give a voucher or money in as a gift! The cardstock used is 'Crumb Cake' (I seem to be using a lot of that recently) as well as some 'Red Riding Hood' and some 'Basic Black', the stampset used is the wonderful 'Artistic Etchings' with some 'Crumb Cake' ink and the DSP used is from the 'Love Letters' collection. I have also used the 'Eyelet  Border Punch', the 'Scallop Circle Punch' and the '1-3/8" Circle Punch) and a couple of 'Dimensionals' to raised the 'Scalloped Circle'.

Here's the card in it's closed form:


And here's a pic to show you how the card opens and closes:


I've been trying really hard to make different styles of card and really enjoyed making this card, it's really different from my usual style!

My hubby is away for the weekend on a stag do, so i have a completely free weekend to catch up with friends and hopefully get in some crafting without being told off for making the dining room table all messy!! Can't wait to share with you all, more of my creations!!! xx

Thursday 5 May 2011

Thank You to All My Lovely Customers!!!

Hi everyone! How exciting, i returned home from work yesterday to a massive box of Stampin' Up! goodies, lots of customer orders (as well as a few little 'treats' for myself!)

I always like to say thankyou to my customers with a little handmade card. So last night i made a batch of thankyou cards, here they are:


The cardbase is 'Bashful Blue', which i ran through the 'Big Shot' using the 'Vintage Wallpaper Embossing Folder'. The owl (from the 'Fox & Friends' set) is stamped in 'Pear Pizzazz' ink on 'Whisper White' cardstock, then punched out using a '1-1/4 Circle Punch', then mounted with 'Dimensionals' onto a '1-3/8 Circle' punched out in 'Bashful Blue'. Both of which were mounted onto a 'Pear Pizzazz' 'Scallop Circle'. The 'thank you' sentiment is from the 'Because i Care' level 1 hostess set, inked in 'Pear Pizzazz' ink on 'Whisper White', mounted again on a scrap of 'Pear Pizzazz' cardstock. I always leave my customer cards blank so they can reuse them if they wish. I hope you like them!!! Here's a close up:


I'm regularly putting Stampin' Up! orders through, so if you would like to make an order drop me an email: amyjtidd@gmail.com

As i said, i have a few new crafty goodies!!! So i'm hoping i can have a play this weekend! Can't wait to share all my creations with you!!

Wednesday 4 May 2011

May the Forth Be With You!

Hi all, Hope you are well! I can't believe how quickly the week is flying by!! Today is my friend Lucinda's little boy's first birthday!! Happy 1st Birthday Harry!!!

Here is the card that i made for the little man:


This card is CASE'd from my upline Cate (Blueangelcrafts). The card used is ' Wild Wasabi', 'Bashful Blue' and 'Whisper White'. Firstly i created the 'Harry' using 'Bashful Blue' and 'Wild Wasabi' ink and the 'Broadsheet Alphabet' stampset (I used the 'stamp-a-ma-jig' to line up the letters nice and straight). The 'is' is handwritten using an 'Old Olive' 'Stampin' Write Marker' and the '1' is created using 'Schoolbook Serif Numbers' set.

The tumbling monkeys come from the 'Fox & Friends' stampset, inked in 'Soft Suede' and then i have coloured in their faces using 'Crumb Cake' ink and a blender pen! They look mischevious don't they!?!

I hope little Harry likes his card! I was really tempted to make him a Star Wars card given the fact his birthday is on May the 4th, but i'm sure he will be sick of that joke in a few more years time!!

I also want to take the opportunity with this post to plug Lucinda's blog: Bakes, Books and my Boys. It is absolutely fabulous. Seriously this blog could easily be transformed into a book and make her millions! It's a brilliant guide to becoming a perfect housewife! Please take a look!!

Tuesday 3 May 2011

Happy Birthday Rachel!

Hi all! Today i want to dedicate my post to my good friend Rachel! It's her birthday today, so happy birthday!!! Here's the card that i gave her...


The card base is 'Old Olive'. I then placed a piece of 'Pumpkin Pie' ontop, and then cut out a square of 'Old Olive', stamped a heart (from the 'Sweetheart' stampset) using 'Old Olive' ink and then used the 'heart' punch to punch out a heart! I created the owl using the 'Owl Punch' from the Mini Catalogue! the owl is created with 'Early Espresso', 'Crumb Cake', 'Whisper White' and 'Pumpkin Pie DSP' scraps. (Isn't he cute!!) I used another piece of 'Old Olive' card edged with the 'Eyelet Border Punch' and then mounted the 'Pumpkin Pie DSP' Next i stuck down a piece of 'Old Olive Grosgrain Ribbon using 'Sticky Strip'. The sentiment is from the 'a la Carte' 'Sweet Birthday', mounted with the border of a stamp from the 'Four Frames' set. (I used the 'Stampin' Write Markers' to stamp both colours) and punched the frame out using the 'Decorative Label Punch'. Sounds complicated... but really not so! I think i'm in love with the 'owl punch'! I can't wait to play some more and see what i come up with!!

Monday 2 May 2011

Pillow Box Basket!

Hi all!! Hope you have all enjoyed the lovely bank holiday Monday! How lovely is it to have a long weekend! I have had such an amazing weekend! Before i share my craft project with you i just want to say hello to some of my newest followers - a big hello to Sherie Ann, Stephanie and Laura M! Hope you enjoy my blog!

Today i'm sharing a project that i made during my crafty day with Cate and Ruth!! It's a basket made using the 'Pillow Box' die. I was so excited to stumble across a tutorial to make this on the Splitcoaststampers YouTube channel! I love the fact that you can make other items using the 'Pillow Box' Die other than the regular box!! So here it is:


The cardstock used for this project is 'Crumb Cake'. The basket is made from three 'Pillow Box' templates, stuck together with 'Sticky Strip'. I have wrapped around some of the beautiful 'Springtime Vintage' DSP and used some of the lovely 'Rose Red' 'Seaming Ribbon' on the handle!

This basket could be used in so many ways, maybe as an alternative to a gift bag - what a lovely way to present a gift, or maybe as a flowergirl basket for a wedding!!

I love experimenting with products and coming up with alternative uses!! Hope you like!! Check back soon for another craft project!!!

Sunday 1 May 2011

It's The Final (Wedding) Countdown!!

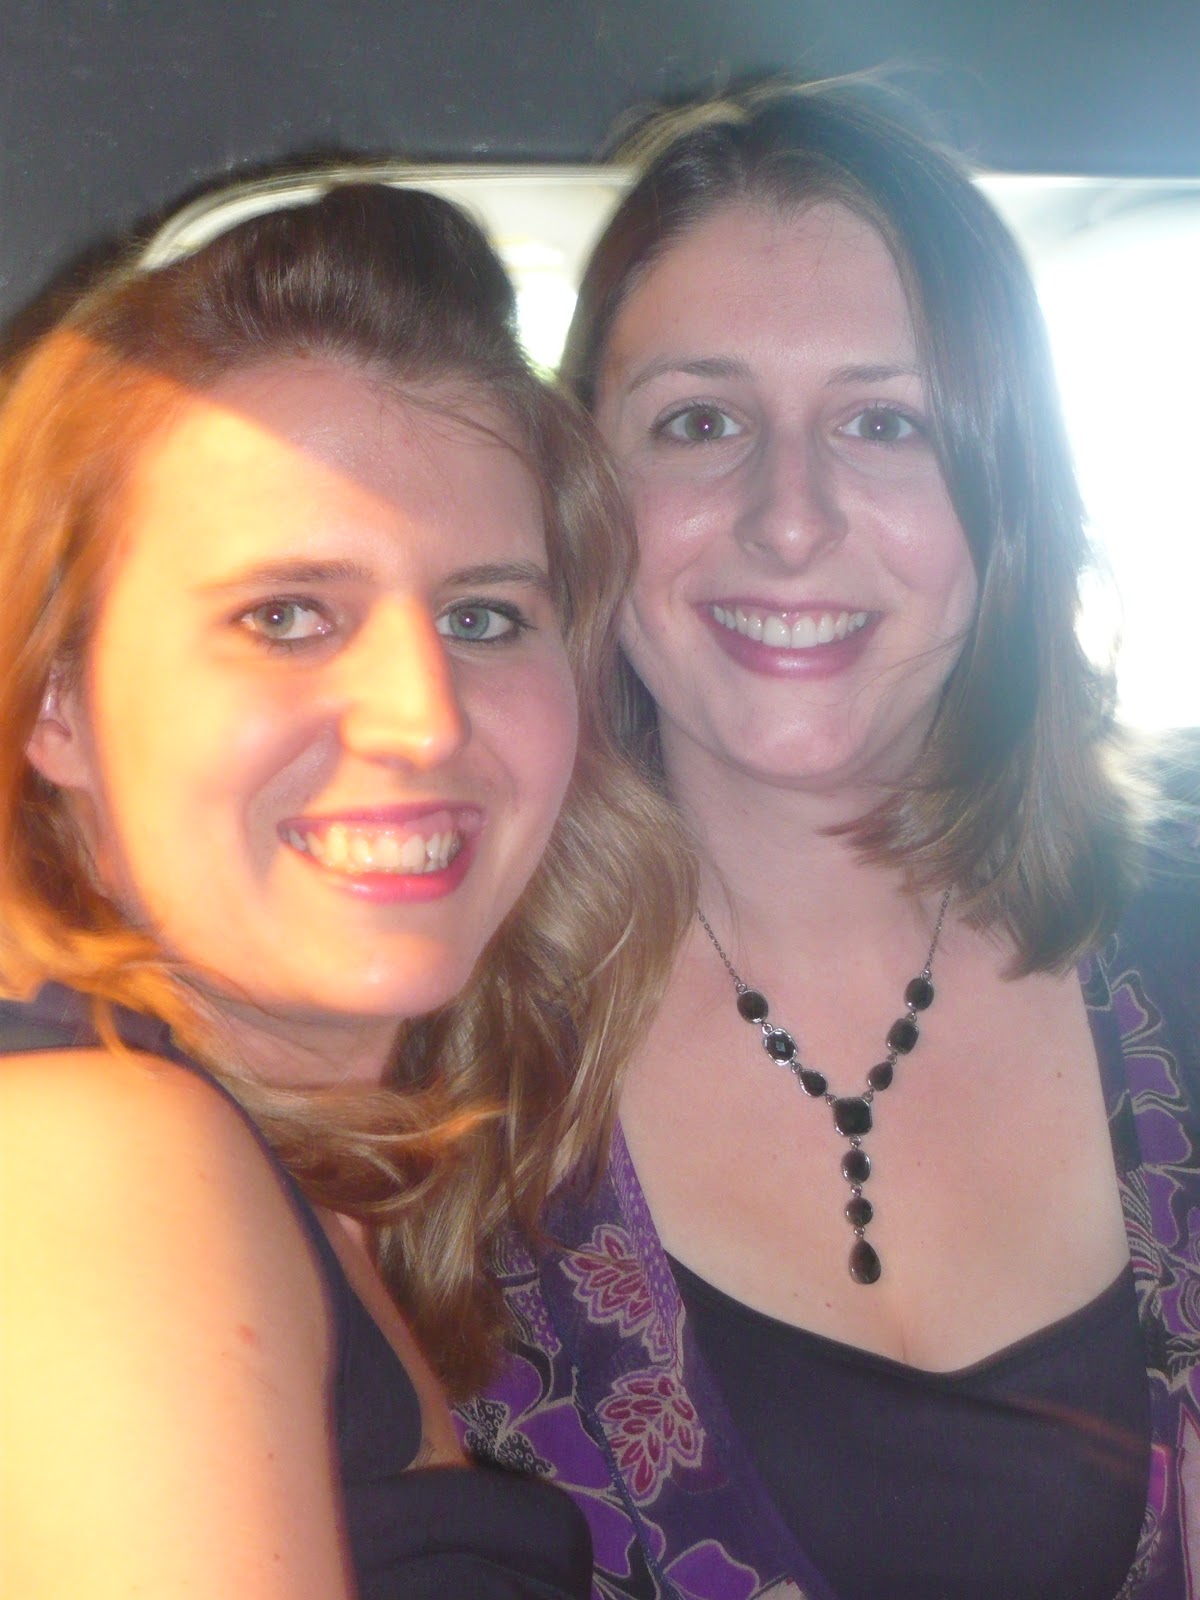
Hello everyone! Sorry for posting late but i have been quite busy today in one way or another! Last night i went out for my friend Iwonas hen do! We had a fab time, playing lots of games, having a ride in a limo, going to a casino and having a good dance to finish off the evening!! Here's a few pics of the evening. 1st pic is of the beautiful bride to be, we creatively made her a wedding dress out of white bin liners and toilet roll! Next pic is of me and my best friend Suzanne in the limo! Below that is a pic of me collecting mine and Suzannes £60 winnings from the slot machine and finally a pic of me and Iwona playing on the roulette table!


It was a really fun night, and not too long now to her 1st wedding (the UK one! They are also having a Polish wedding in October!! We're really looking forward to that one!)

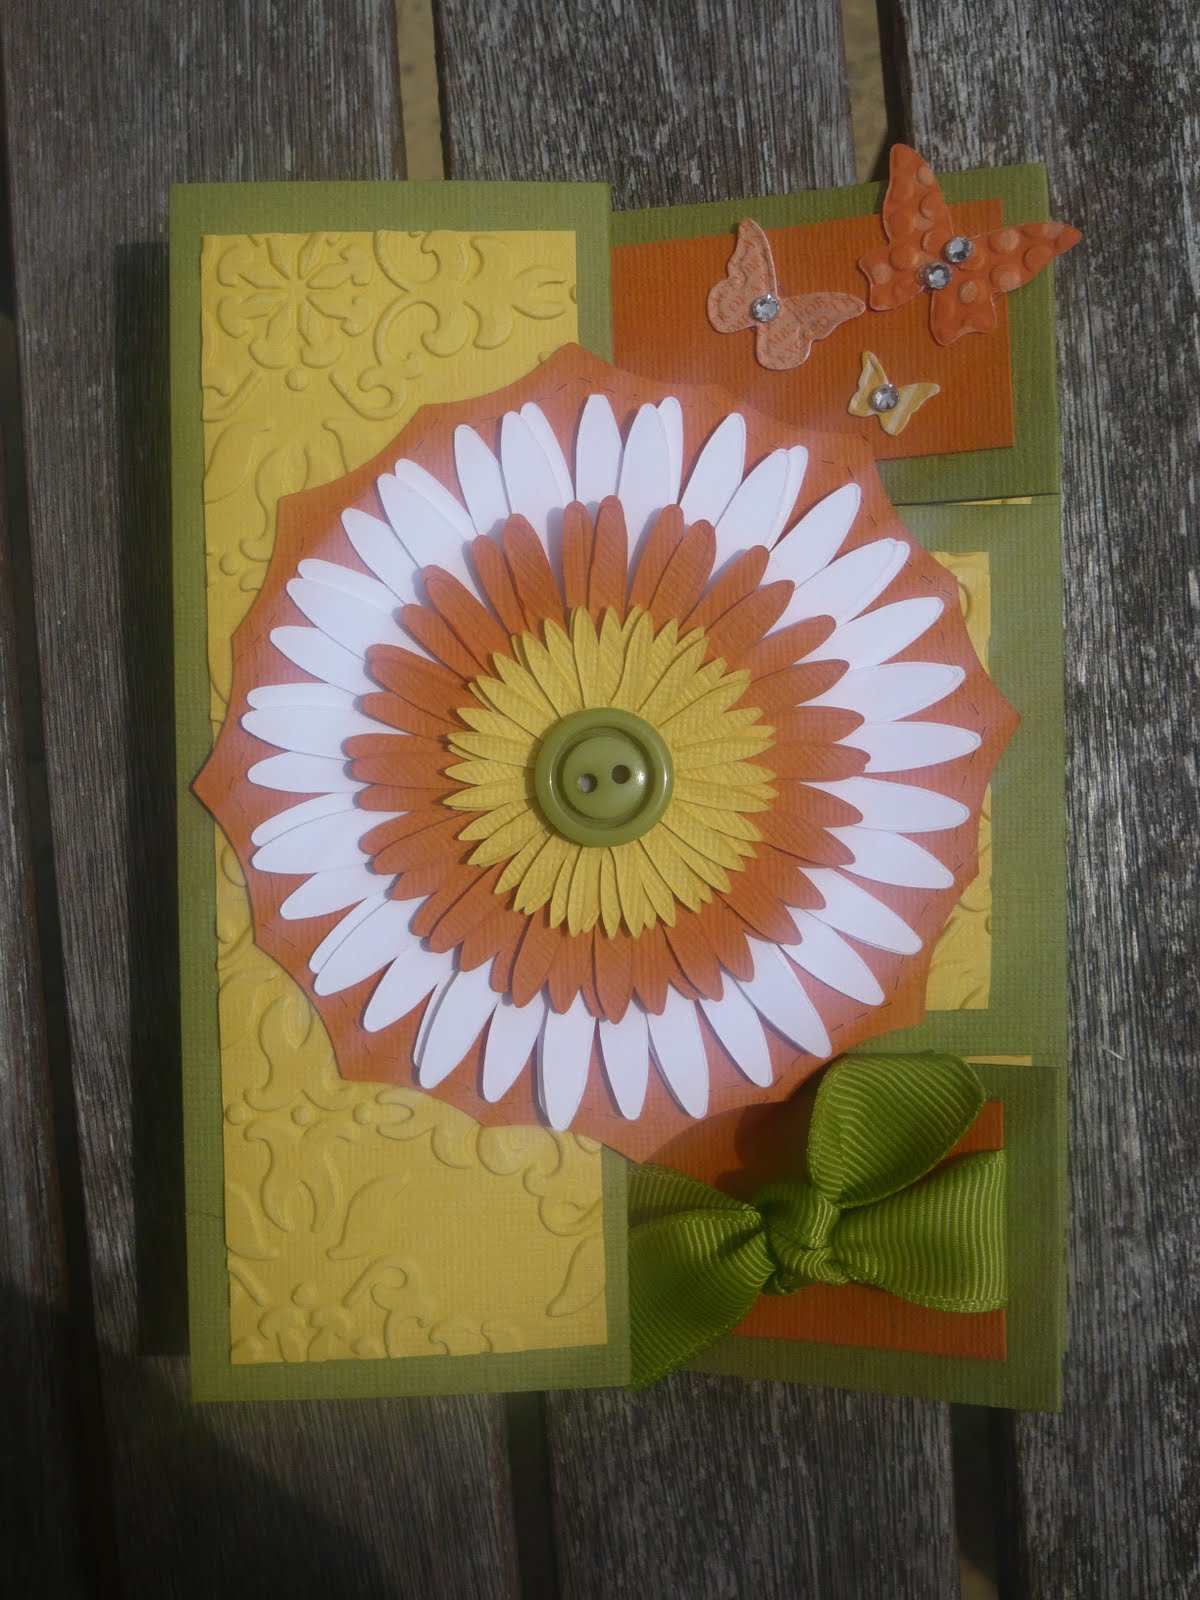
Anyway along the theme of weddings, it seems that all of our friends are getting hitched at the moment! We have three weddings this year and another two now planned for 2012! I remember how excited i was counting down to our wedding so i decided to get crafty and make a wedding countdown project for the 2012 couples. I got the idea from Karla Anders blog (where she had created a similar birthday countdown project) Here they are:

I could resist the new 'Sprintime Vintage DSP' and the lovely 'Seaming Ribbon', the cardstock used is the versatile 'Crumb Cake' and i have used 'Crumb Cake', 'Night of Navy' and 'Rose Red' ink and the 'Just Perfect Alphabet' set to create the 'days until your wedding', the numbers have been created using  'Rose Red' and 'Baja Breeze' ink, depending on the project and the 'Schoolbook Serif Numbers' set, stamped on 'Whisper White Card Stock' and then mounted on 'Baja Breeze' or 'Night of Navy' card. I have backed the numbers with velcro (attached with red 'Sticky Strip') So the recipient can alter the numbers as they countdown to their big day!!

Here they are individually:


Material wise this project uses very little card etc, just a word of warning, they take a fair bit of time to make, as you have to stamp and mount A LOT of numbers!! (Approx 24 for each project in total!) If you wanted to speed up this project i guess you could do a weekly countdown! 

I'm so happy with the final product and will definately making some christmas countdowns! So if you would like one, put in your order! I'm thinking of using the 'Jolly Holidays' DSP, but can customise them for you if you would like!

Sorry for the mega long post! Thanks for visiting and i hope you come back to see more of my crafty creations soon!! xxx