Today i have another New Baby card to share with you created by one of my fabulous crafty friends Hannah using the fab versatile 'Every Little Bit' stampset:
Hannah started off with a 'Whisper White' base and layered some 'Tempting Turquoise' 'DSP' on to it. She then punched out three 'Scallop Circles' from 'Bashful Blue' card and glued them onto the 'DSP'. On some 'Whisper White' card she stamped out the teddybear, cat and dog images from the 'Every Little Bit' stampset using 'Basic Black' ink and then coloured in using 'Blender Pens'. She punched these out using the '1" Circle Punch' and then secured them into place using 'Dimensionals' to create a raised effect. Finally she punched out a heart using the 'Heart to Heart' punch and then covered it in Versamark and then 'Silver Embossing Powder' and then finished it off with the heatgun!
I love this card. Fab layout and completely versatile! There are so many images in the 'Every Little Bit' stampset that you could customise this card depending on the recipient. Thankyou Hannah for being so thoughtful and sending this fab card! Another one for Xanders scrapbook!! xxxxx
Amy Tidd - Independent Stampin' Up! demonstrator. Operating in the Surrey/ Hampshire area.
Showing posts with label Heart to Heart Punch. Show all posts
Saturday, 18 August 2012
Thursday, 20 October 2011
Top Note Dog GiftCard Holder
Another 'Top Note Die' project for you all today! I've been thinking about christmas quite a lot recently and we often give people giftcards but i think they can be quite impersonal gifts, so wanted to start thinking of some imaginative ways of giving these to people. Playing aroung with the 'Top Note Die' i came up with idea:
To create this dog you need to run some 'Soft Suede' cardstock through the 'Big Shot' using the 'Top Note Die'. You need two 'Top Notes' to make this project. His eyes were made from two '1-3/8" Circles' punched from 'Very Vanilla' card, two '1/2" Circles' of 'Soft Suede' and then two smaller circles made from 'Basic Black' card, using the 'Owl Punch'. His muzzle was made using the 'Round Tab Punch' from some 'Very Vanilla' card. his nose was made from some 'Basic Black' card using the 'Heart to Heart' Punch, his tongue was created from some 'Blushing Bride' card using the 'Heart Punch'. His ears were created from a 'Top Note' chopped in half and then glued in place!!
Now, you're wondering how this can hold a gift card, well here you go:
Simply run one more piece of 'Soft Suede' card through the 'big Shot' to create another 'Top Note', chop it in half and then run some 'Red Sticky Tape' along three sides of it to create a pocket.
This giftcard holder can fit sniggly into a 6"x6" envelope and definately personalises a simple gift card!! Hope you like the idea! You could of course create this dog in different colours, or create a different character althogether with a little bit of imagination! Why not treat yourself to the 'Top Note Die', email over your order today: amyjtidd@gmail.com
To create this dog you need to run some 'Soft Suede' cardstock through the 'Big Shot' using the 'Top Note Die'. You need two 'Top Notes' to make this project. His eyes were made from two '1-3/8" Circles' punched from 'Very Vanilla' card, two '1/2" Circles' of 'Soft Suede' and then two smaller circles made from 'Basic Black' card, using the 'Owl Punch'. His muzzle was made using the 'Round Tab Punch' from some 'Very Vanilla' card. his nose was made from some 'Basic Black' card using the 'Heart to Heart' Punch, his tongue was created from some 'Blushing Bride' card using the 'Heart Punch'. His ears were created from a 'Top Note' chopped in half and then glued in place!!
Now, you're wondering how this can hold a gift card, well here you go:
Simply run one more piece of 'Soft Suede' card through the 'big Shot' to create another 'Top Note', chop it in half and then run some 'Red Sticky Tape' along three sides of it to create a pocket.
This giftcard holder can fit sniggly into a 6"x6" envelope and definately personalises a simple gift card!! Hope you like the idea! You could of course create this dog in different colours, or create a different character althogether with a little bit of imagination! Why not treat yourself to the 'Top Note Die', email over your order today: amyjtidd@gmail.com
Tuesday, 20 September 2011
Congratulations Dan and Jade!
So many of my friends and family members are at the marriage and baby stage of their life!! It's so exciting and great for my crafting as i get to make lots and lots of cards!!
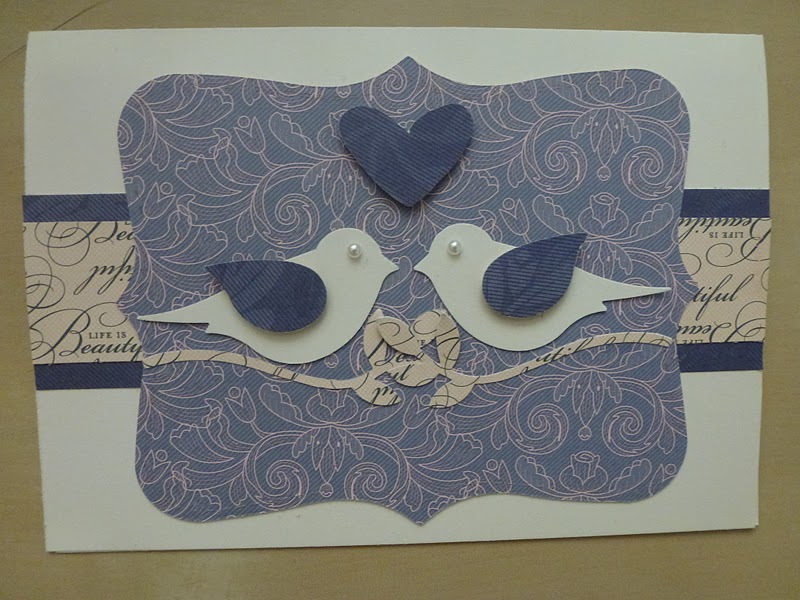
My cousin, Daniel recently got engaged to his girlfriend Jade! It's lovely, he is so happy and i couldn't wait to crack open my craft gear and make them a card! Here it is:
The cardbase that i used is 'Very Vanilla'. I have used three different sheets of 'DSP' all from the 'Lap of Luxury' collection - a beautiful set of papers that use the following colours: 'Very Vanilla', 'Pretty in Pink', Concord Crush' and 'Basic Gray'. These papers are completely stunning, but sadly retiring at the end of the month - so ensure you don't miss out - get an order in today!
So here is how i made the card: first i cut two strips of 'Lap of Luxury DSP', one slightly wider than the other and then layered them up and glued them along the centre of the card. Next i ran another piece of 'DSP' through my 'Big Shot' using the 'Top Note Die' and glued that in the centre of the card. I punched two birds out of 'Very Vanilla' card, using the 'Two-Step Bird Punch', and positioned them looking at one another! I then used the 'Bird Punch' to punch out some wings from the same 'DSP' i used on the backing strip and punched two branches from the other 'DSP', again using the 'Bird Punch'. Two little 'Basic Pearls' are placed on the birds to create their eyes. To complete this card, i punched a small heart out of coordinating 'DSP' using the 'Heart to Heart Punch'.
I used a lovely stamp from the 'Occasional Quote' stampset in the centre of the card: 'Love begins in a MOMENT, grows over TIME, and lasts an ETERNITY.' a perfect sentiment for an engagement card - don't you think!!!
(I've entered this card into the 'Oh la la Creations Challenge Blog', the theme to follow this week is 'Punches/Dies', the 'Cardmakinmamas blog, which has a 'Punches' theme and 'Cute Card Thursday' - anything goes.)
My cousin, Daniel recently got engaged to his girlfriend Jade! It's lovely, he is so happy and i couldn't wait to crack open my craft gear and make them a card! Here it is:
The cardbase that i used is 'Very Vanilla'. I have used three different sheets of 'DSP' all from the 'Lap of Luxury' collection - a beautiful set of papers that use the following colours: 'Very Vanilla', 'Pretty in Pink', Concord Crush' and 'Basic Gray'. These papers are completely stunning, but sadly retiring at the end of the month - so ensure you don't miss out - get an order in today!
So here is how i made the card: first i cut two strips of 'Lap of Luxury DSP', one slightly wider than the other and then layered them up and glued them along the centre of the card. Next i ran another piece of 'DSP' through my 'Big Shot' using the 'Top Note Die' and glued that in the centre of the card. I punched two birds out of 'Very Vanilla' card, using the 'Two-Step Bird Punch', and positioned them looking at one another! I then used the 'Bird Punch' to punch out some wings from the same 'DSP' i used on the backing strip and punched two branches from the other 'DSP', again using the 'Bird Punch'. Two little 'Basic Pearls' are placed on the birds to create their eyes. To complete this card, i punched a small heart out of coordinating 'DSP' using the 'Heart to Heart Punch'.
I used a lovely stamp from the 'Occasional Quote' stampset in the centre of the card: 'Love begins in a MOMENT, grows over TIME, and lasts an ETERNITY.' a perfect sentiment for an engagement card - don't you think!!!
(I've entered this card into the 'Oh la la Creations Challenge Blog', the theme to follow this week is 'Punches/Dies', the 'Cardmakinmamas blog, which has a 'Punches' theme and 'Cute Card Thursday' - anything goes.)
Saturday, 27 August 2011
Home is where the heart is!!
Hi all, hope you are having a great weekend! Today i have no plans other than to craft ... BLISS! As you may be aware i have recently been appointed a member of the Crafty Boots Challenge DT, and i'm now working hard on my projects!! I can't wait to share them with you and i hope you all join in!!
Now today, as promised i have the Welcome Home card that i made for my sister Jamie (She has recently been on a month long holiday to Australia - and i missed her lots!) My sister is a bit of a home-bird and so i knew this card was perfect to welcome her home!:
Now i can't take credit for this beautiful card, i case'd it from a blog called 'In the Palms', check this blog out - it even has a tutorial on how to create it!! (I did slightly alter the dimensions) The cardbase used is 'Early Espresso', the roof and base of the card is 'Whisper White', which has been ran through the 'Big Shot' using the 'Vintage Wallpaper Embossing Folder'. I have used my '1-3/8" circle Punch' to create the 'Soft Suede' circle and the bid has been created out of 'Sweet and Sour DSP' using my 'Two-Step Bird Punch'. The branch has been made out of a little scrap of 'Pear Pizzazz' also using my 'two-Step Bird Punch' and the flower was created out of a scrap of 'Melon Mambo' and the 'Boho Blossom Punch' - i have placed a 'Basic Pearl' in the centre! The heart at the top of the chimney has also been created from a scrap of 'Melon mambo' and the 'Heart to Heart Punch'.
Hope you like the card!! Have a great weekend!!
Friday, 19 August 2011
Heart Themed Table Favour Designs
(Hi guys for some reason my scheduled posts have let me down so posting lots of projects at once ... hope it works - sorry if you have been missing me and my crafting - i didn't abandon you!!)
So i have been playing around a lot with wedding themed projects recently, and i thought i would have a go at making some heart themed table favours. I have used the chocoloate coins featured in yesterdays post:
and here they are in their transformed state:
Design 1:
I have sandwiched the chocolate between two 'Whisper White' 'Scallop Circles'. I have dotted around the top 'Scallop Circle' with a 'Melon Mambo' 'Stampin' Write Marker', next layered a 'Pretty in Pink' '1/38" Circle' and then punched the heart out of a scrap of 'Melon Mambo' cardstock using the 'Heart to Heart Punch' smothered it in glue using my '2-way glue pen' and dunked it in my pot of 'Dazzling Diamond Glitter'. I have used a dimensional to stick it into place, creating a 3D effect.
Design 2:
A much simpler design, this time i sandwiched the chocolate discs between two 'Basic Black' '1 3/8" Circles', i then punched a heart from some 'Cherry Cobbler' cardstock using the 'Heart Punch' and then ran it through my 'Big Shot' using the 'Vintage Wallpaper Embossing Folder' for added effect and then glued it onto the 'Basic Black' discs with 'Red Sticky Tape'
Two very different heart themed designs to add to your wedding tables or maybe even your dining table if your hosting a dinner party?! Wouldn't they look fab sprinked over a valentines dinner table (I'll have to remember that idea for next year!!)
Check back tomorrow as i have a butterfly themed table favour to share with you!
So i have been playing around a lot with wedding themed projects recently, and i thought i would have a go at making some heart themed table favours. I have used the chocoloate coins featured in yesterdays post:
and here they are in their transformed state:
Design 1:
I have sandwiched the chocolate between two 'Whisper White' 'Scallop Circles'. I have dotted around the top 'Scallop Circle' with a 'Melon Mambo' 'Stampin' Write Marker', next layered a 'Pretty in Pink' '1/38" Circle' and then punched the heart out of a scrap of 'Melon Mambo' cardstock using the 'Heart to Heart Punch' smothered it in glue using my '2-way glue pen' and dunked it in my pot of 'Dazzling Diamond Glitter'. I have used a dimensional to stick it into place, creating a 3D effect.
Design 2:
A much simpler design, this time i sandwiched the chocolate discs between two 'Basic Black' '1 3/8" Circles', i then punched a heart from some 'Cherry Cobbler' cardstock using the 'Heart Punch' and then ran it through my 'Big Shot' using the 'Vintage Wallpaper Embossing Folder' for added effect and then glued it onto the 'Basic Black' discs with 'Red Sticky Tape'
Two very different heart themed designs to add to your wedding tables or maybe even your dining table if your hosting a dinner party?! Wouldn't they look fab sprinked over a valentines dinner table (I'll have to remember that idea for next year!!)
Check back tomorrow as i have a butterfly themed table favour to share with you!
Subscribe to:
Posts (Atom)