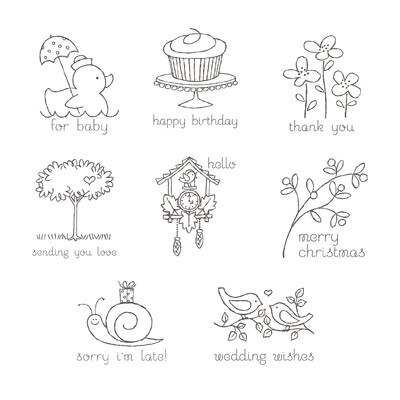
Showing posts with label Teeny Tiny Wishes. Show all posts

Sunday, 2 September 2012

A Couple More New Baby Cards!

Morning all! Today i have two final cards to share with you that my lovely friends made to congratulate us on the arrival of Xander! We have been overwhelmed by the amount of beautiful handmade cards and gifts that we have recieved so thankyou so much for your creativity and kindness! It means alot and will all be presented in Xanders scrapbook!

First up a card from fellow Stampin Up demonstrator Julie:

I love this card. Julie used a 'Baja Breeze' cardbase on which she layered a piece of 'Very Vanilla' card which has been ran through the 'Big Shot' using the 'Stripes Embossed Folder', which she ran some 'Baja Breeze' 'Taffeta Ribbon' around. Next she layered three squares of 'Crumb Cake' card on some slightly larger 'Baja Breeze' squares. Then using punches she created the sailing boat (from '1-1/4" Circle Punch' and some handcut triangles, the star has been cleverly created from the ;5 Petal Punch' cleverly snipped and the moon from the '1-3/8" Circle Punch' - all out of 'Baja Breeze' and 'So Saffron' card. Although you can't really see it Julie 'spongue daubed' the edges of these and also raised the star using 'Dimensionals' to create a 3D effect. Finally the sentiment (from 'Teeny Tiny Wishes' has been stamped using 'Baja Breeze' ink onto 'Very Vanilla' card and punched using the 'Word Window Punch' again 'Sponge Daubed' around the edges!

Andhere is a card from Jane (aka @janesgrapevine):

I LOVE this card! The embossed bear is so cute! And i absolutely love the sentiment!! Thankyou Jane!


Friday, 17 August 2012

A Monkey New Baby Card From Jade!

Back again with another beautiful handmade new baby card. This time a card made by the wonderfully crafty Jade!

She actually used my own stamp set, 'Fox and Friends' to create this card with the cute little monkeys (very sneaky!)  Jade carefully stamped them using her 'stamp-a-ma-jig' so they 'hang' from each other. You will see the middle one has been cut out by hand and raised up with dimensionals and his tail is looped into one of the letters, i love this effect!

Jade used the 'Top Note die' cut from 'Whisper White' card stock and mounted this onto a 'Bashful Blue' 'Top Note' and then added the lettering cut with the 'Timeless Type Junior Alphabet dies', of course stamping the cheeky monkeys first.

Jade the stamped out  out the 'hello baby' sentiment from the 'Teeny Tiny Wishes 'stamp set placed just above the 'BOY' inked in 'Bashful Blue', and then she mounted the panel onto 'Shimmery White card; and added a 'designer button' to finish.

I just love this card and of course with changing of sentiments and wordings it could be a fab kids birthday card too!

Thanks Jade!!This card is fab and will most definately be going in Xanders scrapbook!  xxxxxxx

Saturday, 11 August 2012

Happy Birthday Nan! A bookmark card!

Yesterday i shared with you a beautiful bookmark we created at Jades 'Big Shot' craft class last month:

See yesterdays blog for details on how to create this bookmark!

Jade showed us how to transform this lovely bookmark into a card, which i intend to give to my Nanny Hazel as today is her birthday!!


We began with a square 'Whisper White' base which we folded along the top. On which we mounted a piece of 'Early Espresso' card and then a piece of 'Whisper White' card which we ran through the 'Big Shot' using the 'Square Lattice Embossing Folder'. We wrapped the bookmark around the card, securing it in place with a couple of glue dots (allowing the recipient to remove the bookmark with ease and make use of it!!) Finally we embossed the 'happy birthday' sentiment' from the 'For My Family' stampset using 'Versamark', 'White Embossing Powder' and a 'Heat Gun'. We punched the sentiment out using the 'Word Window Punch' and then secured it in place using 'Dimensionals' to create a 3D effect.

I love this idea! A fab way of incorporating a gift and a card - don't you think?! Thankyou to Jade for sharing this idea with me! I will most definately be making more of these cards in the future!!

Monday, 30 July 2012

Anniversary Wishes For Ruth and Teif!

Tomorrow is my good friend and her hubbys anniversary - here is the card i made for them:


The paris theme is simply for romantic purposes!! On a 'Soft Suede' cardbase i layered some 'Pink Pirouette' card and some 'Beau Chateau DSP'.

On a piece of 'Very Vanilla' card i stamped the circle image (using 'Crumb Cake' ink) and the Eiffel Tower image (using 'Soft Suede' ink)both frome the 'Artistic Etchings' set and then ran it through the 'Big Shot' using the 'Textured Impression Embossing Set: Designer Frames'. I layered this onto some pink card and then glued it onto the cardbase.

I finished off the card by stamping the sentiment (from 'Teeny Tiny Wishes') and punching it out using the 'Word Window' Punch, raising it with 'Dimensionals' to create a 3D effect. Finally finishing the card off with some 'Basic Pearls' to add some bling!

I hope Ruth and Teif have a fabulous anniversary tomorrow! Can't believe how quickly the last two years have gone!!

Sunday, 29 July 2012

A simple Shirt and Tie Card!

A nice, quick and simple card for you today - yesterday i posted a card for the girls, so today one for the boys: a shirt and tie card:


This card i soooooooooooooo easy to make! Start off with a cardbase (i have used 'Bashful Blue') Then find a strip of card and fold it to create the collar and glue it into place!! I have added some 'Silver Brads' to the collar! You could leave it plain or add buttons?!

Find some coordinating 'DSP' snip it into shape to make the tie - i used 'Pacific Point' 'DSP' (Notice i raised the knot of the tie using 'Dimensionals'.

Finally i stamped the 'happy birthday' sentiment (from 'Teeny Tiny Wishes') using 'Pacific Point' ink in the corner of the card!

So simple! A perfect quick make for the men in your life!

Saturday, 21 July 2012

A 'Boho Blossom' Wedding Card!

Today is our friends Jen and Andy's wedding reception - they got married in Sicily a month or so ago and tonight it their UK wedding reception. Here is the card i made for them:


I started off by punching out lots and lots of little flowers from 'Very Vanilla' and 'Blushing Bride' cardstock and 'Beau Chateau DSP' using the 'Boho Blossom Punch'. I very patiently glued them into a heart shape onto a square of 'Crumbcake' card. I then mounted this onto a square of 'Very Vanilla' before gluing it onto a 'Blushing Bride' cardbase. I wrapped a knotted piece of 'Very Vanilla' 'Seam Binding Ribbon' around the spine of the card. Finally i stamped the 'for the newlyweds' sentiment from the 'Teeny Tiny Wishes' stampset using 'Crumbcake' ink onto some 'Blushing Bride' card, which i punched out using the 'Word Window Punch'. I secured this onto the cardbase using 'Dimensionals' to give it a 3D effect!

I hope Jen and Andy have an amazing evening!!

Saturday, 14 July 2012

Wedding Wishes For Martin and Tasha!

It's July - so of course another wedding! Today is my second cousin Martins wedding so here is the card i made for them to recognise their day:


I embossed a  'Shimmery White' cardbase using the 'Big Shot' and the 'Elegant Bouquet Embossing Folder' placing some 'Basic Pearls' in the centre of the flowers. I ran some 'Rose Red' card through the 'Big Shot' using the 'Textured Impression Embossing Designer Frames'. On a piece of 'Whisper White' i stamped the lovebird image from 'Easy Events' in 'Soft Suede' ink and coloured it in using a selection of 'Stampin' Write Markers'. I 'Sponge Daubed' around the edges of the card before setting it inside the frame. Finally the sentiment is also from 'Easy Events' inked it 'Rose Red', stamped onto some 'Whisper White' card and punched using the 'Word Window' punch. I layered this onto a rectangle of 'Rose Red' card raising it up using 'Dimensionals' to create a 3D effect.

If you're new to crafting or looking for a new all rounder stampset why not consider 'Easy Events' it is a fantastic set which has an image and sentiment for all occassions:

If you'd like to make an order feel free to email me: amyjtidd@gmail.com - Don't forget there is an offer on throughout July - order £45 of products and get two reels of ribbon and some brads for FREE! Check the top of my blog for details of this promo!!!

I hope Martin and Tasha have a wonderful wedding day!!

Tuesday, 10 July 2012

I Heart You Hubby!

Hey all! I cannot quite believe that it is 10 whole years since me and hubby had our first date!! Time flies when you're in love!! I couldn't let today pass without some recognition (although it is our official wedding anniversary a week today) So i made hubby this card:


On a 'Cherry Cobbler' cardbase i layered some 'Basic Grey' squares of card. On which i layered some smaller squares made from 'Very Vanilla' card, which i ran through the 'Big Shot' using the 'Square Lattice Embossing Folder' to add some texture.

I then ran some 'Cherry Cobbler' card though the 'Big Shot' using the 'Timeless Type Alphabet Die' (the hearts also come from the die set!) and glued them onto the squares. I ran the smallest heart though the 'Big shot' using the 'Perfect Polkadot Embossing Folder' to create more texture and raised it using a 'Dimensional'.

I finally added a sentiment to the card, by stamping 'Happy Anniversary' from 'Teeny Tiny Wishes' set using 'Cherry Cobbler' ink onto 'Very Vanilla' card and punched it out using the fab 'Word Window Punch', raising it using some 'Dimensionals'.

I LOVE this card almost as much as i LOVE my hubby!! If you like the look of any of the products i have used and would like to order them then feel free to drop me an email!! amyjtidd@gmail.com

Sunday, 8 July 2012

Baby Shower Thanks!!

Last week was my baby shower! I had the most wonderful day and still overwhemed by the amount of effort and love that my friends and family showed to make it so special! I had a lot of people to thank and made these cards to express our gratitude:


I used 'Bashful Blue' card to create the cardbases (3 from each piece of A4!!) On which i directly embossed the 'Designer Frame' from the 'Textured Impression Embossing Set' using my 'Big Shot'. On a piece of 'Whisper White' cut to size i stamped the baby using 'Basic Black' ink and the 'All in the Family' stampset and coloured it in using 'Bashful Blue' and 'Pink Pirouette' 'Stampin' Write Markers' and then glued this into the frame. Finally i stamped the thankyou  sentiment from 'Teeny Tiny Wishes' using 'Bashful Blue' ink and punched it out using the 'Word Window Punch' sticking it into place using some 'Dimensionals' to give it a 3D effect.

Here's a close up:


These cards with a change of sentiment would be perfect to give someone at a baby shower, pregnancy and baby annnouncements, new baby cards, christening cards etc... and of course you could change the colour combo depending on the sex of baba! If you'd like to order some materials to make cards similar to these email me today: amyjtidd@gmail.com

I really hope all the ladies who attended my baby shower know how fabulous they are and how grateful i am for all the beautiful gifts both myself and bump recieved!! Love you all!

Thursday, 5 July 2012

Bracknell Craft Show Make and Take!

Hey all, i forgot to mention last weekend i went to a fab craft show at Bracknell Lesuire Centre!! Stampin' Up! had a stall and the demo's as always offered all attendees a wonderful make and take project! Whilst visiting i couldn't resist making it myself! So here it is:


I features the wonderful 'The Open Sea' stampset from the 'Summer Mini Catalogue'. First we stamped the compass image in 'Night of Navy' ink onto a 'Night of Navy' cardbase.

On  a piece of 'Old Olive' card we stamped the anchor image, using 'Old Olive ink' and then shaped the edges using the '1/2" Circle Punch' before gluing it onto the base. Next on  a piece of 'Very Vanilla' card we stamped the background in 'Crumb Cake' ink and then stamped the ship and compass image using 'Night of Navy' ink, again edging the corners using the '1/2" Circle Punch'. Finally we stamped the sentiment from the 'Teeny Tiny Wishes' set on 'Very Vanilla' and punched it out using the 'Modern Label Punch' and layered it onto a 'Night of Navy' 'Modern Label which has been snipped in half!!

I think you'll agree this is a fab design and brilliant colour combo! Well done ladies! And this stampset is a must to create cards for men! So why not treat yourself today and add this to your craft stash! Email me your order: amyjtidd@gmail.com (Don't forget to check out the July offer at the top of my blog! You can earn free ribbon and brads with all orders of £45!!)

Sunday, 1 July 2012

An Open Sea Ships Wheel Card!

Hey everyone - can you believe it is July! I can now officially say - 'my baby is due this month'!! yay!! Another step closer!!

Anyway - today's card (unrelated to the topic of babies - you may be please to hear - i appreciate my blog has had a baby theme recently!):


This card was designed by my friend Jade and we made it at her recent card class. (Check out her blog for details of upcoming classes!!)

In my opinion this card really showcases the brilliant 'Open Sea' stampset - which is just perfect to create cards for men or of a nautical theme:

We stamped the 'Baja Breeze' cardbase with the largest stamp in the set to create a background (using 'Pacific Point' ink) We then stamped the ship image (again using 'Pacific Point' ink) onto some 'Whisper White' card and cut this out (using the lid of a Stampin' Up! button pot as a template)

To create the 'Ship Wheel' We stamped the fab 'Woodgrain' background stamp onto a piece of 'Crumbcake' card (using 'Early Espresso' ink) We used the inside of a 'Red Sticky Tape' reel as a template to cut out the circle and then punched out some shapes using the  'Word Window Punch' to create the handles... sorry if i'm not using the technical nautical language!!! The shipswheel was attached to the cardbase using 'Dimensionals'!

Finally the sentiment comes from the 'Teeny Tiny Wishes' - i obviously used this card for Father Day but you could substitute this sentiment for any in the set, we punched this out using the 'Word Window Punch', using dimensionals to raise the sentiment and give it a 3D effect!!

Saturday, 30 June 2012

My Baby Shower!!

Hey everyone, sorry for the late post tonight - i have had the most amazing day - today my sister, mum and my two bestest ever friends Lucy and Suzanne arranged a baby shower for me! An amazing number of people came and both myself and baby Tiddlywink was completely spoilt!!


Now i have to find homes for all the beautiful gifts that everyone brought!!

Today i have a card that Jade made for me today - a special baby shower card:


On a 'Bashful Blue' cardbase she has glued a piece of embossed 'Whisper White' card using the 'Perfect Polkadot Embossing Folder'. (notice she has used the a circle from the 'Owl Punch; to shape the corners!!) Onto this she glued a piece of 'Bashful Blue' card (again embossed using the 'Perfect Polkadot Embossing Folder' and the circle from the 'Owl Punch; to shape the corners, before gluing it downshe wrapped a piece of 'Whisper White' 'Satin Ribbon'. She stamped the 'for your shower' sentiment from the fab 'Teeny Tiny Wishes' set inked in 'Daffodil Delight' and punched it out using the 'Word Window Punch', raising it up using 'Dimensionals', She glued a 'Designer Button' threaded with some 'Linen Thread',

Next she ran some 'Whisper White' card through the 'Big Shot' using the frame die from 'Textured Impression Embossing Set', which she then cut out. Finally she made the cute babygrow - using the wonderfully versatile 'Owl Punch' which she finished off with some 'Brads'.

I love this card!! Thankyou Jade!! And thankyou to all my lovely friends and family for making today so fabulous!! Love you all!!!

Friday, 29 June 2012

An Owl On The Fence!

Hey all! I couldn't resist making this card when i saw several versions of it whilst googling card designs using the fabby 'Owl Punch'!


I created the fence by stamping a piece of 'Crumbcake' cardstock using the 'Woodgrain' background stamp, using 'Early Espresso' ink. I have to admit i had overlooked this stamp in the catty - but i'm warming to it - as there are so many uses for it:


I then punched the card using the 'Word Window' punch to create the fence!!! I glued this onto a 'Baja Breeze' cardbase and then punched some leaves from 'Pear Pizzazz' card using the branch part of the 'Two Step Bird Punch' and glued these into place!

I punched a 'sun' out using the '1-3/8" Circle Punch' from some 'So Saffron' card and glued it onto the base and then punched the owl from 'Early Espresso', Crumbcake' and 'Whisper White' card and some 'Baja Breeze' 'DSP'. I glued all the components together and used 'Dimensionals' to raise the owl and create a 3D effect! Finally i printed the sentiment from the 'Teeny Tiny Wishes' stampset (obviously i used this one for Fathers Day although you could of course use any sentiment on this card!) and punched it out using again the 'Word Window Punch'.

If you'd like to order any of the products featured or have any questions about the products/ techniques i have used feel free to email me: amyjtidd@gmail.com

Thursday, 28 June 2012

Embossing Tinfoil! A motorcycle card!

I love experimenting with techniques and products. I also love playing with everyday household items!! You may have seen on a previous blogpost i embossed tinfoil and used it on a card. My friend Jade saw this technique and it inspired her to create the card i want to share with you today, which we made at Jades recent craft class!!


Now i have to warn you - although effective - this card is fiddly and not necessarily a card for any perfectionist to attempt! The hardest part is neatly cutting the tinfoil, as it is very delicate, then you run it through the 'Big Shot' in this case using the 'Lattice Square Embossing Folder'. We layered this onto a 'Soft Suede' cardbase.

Next up we stamped the 'happy fathers day' sentiment from 'Teeny Tiny Wishes' (but you could of course use any of the other sentiments to suit the purpose of the card) and the 'it's your day' stamp from the 'Happiest Birthday Wishes' set, using 'Old Olive' ink onto 'Old Olive' card. We placed three silver 'Brads' along the edge and then glued this piece of card to the bottom of the card,

Finally we stamped the motorcycle image (using 'Early Espresso' ink) onto 'Whisper White' card, we coloured in the image using an 'Old Olive' 'Stampin Write Marker' and then cut this out using the 'Big Shot' using the 'Labels Collection Framelits Die' and then mounted it onto a bigger 'Label' cut from 'Old Olive' card.

Don't forget - you can order Stampin' Up! products through me - why not take a peek at the catty's on the righthand side of this blog. Write up your wishlist and email it over: amyjtidd@gmail.com

Monday, 25 June 2012

Crafty Boots Challenge: Sports! My Baseball Owl!

Hey all, back again with another Crafty Boots Challenge - this one has been set by Zoe and i have to be honest - i found it quite a tricky one. The theme for this fortnights crafty challenge is SPORTS! I looked through my craft stash and realised i had NO sports related stamps, so had to think outside the box... and heres what i came up with:


I have to be honest - i'm quite proud of this card - a completely original design it did take me some time to come up with!!

On a 'Very Vanilla' cardbase i mounted some glittery 'DSP' from the 'Holly Berry Bouquet' collection. I created two baseballs by punching some 'Whisper White' card using the '1-3/8" Circle Punch' on which i drew on some stitching using a 'Cherry Cobbler' 'Stampin' Write Marker', i raised these up on the cardbase using 'Dimensionals' to create a 3D effect. The sentiment is from the 'Teeny Tiny Wishes' set, inked in 'Cherry Cobbler' ink and then punched out using the fab 'Wrod Window Punch' (again raised up using 'Dimensionals')

Next i created the baseball owl using the amazing 'Owl Punch'! Here's a close-up:


I punched the owl out using 'Early Espresso' card, his eyes created from scraps of 'Whisper White' and 'Basic Black' card. His body has been punched out using 'Real Red DSP'. I punched some wings out using the 'Two-Step Bird Punch'. His baseball bat has been create from 'Crumbcake' cardstock which has been stamped using the 'Woodgrain' stamp (using 'Early Espresso' ink) I handsnipped it into a baseball bat shape. The baseball was created using the eye part of the 'Owl Punch' from some 'Whisper white' card, and then i drew on the stitching using a 'Real Red' 'Stampin' Write Marker'. Finally owls baseball cap was made using some scraps of 'Real Red' card cut into two semi-circles, on which i glued a small 'Whisper White' circle (eye from the 'Owl Punch') and the 'w' emblem is a 'Real Red' owl foot!

I mounted the baseball owl onto a couple of 'Scallop Circles' ('Whisper White' and 'Cherry Cobbler'.

I hope you like my baseball owl as much as i do!! I'm very proud of him!! I can't wait to see your sporty creations! Don't forget - if you would like to own the fab 'Owl Punch' for yourself you can order it through me!!
Email me you Stampin Up order today: amyjtidd@gmail.com (FREE UPS P&P on orders over £40 - usually £4.95 - if you mention CRAFTY BOOTS CHALLENGES when ordering!!) Online catalogues are available to view on the righthand side of this blog!

Monday, 18 June 2012

Anniversary Wishes!

June and July are always very popular wedding months - and so i have had lots and lots of anniverary cards to make. Today is Dave and Sarahs first wedding anniversary and here is the card that i made for them:


I embossed the bottom of a cardbase using my 'Big Shot' and the 'Adorning Accents Embossing Folder'. Next i glued a strip of 'Cherry Cobbler' card and 'DSP' from the 'Holly Berry Bouquet' collection. I stamped the 'Happy Anniversary' sentiment from the 'Teeny Tiny Wishes' stampset using 'Cherry Cobbler' ink (which i lined up using the fab 'Stamp-a-ma-jig' tool. Finally i punched two hearts out of 'Very Vanilla' and 'Cherry Cobbler' cardstock, using the 'Heart Punch', which i ran through the 'Big Shot' using the 'Perfect Polka Dot Embossing Folder'. I glued the 'Cherry Cobbler' heart onto the base and then raised the 'Very Vanilla' heart using 'Dimensionals' to create a 3D effect!

Sunday, 17 June 2012

Happy Fathers Day!!

Today is FATHERS DAY!! So wishes all the Dads out there a very happy day - i hope you all get spoilt rotten!

I couldn't resist making hubby a Fathers Day card from bump!! So here it is:


I have Jade to thank for this design as i CASE'd it from her last week when she came around mine for a crafty session!! On a 'Pool Party' cardbase i ran a strip of 'DSP' from the 'Beau Chateau' collection down one side. On some 'Whisper White' card i stamped the dad image and the baby image created using the 'All in the Family' stampset. (TIP: use a 'stamp-a-ma-jig' to line up the componants' of the set) I coloured these images in using a selection of 'Stampin' Write Markers' and then carefully snipped them out. I created the 'Daddy' by running some 'Marina Mist' card through the 'Big Shot' using the 'Timeless Type Alphabet Dies' and glued the images and letter into place on the cardbase. Finally i stamped the 'Happy Fathers Day' sentiment, from the 'Teeny Tiny Wishes' set along the bottom of the card (using 'Marina Mist' ink). Finally i threaded some 'Linen Thread' through a 'Marina Mist' 'Designer Button' and then glued it into place on the top lefthand corner of the card!!

I hope my hubby (and every other Dad) has a lovely fathers day!!

Saturday, 16 June 2012

Happy fathers Day! (From the Cats!!)

Ok ... yes, many of you will probably think that i'm incredibly sad to create this card for my hubby! But the cats are part of our family and every year since we've had them i have made a Father Day for him from the cats!!


On a 'Real Red' card base i mounted a piece of 'Just Add Cake' stripy 'DSP'. On a piece of 'Whisper White' card i stamped the man image and the two cats using the 'All in the Family' stampset (hint: you may want to use a 'Stamp-a-ma-jig' to line up all the components nice an straight!!) I coloured the images in using 'Stampin' Write Markers' and then mounted it onto a piece of 'Real Red'card and then glued in onto the cardbase.

I stamped the 'happy fathers day' sentiment from the 'Teeny Tiny Wishes' set using 'Marina Mist' ink and then punched it out using the 'Word Window Punch'. Finally i ran some 'Marina Mist' card through the 'Big shot' using the 'Timeless type Alphabet Dies' to create the word 'Dad' which i glued in place at the bottom of the card!

This Fathers Day is a little bit more special for my hubby this year - as he not only gets a card from the cats but also from Baby Tiddlywink! I got a lot of enjoyment making Fathers Day cards this year - check out my blog tomorrow to see the card from bump!

Thursday, 14 June 2012

Nautical Fathers Day Card!!

So it's Fathers Day this weekend coming - so have you brought/ made your cards yet? If not heres a little inspiration for you! I CASE'd this card from a Catherine Poolers blog i have recently come across! it's fab for ideas! The card i have to show you today features 'The Open Sea' stampset from the 'Summer Mini Catalogue'. I have slightly altered Catherines design - here it is:


On a 'Crumbcake' cardbase i stamped the large image from the stampset in two corners to create a background  (using 'Crumbcake' ink) and then right at the bottom of the card i stamped the 'happy fathers day' sentiment from the 'Teeny Tiny Wishes' set in 'Night Of Navy' ink. Next on a strip of 'Crumbcake' i stamped the anchor image from the set using 'Night Of Navy' and 'Cherry Cobbler' ink and placed three 'Basic Rhinestones' to add a little bling! I snipped this strip of card at the bottom and then mounted it onto a larger strip of 'Cherry Cobbler' card.

I just love 'The Open Sea' stampset - it is completely perfect to make cards for men:


The great thing about this card is with a quick change of sentiment this card could be used for another occassion - a perfect masculine card!

If you'd like to make an order email me today: amyjtidd@gmail.com

Thursday, 7 June 2012

Babymoon Review and an idea for Fathers Day!

Hey all! I'm back from Bath!! Hubby took me away for a short little break and i we had such a lovely time. We stayed in a completely lush hotel/B&B hybrid called Brittons Farm Estates - it was completely 5* and i totally recommend it to anyone who is planning a short break away! The owners (Fred and Helen) are lovely and friendly and the service is top notch (they even deliver your breakfast to you butler style!!) Whilst we was there we visited the Roman Baths, which we found completely fascinating!!


We both returned back from our trip completely relaxed and i still have the rest of the halfterm before i go back to work... and yes, i plan to get some crafting done, as it seems like forever since i had a proper crafty session!!

Today i have a card to share with you that i made some time ago at a crafty session with some fellow Stampin' Up! demos. This card was designed by Fiona and uses a fab set from the new mini catty called 'The Open Sea' which is just perfect for Fathers Day!


Onto a 'Baja Breeze' base we stamped the compass image twice using 'Island Indigo' ink. On a square of 'Island Indigo' card we stamped and re-stamped the globe image several times and then wrapped some of the 'Island Indigo' 'Bakers Twine' around it.

On a piece of 'Whisper White' card we stamped the globe image using 'Island Indigo' ink to create a background and then using 'Rich Razzleberry' ink we stamped the ship image and the anchor. We then used the '1/2" Circle Punch' to shape the corners and then mounted it onto a 'Rich Razzleberry' card which we also edged the corners.

Finally i stamped the happy fathers day sentiment from the 'Teeny Tiny Wishes' set using 'Baja Breeze' ink and then punched out using the 'Word Windown Punch' and finished it off my mounting it onto some 'Baja Breeze' 'DSP' punched using the 'Modern Label Punch'.

Its not too late to order this fab stampset - email over your order today: amyjtidd@gmail.com