Hey all, hope you're enjoying the long bank holiday weekend! Me and hubby are off to Bath for a couple of days for a 'babymoon'! So i've scheduled this blog - i hope it works!!
Today i have a card to share with you that i CASE'd from my crafty friend http://www.jadedcrafter.blogspot.co.uk/ at a recent crafty session we had!! As soon as i saw her make it i couldn't resist making a copy for myself!!
The daisies have been created from two of the designs from the 'Flirtatious Fabric' that we mounted onto some card using 'Sizzix Multipurpose Adhesive Sheets' and then cut out using the 'Big Shot' and the 'Flower Daisies Die'. I placed an 'Antique Brad' in the centre of them.
Next we used the fab 'Labels Collection Framelits Dies', using 'Melon Mambo' to create the larger one, and then a piece of 'Very Vanilla' to create the smaller one, which we then ran through the 'Big Shot' using the 'Perfect Polkadot Embossing Folde'r to add some texture. We mounted these onto a 'Very Vanilla' cardbase and then secured the fabric daisies into place using some 'Red Sticky Tape'.
Finally we stamped the sentiment, using the 'Teeny Tiny Wishes' stampset (in 'Melon Mambo' ink, onto a piece of 'Pink Pirouette' card) and the punched it out using the fab 'Word Window Punch'. We placed two teeny tiny 'Basic Pearls' either side of the sentiment and secured it in place using some 'Dimensionals' to create a 3D effect!
Thanks Jade for the inspiration! If you would like to order any of the products featured why not drop me an email: amyjtidd@gmail.com
Amy Tidd - Independent Stampin' Up! demonstrator. Operating in the Surrey/ Hampshire area.
Showing posts with label Flower Daisies Die. Show all posts
Tuesday, 5 June 2012
Saturday, 17 March 2012
For My Nanny ...
Hey all, sorry for the late post today. I've been really busy preparing for Mothers Day! So tonight i want to share with you a gift i made for my mum from baby Tiddlywink:
I brought this box frame from the 'Range', it comfortably fits a 8"x8" layout in it. The background is a piece of 'Everyday Enchantment DSP'. I printed out two scan pictures of Baby Tiddlywink - one at 12 weeks (top pic) and one at 20 weeks (bottom pic) - onto photopaper, mounted this onto some 'Pool Party' and then some 'Lucky Limeade' and glued them in pace. Next i ran some 'Pool Party' and 'Lucky Limeade' card through the 'Big Shot' with the 'Flower Daisies Die'. I glued that into place and placed a 'Designer Button' in the centre with some 'Red Sticky Tape'. I next ran some card through the 'Big Shot' using the 'Beautiful Wings Embosslits Die' and placed some 'Basic Pearls' down the centre. Finally i created the words 'For my Nanny' by running some 'Pool Party' through the 'Big Shot' using the 'Timeless Type Alphabet Dies'.
I'm really pleased with how this project turned out and hope my mum likes her first gift from her first grandchild!!
I'm really looking forward to tomorrow, we are off visiting family to give out gifts and cards and i even have had a secret package delivered to be opened tomorrow - my first mothers day!!!
Hope you all have a lovely day tomorrow, check back at this blog to see the cards i made for this special occassion!!
I brought this box frame from the 'Range', it comfortably fits a 8"x8" layout in it. The background is a piece of 'Everyday Enchantment DSP'. I printed out two scan pictures of Baby Tiddlywink - one at 12 weeks (top pic) and one at 20 weeks (bottom pic) - onto photopaper, mounted this onto some 'Pool Party' and then some 'Lucky Limeade' and glued them in pace. Next i ran some 'Pool Party' and 'Lucky Limeade' card through the 'Big Shot' with the 'Flower Daisies Die'. I glued that into place and placed a 'Designer Button' in the centre with some 'Red Sticky Tape'. I next ran some card through the 'Big Shot' using the 'Beautiful Wings Embosslits Die' and placed some 'Basic Pearls' down the centre. Finally i created the words 'For my Nanny' by running some 'Pool Party' through the 'Big Shot' using the 'Timeless Type Alphabet Dies'.
I'm really pleased with how this project turned out and hope my mum likes her first gift from her first grandchild!!
I'm really looking forward to tomorrow, we are off visiting family to give out gifts and cards and i even have had a secret package delivered to be opened tomorrow - my first mothers day!!!
Hope you all have a lovely day tomorrow, check back at this blog to see the cards i made for this special occassion!!
Thursday, 25 August 2011
Welcome Home Seb and Jamie!!
Woo hoo!! I have had a fab couple of days! My little sister, Jana came over for a sleepover last night, we watched films, ate lots of popcorn and chocolate, played Mario Kart and did lots and lots of crafting!!
My other sister, Jamie and my brother Seb has been on holiday in Australia for over three weeks and as i have been away for all of July and the first week of August it has been AGES since i have seen them. So me and Jana made some cakes, a welcome banner and some welcome home cards to celebrate them setting foot back in the UK!! Good fun!!
Here's our cake making:
| My sister Jana decorating the cakes! |
| The finished products!! |
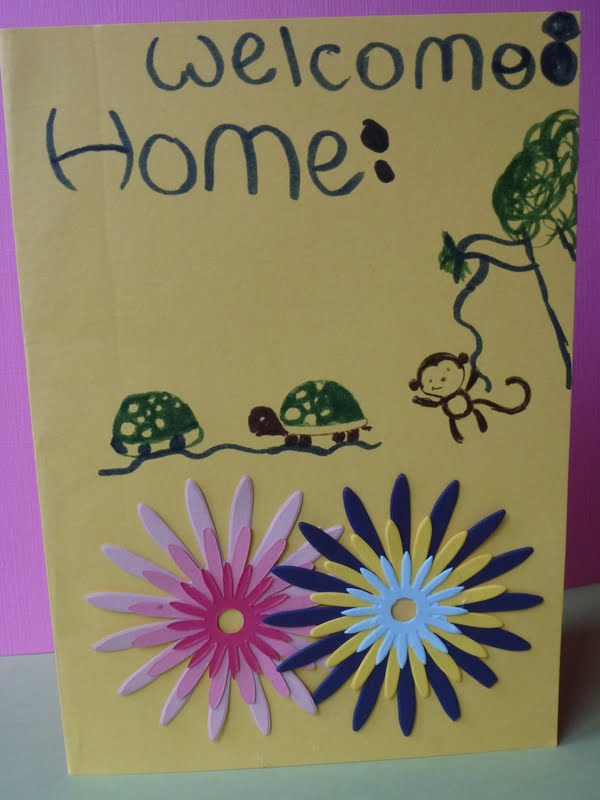
Jana's welcome home cards:
Jana has used some of my 'Big Shot' daisy scraps, as well as the 'Fox and Friends' stampset and my 'Stampin' Write Markers' to create this masterpiece!
Her second card has a 'Pear Pizzazz' cardbase, the spider has been create using 'Basic Black' card, she punched a '1-3/8" Circle' for the spiders body and the legs and pinchers have been made from the branch from the 'Two Step Bird Punch' - the web was hand-drawn with a 'Stampin' Write Marker' - isn't it great!! She's definately got a knack for punch art!! I can't wait to have a go at making a spider like this one!
I love having my little sis around! She's like a mini-me!! We had a brilliant crafty time!!! Check back tomorrow to see the welcome home cards that i made for my brother and sister!!
Thursday, 18 August 2011
Continuing with the wedding theme...
(Hi guys for some reason my scheduled posts have let me down so posting lots of projects at once ... hope it works - sorry if you have been missing me and my crafting - i didn't abandon you!!)
Weddings can be expensive, trust me - i know!! One thing i was obsessed about when planning my wedding was making sure that everything coordinated! Stampin' Up! materials are fab to use because you can ensure that all your wedding stationary matches - cardstock, ink, pens, ribbon, buttons, brads, papers all come in a set range of colours, which can literally save you hours trapsing around craft shops with swatches of colours!!
One thing brides and grooms (lets be honest - usually brides) spend ages on is trying to decide what to give away as wedding/ table favours. Well ... you can't go wrong with chocolate! and here is a cute little way of making a little chocolate go a long way, look effective and coordinate in completely with your wedding theme!!
The chocolates that i'm talking about start life like this:
You can buy these chocolate coins from wedding shops (like Confetti, online or even in some supermarkets) and then transform them for very little cost into wedding favours for your guests and the great things is they cost very little, take hardly any time to make and can 100% coordinate with any wedding theme you may have. Here's an example:
Made using the 'Big Shot' and the 'Flower Daisies Die' i ran some 'Whisper White' and 'Regal Rose' card stock through to make the daisies. I sandwiched the chocolate disc between a 'Whisper White' 'Scalloped Circle' and the daisy cutouts and have placed a 'Dimensional' dipped in 'Dazzling Diamond Glitter' in the centre! Cute, huh?! (A little hint: use the super sticky 'Red Sticky Tape' to stick everything together!! It will hold anything to anything!!)
Can you imagine lots of these cute wedding favours scattered around your wedding tables?! You wouldn't need any other decorations - beautiful!!
And the great thing about this design is you could make them in ANY colour to coordinate with any colour theme!
Weddings can be expensive, trust me - i know!! One thing i was obsessed about when planning my wedding was making sure that everything coordinated! Stampin' Up! materials are fab to use because you can ensure that all your wedding stationary matches - cardstock, ink, pens, ribbon, buttons, brads, papers all come in a set range of colours, which can literally save you hours trapsing around craft shops with swatches of colours!!
One thing brides and grooms (lets be honest - usually brides) spend ages on is trying to decide what to give away as wedding/ table favours. Well ... you can't go wrong with chocolate! and here is a cute little way of making a little chocolate go a long way, look effective and coordinate in completely with your wedding theme!!
The chocolates that i'm talking about start life like this:
You can buy these chocolate coins from wedding shops (like Confetti, online or even in some supermarkets) and then transform them for very little cost into wedding favours for your guests and the great things is they cost very little, take hardly any time to make and can 100% coordinate with any wedding theme you may have. Here's an example:
Made using the 'Big Shot' and the 'Flower Daisies Die' i ran some 'Whisper White' and 'Regal Rose' card stock through to make the daisies. I sandwiched the chocolate disc between a 'Whisper White' 'Scalloped Circle' and the daisy cutouts and have placed a 'Dimensional' dipped in 'Dazzling Diamond Glitter' in the centre! Cute, huh?! (A little hint: use the super sticky 'Red Sticky Tape' to stick everything together!! It will hold anything to anything!!)
Can you imagine lots of these cute wedding favours scattered around your wedding tables?! You wouldn't need any other decorations - beautiful!!
And the great thing about this design is you could make them in ANY colour to coordinate with any colour theme!
Sunday, 24 July 2011
Another Daisy Card!
The cardbase is 'Blushing Bride' cardstock, to create the background i have ripped some 'In Colours DSP'. The daisy has been created using the 'Big Shot', the 'Flower Daisies Die' and some 'Whisper White' and 'Blushing Bride' cardstock. I have placed a 'Basic Pearl' in the centre. The daisy overlapped so i chopped off some of the petals so that it could snuggly fit in an envelope - i love this layout!
I hope you have had a great weekend!
Saturday, 23 July 2011
...Give me your answer do!!
Another Daisy make for you today - a cute little 'Pillow Box':
This is so quick to make - and would make a fab little wedding favour or gift box for some jewellry! I ran a piece of 'Blushing Bride' cardstock through the 'Big Shot' using the 'Pillow Box Die' to make the box. I wrapped a piece of 'Blushing Bride DSP' round the box. (This paper is available as a free hostess gift!) I then ran some 'Melon Mambo' and 'Blushing Bride' card through the 'Big Shot' with the 'Flower Daisies Die' to create the flower and placed a 'Basic Rhinestone' in the centre'.
Friday, 22 July 2011
Daisy, Daisy...
By now assuming my itinerary is still on track i will be in Tanga camp!! A beautiful camp right by the sea - the plan is to take some time to do some scuba diving here!
Don't worry - although i'm not in the UK, i had some very busy crafty days throughout June to create enough projects to share with you whilst i'm away. So today i have a beautiful card using the 'Flower Daisies Die'.
I ran some 'Whisper White' cardstock through the 'Big Shot' using the 'Flower Daisies Die', glued all the daisy pieces together to create this beautiful flower! I placed a 'Designer Button' tied with some 'linen thread' in the centre of the flower. I then got a piece of DSP from the 'Greenhouse Gala DSP Collection', wrapped a piece of 'Pear Pizzazz' 'Seaming Ribbon' around it and then placed the daisy over it. Finally i mounted this onto the 'Pear Pizzazz' cardbase.
A lovely sunny card, that could be used for any occassion!!
Don't worry - although i'm not in the UK, i had some very busy crafty days throughout June to create enough projects to share with you whilst i'm away. So today i have a beautiful card using the 'Flower Daisies Die'.
I ran some 'Whisper White' cardstock through the 'Big Shot' using the 'Flower Daisies Die', glued all the daisy pieces together to create this beautiful flower! I placed a 'Designer Button' tied with some 'linen thread' in the centre of the flower. I then got a piece of DSP from the 'Greenhouse Gala DSP Collection', wrapped a piece of 'Pear Pizzazz' 'Seaming Ribbon' around it and then placed the daisy over it. Finally i mounted this onto the 'Pear Pizzazz' cardbase.
A lovely sunny card, that could be used for any occassion!!
Monday, 13 June 2011
Congratulations On Winning Blog Candy!
Now you may remember that last week i ran my blogcandy competition and the lucky Crafty_Nessa won the craft stash!
I finally got my bum in gear and got it posted off to her on Thursday. I heard from Vanessa on Saturday and sadly the parcel was ripped in transit and she still has not recieved all the goodies... which is a real shame. Royal Mail are on the case and is currently searching for the missing items. (Did you know that Royal Mail have twitter?! I've been having a really useful twitter conversation with them trying to locate the missing pieces of the prize!?) Fingers crossed it will arrive soon.
One things that Vanessa definately did recieve is the little Congratulations card that i made for her. Here it is:
The cardbase used is the 'In Colour' 'Concorde Crush'. I next ran some 'Melon Mambo' 'DSP' through the 'Big Shot' using the 'Top Note Die' and then turned it 90 degrees and ran it through again to create this shared shape. The daisy has been created with 'Melon Mambo' and 'Concord Crush' card which has been run through the 'Big Shot' with the 'Flower Daisies Die'. I just love this Die!
I used the 'Top Note Die' and some 'Whisper White' card to create an insert for this card using the same technique:
The congratulations sentiment is from the Level 2 hostess set 'Something to Celebrate' (available in the mini catalogue)
I've entered this card into the Totally Gorjuss craft challenge - the theme this week is : Flower Power.
I hope Vanessa likes her card and i hope that the rest of her prize finds her soon. For all of you who were not lucky this time, don't worry i hope to run another blog candy comp soon! So keep checking back here for details!
I finally got my bum in gear and got it posted off to her on Thursday. I heard from Vanessa on Saturday and sadly the parcel was ripped in transit and she still has not recieved all the goodies... which is a real shame. Royal Mail are on the case and is currently searching for the missing items. (Did you know that Royal Mail have twitter?! I've been having a really useful twitter conversation with them trying to locate the missing pieces of the prize!?) Fingers crossed it will arrive soon.
One things that Vanessa definately did recieve is the little Congratulations card that i made for her. Here it is:
The cardbase used is the 'In Colour' 'Concorde Crush'. I next ran some 'Melon Mambo' 'DSP' through the 'Big Shot' using the 'Top Note Die' and then turned it 90 degrees and ran it through again to create this shared shape. The daisy has been created with 'Melon Mambo' and 'Concord Crush' card which has been run through the 'Big Shot' with the 'Flower Daisies Die'. I just love this Die!
I used the 'Top Note Die' and some 'Whisper White' card to create an insert for this card using the same technique:
The congratulations sentiment is from the Level 2 hostess set 'Something to Celebrate' (available in the mini catalogue)
I've entered this card into the Totally Gorjuss craft challenge - the theme this week is : Flower Power.
I hope Vanessa likes her card and i hope that the rest of her prize finds her soon. For all of you who were not lucky this time, don't worry i hope to run another blog candy comp soon! So keep checking back here for details!
Monday, 30 May 2011
Zesty Colour Combo!
Happy Bank Holiday Monday everyone! What beautiful weather it is, much more summery than i was expecting and i guess the weather is totally reflected in the card that i want to share with you today!
I have completely dedicated today for crafting, hubby is at work so i can make as much mess as i want!!! The first thing i did this morning was log on the Cupcake Craft Challenges to see what this weeks challenge is! This week it is 'Zesty Colour Combo' in other words you have to create a card using the following colours: orange, green, yellow and white. So i decided to make the challenge my first crafty make of the day, here you go:
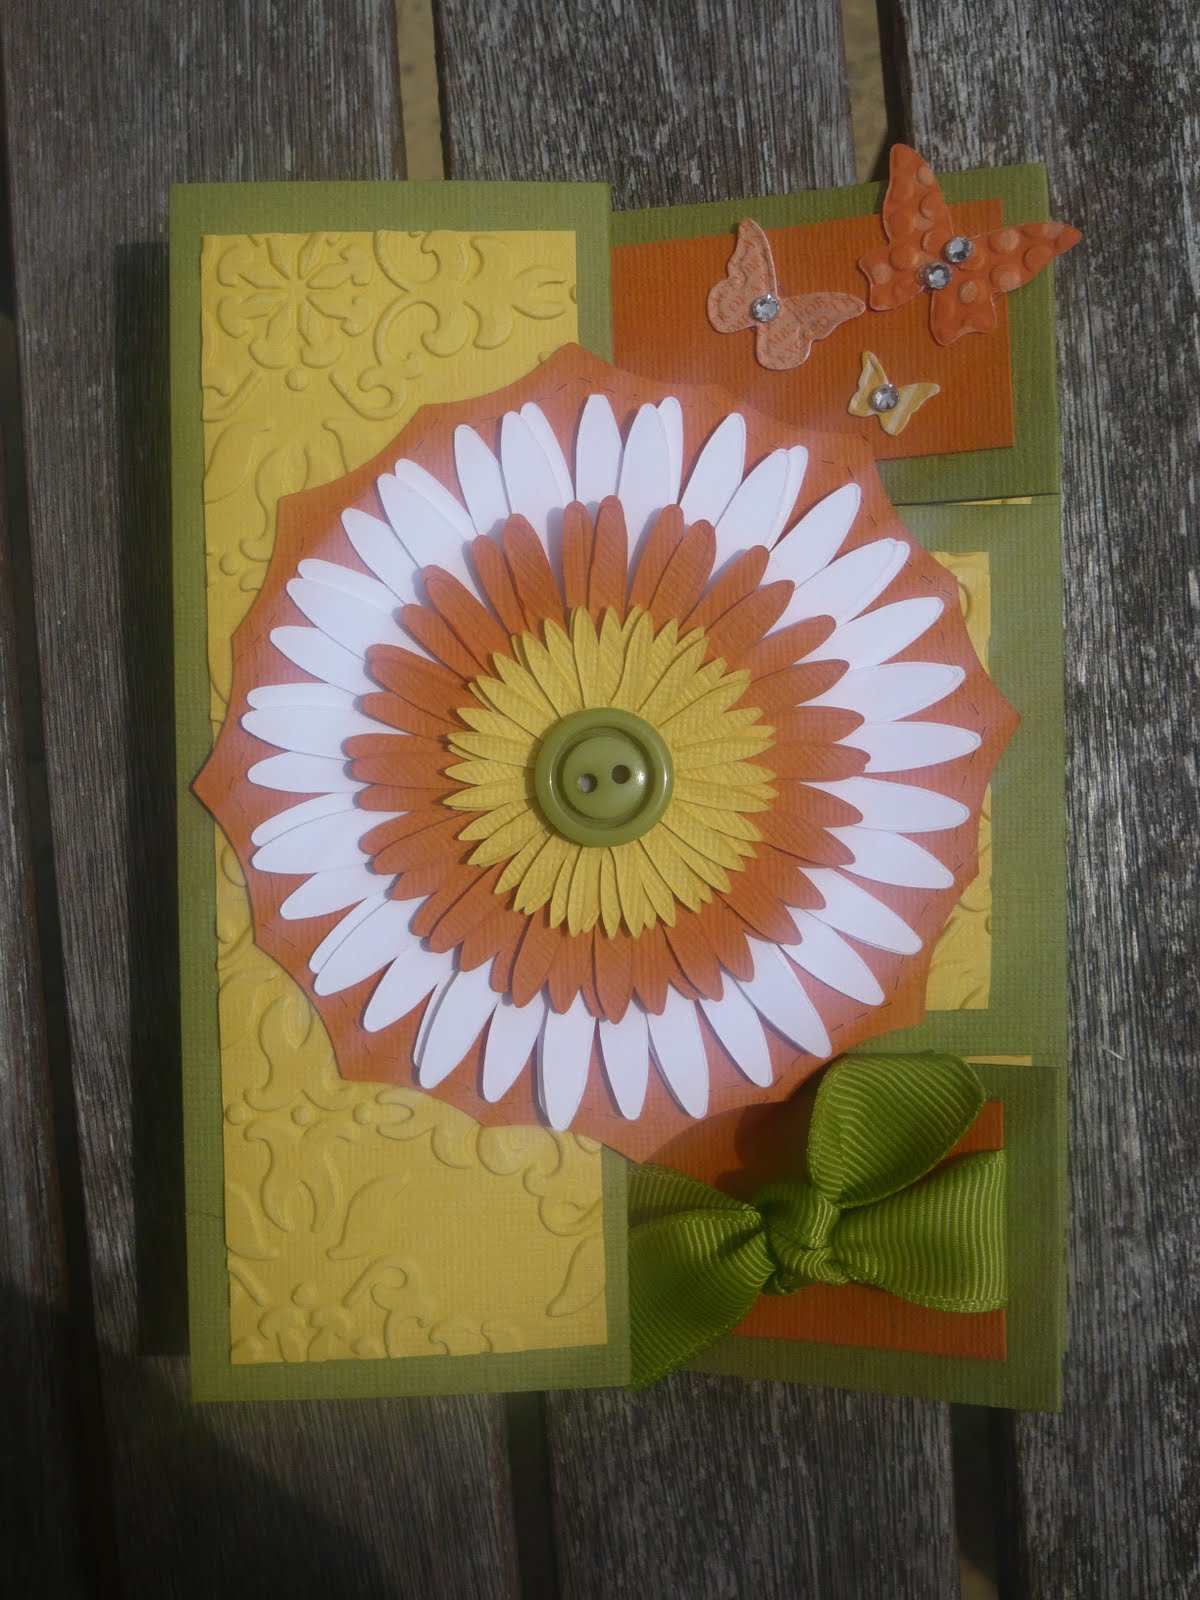
I have created a beautiful tri-fold card. The cardbase is 'Old Olive' and the panels have been made with 'Daffodil Delight' and 'Tangerine Tango' cardstock, some of which has been run through the 'Big Shot' with the 'Vintage Wallpaper Embossing Folder'.
Here's a close up of the front of the card:
The daisies have been created with the 'Flower Daisies Die' using 'Whisper White', 'Tangerine Tango' and 'Daffodil Delight' card. An 'Old Olive' 'Designer Button' has been placed in the centre to coordinate. the daisy is layered on shape that has been created using the 'Top Note Die' and the 'Big Shot'. You basically keep rotating the card on the die to create the effect. (I will try and post a tutorial on how to create this shape soon - you may need to remind me!) I have also placed some beautiful butterflies created from some scraps of 'Brights DSP' and the 'Beautiful Wings Embosslits Die'. I have placed a few 'Basic Rhinestones' on the butterflies for a bit of bling effect! The ribbon featured is 'Old Olive' 'Grosgrain Ribbon'.
Here's the card in it's open form:
The sentiment featured in this card is from the 'Cheers and Wishes' stampset, which i have punched out using the 'Decorative Label Punch'.
I just love this card!! A lovely bright creation to get me in a summery mood. Let's hope the sunshine continues through halfterm!!
Whilst you're here visiting, why not check out my blogcandy!! Have a fab day and please check back tomorrow for another crafty make! xx
I have completely dedicated today for crafting, hubby is at work so i can make as much mess as i want!!! The first thing i did this morning was log on the Cupcake Craft Challenges to see what this weeks challenge is! This week it is 'Zesty Colour Combo' in other words you have to create a card using the following colours: orange, green, yellow and white. So i decided to make the challenge my first crafty make of the day, here you go:
I have created a beautiful tri-fold card. The cardbase is 'Old Olive' and the panels have been made with 'Daffodil Delight' and 'Tangerine Tango' cardstock, some of which has been run through the 'Big Shot' with the 'Vintage Wallpaper Embossing Folder'.
Here's a close up of the front of the card:
The daisies have been created with the 'Flower Daisies Die' using 'Whisper White', 'Tangerine Tango' and 'Daffodil Delight' card. An 'Old Olive' 'Designer Button' has been placed in the centre to coordinate. the daisy is layered on shape that has been created using the 'Top Note Die' and the 'Big Shot'. You basically keep rotating the card on the die to create the effect. (I will try and post a tutorial on how to create this shape soon - you may need to remind me!) I have also placed some beautiful butterflies created from some scraps of 'Brights DSP' and the 'Beautiful Wings Embosslits Die'. I have placed a few 'Basic Rhinestones' on the butterflies for a bit of bling effect! The ribbon featured is 'Old Olive' 'Grosgrain Ribbon'.
Here's the card in it's open form:
The sentiment featured in this card is from the 'Cheers and Wishes' stampset, which i have punched out using the 'Decorative Label Punch'.
I just love this card!! A lovely bright creation to get me in a summery mood. Let's hope the sunshine continues through halfterm!!
Whilst you're here visiting, why not check out my blogcandy!! Have a fab day and please check back tomorrow for another crafty make! xx
Tuesday, 24 May 2011
Cupcake Craft Challenge: Bookworm
Hi all! Here's my 'Cupcake Craft Challenge' entry. The theme this week is: Bookworm. You have to make a card with a book theme or a bookmark. I decided to adapt a previous bookmark i made using the 'Flower Daisies #2 Die' instead.
I ran some 'Whisper White' and 'Daffodil Delight' cardstock through the 'Big Shot' several times using the 'Flower Daisies #2 Die' and then layered up the daisy shapes to create the flower, using 'Sticky Red Tape' to stick them all together. I then threaded some 'linen thread' through a 'Certainly Celery' 'Designer Button' and stuck that in the centre. Here's a close up of the beautiful flower:
To complete the bookmark i punched out a '1-3/4" Circle punch', stuck that on the back, then using 'Red Sticky Tape' attached some 'Pear Pizzazz' 'Seaming Ribbon' to the back and then sandwiched the ribbon between another punched circle. Here's the bookmark minus the book:
I hope you like this project. I value your comments! xxx
I ran some 'Whisper White' and 'Daffodil Delight' cardstock through the 'Big Shot' several times using the 'Flower Daisies #2 Die' and then layered up the daisy shapes to create the flower, using 'Sticky Red Tape' to stick them all together. I then threaded some 'linen thread' through a 'Certainly Celery' 'Designer Button' and stuck that in the centre. Here's a close up of the beautiful flower:
To complete the bookmark i punched out a '1-3/4" Circle punch', stuck that on the back, then using 'Red Sticky Tape' attached some 'Pear Pizzazz' 'Seaming Ribbon' to the back and then sandwiched the ribbon between another punched circle. Here's the bookmark minus the book:
I hope you like this project. I value your comments! xxx
Subscribe to:
Posts (Atom)