Showing posts with label Taffeta Ribbon. Show all posts

Sunday, 2 September 2012

A Couple More New Baby Cards!

Morning all! Today i have two final cards to share with you that my lovely friends made to congratulate us on the arrival of Xander! We have been overwhelmed by the amount of beautiful handmade cards and gifts that we have recieved so thankyou so much for your creativity and kindness! It means alot and will all be presented in Xanders scrapbook!

First up a card from fellow Stampin Up demonstrator Julie:

I love this card. Julie used a 'Baja Breeze' cardbase on which she layered a piece of 'Very Vanilla' card which has been ran through the 'Big Shot' using the 'Stripes Embossed Folder', which she ran some 'Baja Breeze' 'Taffeta Ribbon' around. Next she layered three squares of 'Crumb Cake' card on some slightly larger 'Baja Breeze' squares. Then using punches she created the sailing boat (from '1-1/4" Circle Punch' and some handcut triangles, the star has been cleverly created from the ;5 Petal Punch' cleverly snipped and the moon from the '1-3/8" Circle Punch' - all out of 'Baja Breeze' and 'So Saffron' card. Although you can't really see it Julie 'spongue daubed' the edges of these and also raised the star using 'Dimensionals' to create a 3D effect. Finally the sentiment (from 'Teeny Tiny Wishes' has been stamped using 'Baja Breeze' ink onto 'Very Vanilla' card and punched using the 'Word Window Punch' again 'Sponge Daubed' around the edges!

Andhere is a card from Jane (aka @janesgrapevine):

I LOVE this card! The embossed bear is so cute! And i absolutely love the sentiment!! Thankyou Jane!


Monday, 21 November 2011

Is it too early to put up the Christmas tree?

Ok, it's the 21st of November ... and i'm amazed by the number of Christmas trees i have seen! Not just in the usual places - shops, town centres etc but actually in peoples homes!!! I have a strict December policy - no Christmas tree, decorations, movies or anything else Christmas related in my house (apart from my christmas cards of course!) until at least the 1st of December! Am i being a Scrooge?!

Anyway with a Christmas tree theme in mind here is a related card:


On a piece of 'Whisper White' i stamped the fir tree branches (from the 'Autumn Days' stampset) to the top left-hand corner. (I used an 'Old Olive' and 'Early Espresso' 'Stampin' Write Marker' to create the two-colour effect.) and stamped it several times. I then stamped the sentiment (from the 'Contempo Christmas' set) in 'Cherry Cobbler' on the bottom right-hand corner. On a seperate piece of 'Whisper White' i stamped the bauble (also from the 'Contempo Christmas' stampset) in 'Cherry Cobbler', punched it out using the 'Ornament Punch'. I raised it using some 'Dimensionals' and ran a small piece of 'Real Red' 'Tafetta Ribbon' from the bauble to a hole (created using the 'Crop-a-dile'. I mounted this onto a piece of 'Old Olive' card and then mounted all of this onto a 'Cherry Cobbler' cardbase!!

Hope you like! It's not too late to make some Christmas cards of your own. Email me for more advice, details of christmas craft classes or to make an order: amyjtidd@gmail.com

Sunday, 13 November 2011

Christmas Tags!!!

Hi guys, i hope you have had an amazing week! We have been so increadibly busy! We've been furniture shopping, London for a night out to celebrate our friend Jens birthday and today we went out for a yummy breakfast with friends, brought a sofa and visited my Nan! Busy, busy, busy!! Which means i haven't had much time at all for crafting - but there's still tonight!!! Hubby's working tonight and i have the house to myself so i will definately be getting the craft kit out!

Any due to the lack of crafting this weekend, today i have a lovely christmas tag made by another Stampin' Up! demonstrator Julie. (Every month our Stampin' Up! team get together and swap recent projects with one another!) So here it is:


These are soooooo simple to make, but look fab don't they! Julie punched a tag out of some 'Holly Berry Bouquet DSP' with the 'Large Tag Punch' and then layered this onto a 'Real Red' 'Extra Large Tag'. She then glued this onto a larger piece of 'Pear Pizzazz' which she snipped to turn it into an even larger tag. She stamped the cute little 'Merry' sentiment (from the wonderfully versatile 'Pennant Parade Stampset) in 'Pear Pizzazz' ink at the bottom. Finally she punched a hole with her 'Crop-a-dile' (a tool definately worth popping on your Christmas wish list!) and threaded through some 'Real Red' 'Taffeta Ribbon'.

Gift tags can cost so much at Christmas, and you often can't find tags to coordinate with your gift wrap - so here's the solution - use the 12x12" DSP sheets to wrap and create stunning tags to coordinate! In no time you'll have Christmas all wrapped up!

It's not too late to get in that order. Email me over your wish list today: amyjtidd@gmail.com

Thursday, 10 November 2011

Another 'Polar Party' card!

Yesterday i shared with you a card made with the oh so cute 'Polar Party' stampset! I just couldn't resist sharing with you another christmas card made with this set:


I began with an 'Old Olive' cardbase and stamped the cute little reef from the set all over it (in 'Old Olive' ink) to create a background. Next on a piece of 'Whisper White' i stamped the christmas tree imade in 'Basic Black' and then coloured it in using my 'Stampin' Write Markers' ('Old Olive', 'Real Red', 'Early Espresso' and 'Bashful Blue'.) and stamped the Merry Christmas sentiment from the 'Contempo Christmas' set (in 'Real Red' ink) I mounted this on some 'Old Olive' 'DSP' and then mounted this onto some 'Real Red' cardstock before gluing it onto the cardbase. Finally i wrapped some 'Real Red' 'Taffeta ribbon' around the spine of the card.

This card was super quick to make and so cute and festive!! Why not treat yourself to this lovely stampset - there are so many possibilities!

Get an order in now. Email it over to: amyjtidd@gmail.com

Sunday, 6 November 2011

Another Autumn Days Christmas Reef Card

Yesterday i shared with you a step-by-step tutorial on how to make a fab christmas reef using the 'Autumn Days' stampset.

Today i have a variation of that card to share with you, using the same technique:

I made the reef exactly the same way as yesterday, but stamped it onto a slightly larger piece of 'Whisper White' card and stamped the 'Merry Christmas' sentiment (from the 'Contempo Christmas' set) in the corner of the piece of card, using 'Cherry Cobbler' ink. I used some 'cherry Cobbler' ink and a 'Sponge Dauber' to distress the edges, mounted this onto a piece of 'Cherry Cobbler' card and then mounted it all onto a 'Whisper White' cardbase (which has been 'Sponge Daubered' again!)

I love this card and plan to make a batch of them to send out as Christmas cards!

Have you considered your christmas cards yet? Why not check out my christmas material recommendations at the top of my blog. I'm offering free P&P on all orders placed over £50 before the end of the day on the 7th November. so why not get your order in... email me today: amyjtidd@gmail.com

Saturday, 5 November 2011

Autumn Days Reef: My Stampin' Up! Training Samples (With Step-by-Step Tutorial!)

Hi all, As you know i have not been well at all this week. Well today i'm finally taking a step outside my front door and popping around to my upline Cates house for a quick meet up with some of the other ladies in our Stampin' Up! team.

It's become a bit of a tradition to create a batch of cards to swap with the other girls, to share ideas. At the last meeting the lovely Fiona lent me her 'Autumn Days' stampset to have a play with:
It's a lovely stampset, you get 6 lovely stamps in the set, they are wood mounted at cost £22.95 for the set.

Now anyone who follows this blog regularly will know that i love playing around with the products to come up with alternative uses. So i used this autumnal stampset to create a Christmas design!

And i decided to do a step-by-step tutorial to show you how (Apologies for the quality of some of the pics) So here you go, this is how you make a christmas reef using this set:

Step 1: Start with a piece of 'Whisper White' cardstock and draw a circle on it with a pencil or very light pen. (You can see from this pic that i ahve found an alternative use for a 'Designer Button' pot!)
Step 2: Get the stamp shown above out of the set and load it up with some 'Old Olive' ink
Step 3: Start stamping around the circle. Stamp three times before loading up the stamp with more ink.
Step 4: Keep stamping around the circle!
Step 5: And eventually you end up with this!

Step 6: Get a 'Cherry Cobbler' 'Stampin' Write Marker' and randomly draw some berries.
Step 7: You end up with this!
Step 8: Tie a small bow from some 'Real Red' 'Taffeta Ribbon' and then stick it to the bottom of your reef using some red 'Sticky Strip'.
Step 9: Finally stick this onto a 'Cherry Cobbler' cardbase.
(I had to make 8 for the swaps for todays training and they didn't take long at all!
Why not take a look at the stampsets that you own...is there another use for them?

Want to get your hands on this beautiful stampset - why not make an order today? I'm offering free P&P (usually £4.95) on orders over £50: amyjtidd@gmail.com

Check back tomorrow, i have another christmas card i have to share with you using this Christmas Reef!

Thursday, 3 November 2011

Heart Punch-art Christmas Tree!

Hi all. Still not feeling well, not up to crafting and relying on my backstock of creations that i made whilst in the Isle of Wight last week.

Today i have a christmas tree card made using the 'Large Heart Punch' in a very clever way:


This card was made very easily by punching out 10 'Large Hearts' from some 'Old Olive' card and arranging them to create the tree. The trunk of the tree was made by punching the 'Modern Label' from some 'Early Espresso' card. All of this was glued to a 'Whisper White' cardbase. The Baubles on the tree have been made from some 'Real Red' card, punched using the 'Owl Punch' (The eye part of the punch) and the bow has been created from a small snippet of 'Real Red' 'Tafetta Ribbon', stuck in place with some super red 'Sticky Strip'. Finally the sentiment has been stamped in the bottom righthand corner. It comes from the 'Contempo Christmas' set and has been stamped using 'Real Red' ink.

These cards are so quick to make, you could easily create a batch!! The wonderful thing about this design is the versatility of the 'Heart Punch' - you can use it all year round - valentine, wedding, anniversary and birthday cards! Why not treat yourself? Email me over your order today - i'm offering free P&P on orders over £50 (usually £4.95): amyjtidd@gmail.com

Monday, 31 October 2011

Crafty Boots Challenge: Young at Heart!

Yep, it's that time again - time for another Crafty Boots Challenge! This fortnight the challenge is 'Young at Heart' (this could be anything child related or even reminiscent of children, bright colours etc.) So here's my Design Team offering:


I have used a really fun stampset from Stampin' Up! called 'Something Sweet'. I started off with a 'Real Red' cardbase and layered some 'Daffodil Delight' 'DSP'. Next i got a piece of 'Pacific Point' cardstock and punched a '1-3/4" Circle' out of it. I also got a strip of 'Real Red' card and edged it using the 'Eyelet Border Punch' and glued them together.
I stamped the gumball machine and its lid (onto some 'Whisper White' card) using 'Tempting Turquoise' and 'Basic Grey' (using 'Stampin' Write Markers'). I carefully cut this image out and glued this on the 'Pacific Point Card either side of the punched hole. I then stamped out lots of gumballs in a selection of colours and punched them out using a '1/2" Circle Punch' and arranged them until i was happy with their position and glued them down. I then placed a 'Treat Cup' through the '1-3/8" Circle' before gluing down the 'Pacific Point Card!

Finally i stamped out the sentiment in 'Real Red' ink and punched it out using the 'Modern Label Punch'. I punched out two small holes using my 'Crop-a-dile' and then threaded some 'Real Red' 'Taffeta Ribbon', tucking it behind the 'DSP'.

A lovely bright birthday card, reminiscent of my childhood - i loved my gumball machine when i was a kid! I hope you like my creation! This stampset is fab and is so versatile - you can create so many wonderful cards with it! There are so many pieces to the set - take a look:


I'm always processing Stampin' Up! orders, so if you fancy placing an order drop me an email with your order: amyjtidd@gmail.com

I hope you find a moment to enter the challenge - i can't wait to see your creations!!

Saturday, 22 October 2011

Craft Open House - 22nd October!

Open House Craft Workshop!

Today was my craft open house! An opportunity to share all the lovely new products from the new catalogue with friends, neighbours and family!


Lots of people popped by to create a lovely christmas card!
Here's my version:


A 'Whisper White' cardbase. The stampset i used for this card is 'Beautiful Season', i stamped the bird onto some 'Whisper White' using 'Early Espresso' ink. I coloured the berries in using a 'Cherry Cobbler' 'Stampin' Write Marker' and then coloured the rest of the image in using 'Blender Pens' and 'Old Olive', 'Real Red' and 'Soft Suede' ink. I placed a couple of 'Basic Pearls in the corner and then used a 'Sponge Dauber' and some 'Early Espresso' ink around the edges and then mounted it onto some 'Cherry Cobbler' card. Next i stamped the sentiment onto some 'Whisper White' and punched it out using the 'Decorative Label Punch'. Finally i used the beautiful 'Lace Ribbon Border' to create the 'Cherry Cobbler' strip! (The stampset has a fab inner verse for the centre of christmas cards too!)

What was lovely is that everyone put their own take on it to illustrate this here's Lucy's card:


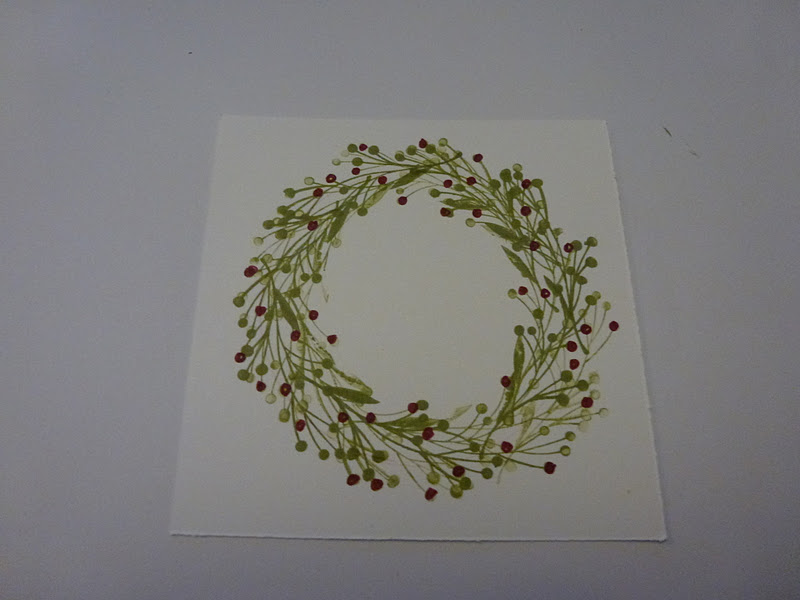
A slightly different layout here! She did a fab job using the 'Sponge Dauber' around all the edges and ran some 'Real Red' 'Taffetta Ribbon' through the 'Lace Ribbon Border'! But what impressed me most was how she used the 'Lace Ribbon Border' inside her card:


She used it as a templace to create this design, using a 'Cherry Cobler' 'Stampin' Write Marker' - i just love this idea!!

Not only did we make christmas cards but we also had lots of tea, coffee, cakes, chocolate and sweets!
There was a free prize draw that i invited all 15 attendees to enter. The prize a handmade 'Milk Carton' filled with a selection of 'Brights Designer Buttons' and some Stampin' Up! ribbon. The lucky winner was:

Jane Willis  

I also organised a crafty raffle -with all proceeds going to the Phyllis Tuckwell Hospice in Farnham. The lucky winners were:

Pat Voller
Lucy Allan
Ruth Jones
Jamie Voller
Hannah Roberts

Congratulations ladies! I will deliver your prizes with your order!!

I hope everyone had a lovely time. It's not too late to make an order. If you do i will send you the materials to create 'make and take' project, just so you don't feel left out! One or two attendees needed a day or two to consider their purchases so there is still time to get involved. I will be making the workshop order on Wednesday when i return home from the Isle of Wight - email me your order: amyjtidd@gmail.com

Thanks to everyone who helped to make today a success!!!

Friday, 21 October 2011

Christmas Joy!

Ok, i'm super busy at the moment prepping for my craft open house tomorrow - it is not too late to get yourself involved. Email me now if you want to come along: amyjtidd@gmail.com

We will be making a Christmas project using some of the new Stampin' Up! products, so to whet your appetite i thought i'd share with you a Christmas card project:


This card was inspired by another member of the 'Blue Angels Team': Fiona from a recent swap she gave me at some training! It uses the beautiful 'Welcome Christmas' stampset. I coloured in the wreath stamp using 'Old Olive' and 'Real Red' 'Stampin' Write Markers' and stamped it onto some 'Whisper Whiote' cardstock. I then stamped the 'joy' stamp over it, using the 'Stamp-a-ma-jig to ensure perfection! I used some 'Crystal Effects' to make the berries POP and tied some 'Real Red' 'Taffeta Ribbon' into a bow and glued it into place using some 'Red Sticky Strip'. I mounted this onto some 'Old Olive' card and then glued it all onto a 'Real Red' cardbase!

Want to have a go at making a lovely Christmas project like this?! I promise you that ANYONE can make lovely cards with just a little bit of tuition, so why not pop along to my crafty workshop tomorrow 11am - 3pm. If you can't make it, why not book your own. They're free of charge to hold and you and your guests will make a free project and you could earn free craft products at the same time!! Get involved and email me for details: amyjtidd@gmail.com

Monday, 10 October 2011

Christmas Wreath using the Perfect Pennant Die!

Hi all,

As promised, another card today using the wonderful 'Perfect Pennant Die':

Today i want to share with you a way to create a fab christmas wreath card:


To create this card i ran some 'Pear Pizzazz' through the 'Big Shot' using the 'Perfect Pennants Die', i punched a '1-3/8" Circle' from the centre. Then created some small circles from the 'Real Red' using my 'Crop-a-Dile' to create the berrys. I tied a small bow out of 'Real Red' 'Taffeta Ribbon', i layered this on some 'Whisper White card', stamped the 'Merry' sentiment (from 'Pennant Parade' stampset) in the righthand bottom corner using 'Real Red' ink. I layered this on spme 'Pear Pizzazz' card and then layered it all on a 'Real Red' base!

Love this card so much! i have to get my bum in gear and start making up my batch of christmas cards, not long at all to go now!

Want to buy this wonderful Die? Then why not make an order. Email me: amyjtidd@gmail.com

Tuesday, 19 April 2011

Let The Vodka Training Commence!!

Our friends Rob and Iwona are getting married soon, in fact they're getting married TWICE!! Very greedy! Their English wedding is next month and then they will be having a big Polish wedding in October!! I have begged the principal at my work and he has agreed that i can take a long weekend off to attend!! I'm so excited!! Flights are all booked, so now i need to start training - i must improve my vodka capacity by then!!

Here's a little 'outer' that i made to send back the RSVP. I couldn't help but put my crafty touch on it!!


The cardstock used for this project is 'Very Vanilla' and 'Real Red'. I couldn't resist using my 'Big Shot' and new 'Vintage Wallpaper Embossing Folder'. I have punched out two hearts using the 'Heart Punch' and using scraps of card created the English and Polish flags, and finally embellished it with a little bit of 'Real Red' 'Taffeta Ribbon'.

We have quite a few weddings this year and next: great excuses to get creative!! Not long now until Iwona's hen do!!

Just a quick update from yesterday, we had a lovely time up in London to celebrate my little sisters birthday!! In the evening my hubby took me to see Chicago and it was amazing!! Having a brilliant Easter hols so far and really enjoying the sunshine today!!