Showing posts with label Beautiful Wings Embosslits Die. Show all posts

Wednesday, 23 May 2012

Wedding Sweet! A MUST HAVE Wedding Stampset!

Hey all, i have had to schedule todays blog post as i have a super busy day today - i'm working ALL day and then off straight away afterwards to the O2 arena to go and watch the Westlife farewell tour with my good friend Ruth!! Woo hoo!

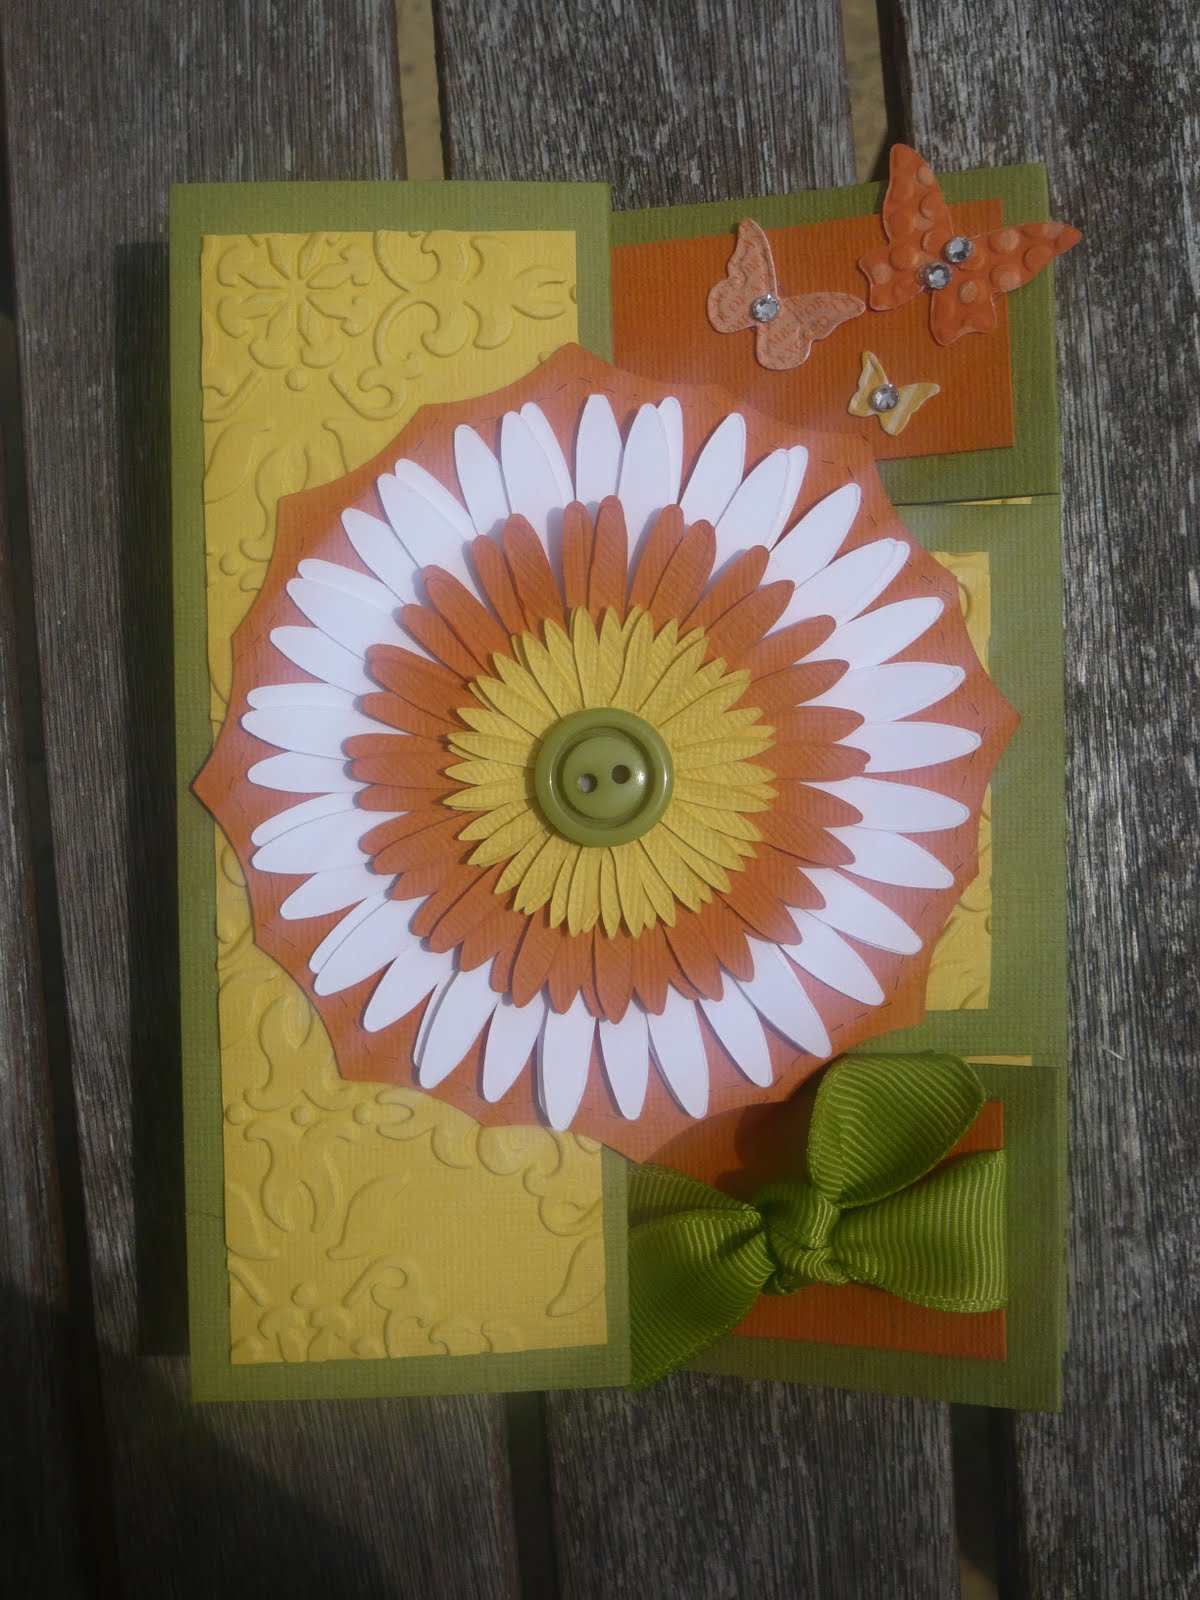
So today i have a card to share with you using the beautiful 'Wedding Sweet' stampset:


This card has been created using a 'Whisper White' cardbase (created from a piece of A4 cardstock cut i half length ways, folded in half and then the front folded back on itself. Onto the front panel i layered a piece of 'Blushing Bride' card stock.

Next up i ran a piece of 'Pear Pizzazz' cardstock and a piece of 'Whisper White' through the 'Big Shot' using the fab 'Top Note Die', trimming around the perforated edge of the 'Whisper White' 'Top Note' and then mounting it onto the green 'Top Note'. Onto the 'Whisper White' 'Top Note' shape i stamped the foilage image from the 'Wedding Sweet' stampset, using 'Pear Pizzazz' ink and then placed some teeny tiny 'Basic Pearls' over the little dots!

I then ran some 'Blushing Bride' cardstock through the 'Big Shot' using the 'Beautiful Wings Embosslits Die, creating the cute little butterflies!

Finally i stamped the 'congratulations' sentiment - also from the 'Wedding Sweet' set ink 'Pear Pizzazz'. (You may also notice that i wrapped a piece of 'Pear Pizzazz' 'Seaming Ribbon' around the spine of the card!!

Here is a pic of the card open:


This card can be used for a range of purposes a engagement/ wedding/ anniversary congratulations card, or with a change of sentiment an engagement/ wedding/ anniversay invitation, Save the dates, RSVP card or Thankyou cards!

The 'Wedding Sweet' stampset is a MUST HAVE if you're intending to make your own wedding stationary...
I recently helped Jade (my crafty partner in crime) and her friend Tori make some beautiful wedding invitations using this set - i will seek permission to share them with you on here - so watch this space!!

Are you getting married soon? Would you like to make your own wedding invites and other stationary but not sure where to start? - drop me an email for some advice - it can work out a lot cheaper to create your own stationary and it is the best way to guarantee you end up with exactly what you want! Drop me an email today: amyjtidd@gmail.com (If you live near to me - Aldershot or surrounding areas - why not drop me an email we can meet up and work through some designs together!!)

Friday, 23 March 2012

A Mothers Day Card For My Nan!

Another Mothers Day make to share with you today that i made last week for my Nan. As i was in hospital on Sunday my lovely hubby had to go round and deliver the flowers and the card. My Nan is like a second Mum to me - i love her to pieces and i hope she had a lovely day!

Here's the card i made for her:


The cardbase is 'Wisteria Wonder', on which i layered some 'Pear Pizzazz' card and a piece of 'Whisper White' - on which i stamped the flower image from the 'Blessed Mother' stampset (using 'Perfect Plum' and 'Pear Pizzazz' 'Stampin' Write Markers'). I wrapped a knotted piece of 'Pear Pizzazz' 'Seaming Ribbon' around before gluing it in place. I ran some 'Wisteria Wonder' card through the 'Big Shot' using the 'Timeless Type Alphabet Die' to create the 'Nan'.

Finally i stamped the sentiment from the 'Teeny Tiny Wishes' stampset and punched it out using the 'Word Window Punch' and placed in the left hand corner of the card and placed a little 'Pear Pizzazz' butterfly (created using 'Pear Pizzazz' card, the 'Big Shot' and the 'Beautiful Wings Embosslit Die') finishing it off with a couple of 'Basic Pearls'.

Don't forget if you like the look of this card and want to buy the materials to make something similar yourself you can place a Stampin' Up! order through me. Just email it over: amyjtidd@gmail.com (And don't forget the Sale-a-bration promotion is still on til the end of the month - so if you spend £45 or more you can also get an exclusive stampset or paper pack for FREE - see the righthand side of this blog for more details!) Don't forget after March these sets WILL NOT be available - so get your order in ASAP!!

Thursday, 22 March 2012

Mothers Day Preperations! (sorry for the delayed post!!)

Hey everyone. I'm back home and under strict instructions to rest - hubby went out this morning and brought lots of supplies and told me not to move from the sofa so i thought i'd get out the laptop and update my blog.

I had my little sister stay with us on Saturday and we spent the afternoon/ evening crafting preparing for Mothers Day. So here are our creations.

First up the card i made for my mum:


This card is a 'Poppy Parade' cardbase. On which i layered some of the lovely Sale-a-Bration 'Everyday Enchantment DSP', which i folded over on one corner. I ran some 'Old Olive' card through the 'Big Shot' using the 'Beautiful Wings Embosslit Die' to create the butterfly and placed some 'Basic Pearls' down the centre. On a strip of 'Whisper White' i stamped the 'I'm blessed to call you mother' sentiment from the 'Blessed Mother' stampset using 'Old Olive' ink. I mounted this onto a wider strip of 'Old Olive' card and tied a piece of 'Baja Breeze' 'Seaming Ribbon'. My mum loved this card and i love this design - i will most definately be CASEing this design in future.

Next up is the card i made for my hubby's Mum to place on her grave:


This card has a 'Wisteria Wonder' cardbase. I layered a piece of 'Paisley Petals DSP' onto a piece 'Concord Crush' card and glued it onto the cardbase. I ran some 'Concrod Crush' through the 'Big Shot' using the 'Beautiful Wings Embosslits Die' to create the five butterflies and glued them into place, placing some 'Basic Pearls' down the centre of each one.

I stamped the sentiment from the 'Teeny Tiny Wishes' stampset onto some 'Wisteria Wonder' card and punched it out using the 'Word Window Punch' and finally ran some 'Wisteria Wonder' card through the 'Big Shot' using the 'Timeless Type Alphabet Die' to create the 'Mum'.

Before i go i just have a couple of makes my sister made using my craft stash for my mum (bear in mind she is 9 - she is quite the crafter!!):


And here is a cupcake craft giftpot we sewed toegther using some felt and pompoms - it was quite an ordeal to make but i love the end result and we popped some chocs in to give to Mum:

Saturday, 17 March 2012

For My Nanny ...

Hey all, sorry for the late post today. I've been really busy preparing for Mothers Day! So tonight i want to share with you a gift i made for my mum from baby Tiddlywink:


I brought this box frame from the 'Range', it comfortably fits a 8"x8" layout in it. The background is a piece of 'Everyday Enchantment DSP'. I printed out two scan pictures of Baby Tiddlywink - one at 12 weeks (top pic) and one at 20 weeks (bottom pic) - onto photopaper, mounted this onto some 'Pool Party' and then some 'Lucky Limeade' and glued them in pace. Next i ran some 'Pool Party' and 'Lucky Limeade' card through the 'Big Shot' with the 'Flower Daisies Die'. I glued that into place and placed a 'Designer Button' in the centre with some 'Red Sticky Tape'. I next ran some card through the 'Big Shot' using the 'Beautiful Wings Embosslits Die' and placed some 'Basic Pearls' down the centre. Finally i created the words 'For my Nanny' by running some 'Pool Party' through the 'Big Shot' using the 'Timeless Type Alphabet Dies'.

I'm really pleased with how this project turned out and hope my mum likes her first gift from her first grandchild!!

I'm really looking forward to tomorrow, we are off visiting family to give out gifts and cards and i even have had a secret package delivered to be opened tomorrow - my first mothers day!!!


Hope you all have a lovely day tomorrow, check back at this blog to see the cards i made for this special occassion!!

Thursday, 8 March 2012

Perfect Mothers Day Creation! Jades Flower Pot Card!

Back again with another creation that we made at Jades craft event last weekend. It was great fun! Each attendee designed a craftymake from Stampin' Up! products and brought the materials with them to share with everyone else!! Jade is planning to arrange another day like this in a couple of months time. Let me know if you would like to attend and you can come along as my guest!

Today i have Jades make which i have to say i love!! It is the perfect mothers day make!! It's a flower pot card which has largely cased  from Amy Celona at Ustamp4fun:


The flower pot has been created from some 'Crumb Cake' cardstock' cleverly folded and cut. Edged with the 'Scallop Trim Border Punch'. We ran some 'Very Vanilla' 'Seaming Ribbon' around the pot. The sentiment is from the 'Happiest Birthday Wishes' stampset (inked in 'Elegant Eggplant') and then punched using the '1-3/8" Circle Punch'. We layered this onto an 'Elegant Eggplant' 'Scallop Circle' before gluing it onto the pot!
 
The flowers are from the 'Vintage Vogue' stampset and have been inked with 'Perfect Plum' and 'Blushing Bride' onto 'Whisper White' card and then cut out and mounted with dimensionals onto the insert created from 'Whisper White' and 'Elegant Eggplant' card stock:
 

Additionally we added some foilage which has been punched out of 'Old Olive' card using the 'Two Step Bird Punch' and a lovely butterfly that has been cut using the 'Beautiful Wings Embosslits Die' from some 'Melon Mambo'. I couldn't resist adding some 'Basic Pearls to the flowers and butterflies for a bit of bling. Notice as well we stamped the foilage stamp from the 'Vintage Vogue' set in 'Old Olive' ink onto the insert as well! This insert could be used to write a message or even as a beautiful bookmark!

Now finally ... you may be wondering how this creation is standing up - as it is clearly not your conventional card design. Well here you go:


A cleverly folded strip of 'Elegant Eggplant' card props this card up on any mantelpiece!!

Thanks Jade for sharing this fab design with us! It was great fun to make and it would be perfect for any occassion - a birthday, mothers day or even a get well soon card!!

Thursday, 12 January 2012

Wedding Acceptance Card!

Hi everyone. It's Thursday - not long until the weekend! Today i have another version of the card that i shared with you yesterday in a different colour combination and for a different purpose - although still wedding related!

It seems at the moment that everyone we know is going through life changing experiences - whether thats engagements, wedding, babies ... it all seems to be happening!! Which is great for me as it means more crafting opportunities!

Friends of ours Kim and Stu are getting married in April and we recently recieved a handmade wedding invitation inviting us to share their big day with them. I felt it was only right to respond with a handmade wedding acceptance card! So here it is:


The card is similar to the one i made yeaterday so i won't go through the process of how to make it again. The colour combo is 'Whisper White' and 'Concord Crush'. The materials i used to make this card are:
  • Big Shot
  • Elegant Bouquet Embossing Folder
  • Basic Pearls
  • Beautiful Wings Embosslit Folder
  • Scallop Punch
  • 1-3/8" Punch
  • Concord Crush ink
  • (A non-Stampin' Up! Acceptance stamp)
I have to thank once again Jade as it is her design that i have CASE'd. These cards are so simple to make - the 'Big Shot' makes the process so super quick that these cards would be perfect to make in bulk. So if you're looking for a save the date, wedding invitation, anniversary invitation or another other type of card this might be the design for you - and it would look fab in any colour combo!)

Get in touch if you would like some help creating your own wedding stationary or if you would like me to make them for you - my prices are very competitative. Drop me an email: amyjtidd@gmail.com

Wednesday, 11 January 2012

Happy Engagement!

Hi everyone. I hope you are having a better week than me. I've been really ill and not at work. Spending most of my time quite pathetically either in bed or on the sofa. But i'm actually feeling quite a bit better so hoping to be back to work tomorrow.

As a result of being housebound for the last four days i have several cards (and mini catalogues) that i have to pop in the post tomorrow. One of these cards is this engagement card that i have made for my crafty friend Stephanie Emma who got engaged to her partner Kieron last week! (So if Stephanie-Emma sees this blog post she will get a sneeky peek of the card!!)


I CASE'd this card from a fellow Stampin' Up! demo and crafty pal - Jade. I started off with a 'Whisper White' cardbase and then ran a strip of the suitably named 'Blushing Bride' cardtsock along the middle. Next i ran a strip of 'Whisper Wite' card through the 'Big Shot' using the fab 'Elegant Bouquet Embossing Folder' to create the raised flowers. I placed some 'Basic Pearls' in the centre of the flowers for a little bling. I punched a 'Scallop Circle' from some more 'Blushing Bride' card. I punched a 1'3/8" Circle from some 'Whisper White' (also ran it through the 'Big Shot' using the 'Elegant Bouquet Embossing Folder' and then created some beautiful butterflies using my 'Big Shot' and the 'Beautiful Wings Embosslit Die' I glued all the butterflies into place and embellished with some more 'Basic Pearls'. I finished off the card with a Congratulations sentiment (from a retired stampset using 'Blushing Bride' ink) - to be honest i wish i had used my 'Stamp-a-ma-jig' because it's a little wonky - but that's a sign of a homemade card!!

I hope Stephanie-Emma and Kieron have a very happy engagement and enjoy all the wedding planning that they now have - they appear to have some very exciting ideas which i can't wait to hear more about! Congratulations once again (and i promise that i will pop it in the post tomorrow so you get the real thing ASAP!)

(If you like the look of any materials that have been used to make this card then why not jot down a wish list! Stampin' Up! sale-a-bration is happening VERY soon - 24th January - a fab time to make an order!! Keep an eye on this blog for details!!)

Monday, 2 January 2012

Embosslit Butterflies Card

Hi all, hope you have all had a fabulous long weekend. Lots of visiting family for us - it has been lovely!

Today i have a card to share with you that uses the 'Beautiful Wings Embosslit Die'. This die is amazing as not only does it cut out the tiny little butterflies but also embosses them!!


I used a 'Whisper White' cardbase and stamped in 'Melon Mambo' ink the birthday sentiment from the fab 'Happiest Birthday Wishes' hostess set. I glued a piece of 'Cheerful Treat DSP' across the card. One this i glued a 'Whisper White' 'Scallop Circle', then layered a '1-3/8" Circle' of 'Cheerful Treat DSP' in the centre. I created the three butterflies by running a different piece of 'Cheerful Treat DSP' through my 'Big Shot' and the 'Beautiful Wings Embosslit Die'. Finally i placed some large 'Basic Pearls' in the centre of the largest butterfly. You can of course change the colour combo to suit the recipient.

If you back to work tomorrow hope it goes ok... only 4 more days until the weekend! I have one more day before i'm back to reality!

Friday, 16 December 2011

Schools out for Christmas!!! Woo hoo!

It's official! It's Christmas!! Today was the last day of term - so just 1/2 a day of teaching, followed by christmas nibbles and then a lovely pub lunch and a spot of christmas shopping with my good friends Ruth and Hannah!!!

Today i have a smaller version of the card that i shared with you on Tuesday:


This cardbase has been made from some 'Whisper White' cardstock. I punched lots of branches (using the 'Two-Step Bird Punch') from 'Old Olive' card, as well as lots of flowers (using the 'Boho Blossom Punch') from 'Rich Razzleberry' card. All of these pieces were arranged on the card before gluing them down, with some 'Basic Pearls' placed in the centre of each flower! The sentiment was stamped from 'Rich Razzleberry' ink using 'Happiest Birthday Wishes' stampset. Finally i ran some 'Rich Razzleberry' 'DSP' through the 'Big Shot' using 'Beautiful Wings Embosslits Die' to create the cute butterflies and placed some teeny tiny  'Basic Pearls' to create their bodies!!

This was another card i made to pop in the card totes that i'm giving away as Christmas gifts!!!

Have a great weekend!

Thursday, 15 December 2011

Happy Birthday Butterfly Card!

Oh, it's so near to the end of the Christmas term! Just one more day to go! I've had a lovely day today, some teaching during the day and then out for a scrummy meal with a group of students who volunteer in a local primary school reading mentor scheme that i help run!

However it is a bit Christmas overload at the mo so it is nice to share a non-Christmas card with you today. this is one of the cards that i made to pop in the card tote that i sent off to Spain for my hubby's grandparents for Christmas:


This card is a 'Very Vanilla' cardbase. I ran some 'Rich Razzleberry' 'DSP' through the 'Big Shot' using the 'Beautiful Wings Embosslits Die' to create the butterfly. I glued this onto a square of 'Old Olive' card and then mounted that onto a 'Rich Razzleberry one and then glued this onto the cardbase. On a seperate scrap of 'Very Vanilla' card i stamped the sentiment (from the 'Happiest Birthday Wishes' stampset) using 'Rich Razzleberry' ink. I punched this out using a 'Decorative Label Punch' and then mounted this onto some 'Old Olive' decorative labels to create a bordered effect. I punched two holes into it using the 'Crop-a-dile' and threaded some 'Rich Razzleberry' 'Grosgrain Ribbon' through and stuck it in place using some super red 'Sticky Tape'. I added a couple of 'Basic Pearls' onto the butterfly for a little bit of bling!!

Hope you like! Have a lovely evening - stay in the warm - it's pretty chilly out there - it may even snow!!!

Tuesday, 13 December 2011

Happy 60th Birthday Card!!!

Hi all, i hope you're all having a great week and enjoying the countdown to Christmas!! Sorry for the late post today but i have been super busy prepping for a craft workshop that i'm doing for a local Rainbows group tomorrow!!

Today i have a card to share with you that was made on Sunday - you may have remembered from Sundays post that i had a really crafty day with Jade in the morning and my friend Lucy in the afternoon. This card was designed by Jade and then made by Lucy!!


This card has been created by folding over an A4 piece of 'Whisper White' cardstock. We punched lots of branches (using the 'Two-Step Bird Punch' from 'Old Olive' card, as well as lots of flowers (using the 'Boho Blossom Punch') from 'Rich Razzleberry' card. All of these pieces were arranged on the card before gluing them down, with some 'Basic Pearls' placed in the centre of each flower!

The 60 has been created using my 'Big Shot' and the 'Timeless Alphabet Dies', from 'Rich Razzleberry' Card. The 'Happy', 'Birthday' and 'th' have all been selectively stamped onto the card using a 'Rich Razzleberry' 'Stampin' Write Marker' and a stamp from the 'Happiest Birthday' set.

Finally we can some 'Rich Razzleberry' 'DSP' through the 'Big Shot' using 'Beautiful Wings Embosslits Die' to create the cute butterflies and placed some teeny tiny  'Basic Pearls' to create their bodies!!

Lucy is a primary school teacher and this card has been made to give to her headmistress for her birthday and will be signed by all the staff! I hope they all like the card!! Well done Lucy - it is a beautiful card - i'll make a crafter of you yet! And thanks once again to Jade for designing a card that i will be making again and again!!!

Friday, 28 October 2011

Lucy's Birthday!

It was my friend Lucy's birthday on Wednesday and we are out today to celebrate! We're off to Thorpe Parks Fright Night, which should be fun! I just hope the rain holds off!! So today i have the card i made for her to share with you. It uses the beautiful 'Vintage Vogue' stampset:


I started off with a piece of 'Whisper White' card and randomly stamped the leaves (in 'Old Olive' ink) and the large flower (in 'Tempting Turqouise') all over it. Next on a seperate pice of 'Whisper White' i stamped some small flowers using 'Island Indigo' ink, carefully cut them out and then placed them over the large flowers using some 'Dimensionals' to raise them and finally placed a blingy 'Basic Rhinestone' in the centre of each. I ran a teeny riny scrap of 'Rose Red' card through the 'Big Shot' using the 'Beautiful Wings Embosslit die' to create the cute little butterfly and placed two teeny tiny 'Basic Pearls' to create its body!

I placed this decorated piece of 'Whisper White' onto a piece of 'Pool Party' card that has been edged with the 'Eyelet Border Punch'. I finally wrapped a piece of 'Rose Red' 'Seaming Ribbon' around it and tied it in a bow. I placed all of this onto an 'Old Olive' cardbase, which has the 'Birthday Wishes' sentiment (from a retired stampset) stamped in the corner, using 'Old Olive ink.

I hope she likes this card! Tomorrow i have a cute little 'Pillow Box' that i made to pop her present in! Why not visit back tomorrow and take a peek!!!

Saturday, 10 September 2011

Stampin' Up! Training - Make and Takes.

One of the great things about being a Stampin' Up! demonstrator is the opportunity to meet lots of people who have exactly the same interests as you! I'm part of a Stampin' Up! team and we all meet up regularly and share ideas with one another.

Our upline Cate hosts these meetings and they're lots of fun, she even organises some make and takes for us to do! You can't have a Stampin' Up! meeting without some crafting!!

So today i'm going to show you what we made! Here's the first project:


This card uses the current 'In Colours' - the cardbase is the lovely 'Pear Pizzazz'. Next we got a piece of 'Whisper White' and stamped it using the 'dots,dots,dots' stamp. We then punched this piece of card using the '1-3/4" Circle Punch' and placed that in the centre of the card. The butterflies have been created using the 'Big Shot', scraps of 'Pear Pizzazz', 'Blushing Bride' and 'Peach Parfait' and the 'Beautiful Wings Embosslits Die'. The sentiment is from the 'Party This Way' stampset and has been stamped onto a strip of 'Whisper White' card, which i have snipped into shape. We placed a couple of 'Basic Pearls' each side of the sentiment to give the card an extra special touch!!

The second project we made was this lovely 'Milk Carton':


Created with use of the 'Big Shot' and 'Milk Carton Die', we wrapped a piece of 'DSP' from the 'Brights Collection' around it. Next we stamped the flower from the 'Vintage Vogue' set, in 'Rose Red' and the friends sentiment (from the 'Just Believe' set) in 'Old Olive' ink and then punched it out using the 'Scallop Square Punch', all finished off with a 'Basic Rhinestone'.

Two lovely projects!! Would you like to have the opportunity to meet lots of new crafty people? Would you like to make a little income that funds your crafting habit? Why not become a Stampin' Up! demonstrator?! Email me: amyjtidd@gmail.com for details on how to join my team!!

Hope you have a great weekend - i'm doing a midnight walk in aid of Phyllis Tuckwell Hospice tonight. It's not too late to sponsor me, visit my Just Giving page HERE. Thankyou in advance!!

Saturday, 20 August 2011

Butterfly themed table favours!

(Hi guys for some reason my scheduled posts have let me down so posting lots of projects at once ... hope it works - sorry if you have been missing me and my crafting - i didn't abandon you!!)

Wow! Amazed that i am sober enough to be typing this post! It was my mum's birthday party last night and it ended up being a bit of a mad one! Lots of fancy dress and drinking way involved!! Here's a couple of pics of me and my best friend Suz!! Good fun!:


Anyway back to business! Today i have a butterfly themed table favour to share with you, here it is:

This time i have sandwiched the chocolate disc between two 'Pretty in Pink' 'Scallop Circles', placed a '1-3/8" Circle' punched from the 'Springtime Vintage DSP' and then placed a 'Perfect Plum' butterfly created using my 'Big shot and the 'Beautiful Wings Embosslit Die' (Exclusive to Stampin' Up!) and finally placed a 'Basic Pearl' in the centre! Another cute table decoration design which could be created in any colour combo!!

Hope you have liked the wedding themed week and that it has given all you future brides some ideas! If you need any help with deisgning your perfect wedding stationary do not hesitate to contact me: amyjtidd@gmail.com

Right, off for lunch and then out to the cinema to watch The Inbetweeners! Hope you have a great weekend!

Friday, 29 July 2011

Riding Hood Red Milk Carton!

Hi everyone! Hope you are all ok! It's almost the weekend and it is almost the end of my trip. I leave Tanzania on the 1st of August and arrive back in the UK on the 2nd. I can't wait to share with you pictures of my adventures!!

Today i have a 'Milk Carton' box, that i have created using my 'Big Shot' and the 'Mini Milk Carton Die'. This box has been made from the beautiful 'Riding Hood Red' cardstock:


Once constucting the box (a little hint - make sure you stick it together with red sticky tape - otherwise it will ping open!) i ran a strip of 'Love Letters DSP' around the carton. Next i ran some scraps of 'Riding Hood Red Cardstock' through the 'Big Shot' with the 'Beautiful Wings Embosslits Die' and glued them on, embellishing them with some 'Basic Pearls'. Finally i punched some holes at the top of the carton with my 'Crop-a-Dile', ran some organza ribbon through and attached a tag, made from 'Basic Black' card and the 'Tag Punch', which was decorated by stamping some 'Very Vanilla' cardstock with the small medallion shaped stamp from the 'Artistic Etchings' stampset (notice how it coordinates with the 'Love Letters DSP'.

Monday, 30 May 2011

Zesty Colour Combo!

Happy Bank Holiday Monday everyone! What beautiful weather it is, much more summery than i was expecting and i guess the weather is totally reflected in the card that i want to share with you today!

I have completely dedicated today for crafting, hubby is at work so i can make as much mess as i want!!! The first thing i did this morning was log on the Cupcake Craft Challenges to see what this weeks challenge is! This week it is 'Zesty Colour Combo' in other words you have to create a card using the following colours: orange, green, yellow and white. So i decided to make the challenge my first crafty make of the day, here you go:

I have created a beautiful tri-fold card. The cardbase is 'Old Olive' and the panels have been made with 'Daffodil Delight' and 'Tangerine Tango' cardstock, some of which has been run through the 'Big Shot' with the 'Vintage Wallpaper Embossing Folder'.

Here's a close up of the front of the card:

The daisies have been created with the 'Flower Daisies Die' using 'Whisper White', 'Tangerine Tango' and 'Daffodil Delight' card. An 'Old Olive' 'Designer Button' has been placed in the centre to coordinate. the daisy is layered on shape that has been created using the 'Top Note Die' and the 'Big Shot'. You basically keep rotating the card on the die to create the effect. (I will try and post a tutorial on how to create this shape soon - you may need to remind me!) I have also placed some beautiful butterflies created from some scraps of 'Brights DSP' and the 'Beautiful Wings Embosslits Die'. I have placed a few 'Basic Rhinestones' on the butterflies for a bit of bling effect! The ribbon featured is 'Old Olive' 'Grosgrain Ribbon'.

Here's the card in it's open form:

The sentiment featured in this card is from the 'Cheers and Wishes' stampset, which i have punched out using the 'Decorative Label Punch'.

I just love this card!! A lovely bright creation to get me in a summery mood. Let's hope the sunshine continues through halfterm!!

Whilst you're here visiting, why not check out my blogcandy!!  Have a fab day and please check back tomorrow for another crafty make! xx

Sunday, 8 May 2011

My first Tri-Shutter Card!!

Hi all! I have had another fab weekend!! My hubby has been away on a stag weekend, of course i have missed him, but it has meant that i have been able to go out and have a lot of fun with my friends! Last night i went out for a lovely meal and cocktails with my two good friends Suzanne and Lucy! Even though we were only going into town we glammed up and it was all very fun! I was particularly happy that i was ID'd getting into the pub!! woo hoo!!! Retail therapy + good food + amazing cocktails + good friends + a little bit of crafting = one FAB weekend!!!

Anyway, back to the crafting... those of you who have been following my blog for a while will know that i have been trying really hard to craft beyond my comfort zone and experiment with new designs, colours, layouts etc.

I have seen lots of Tri-Shutter Cards on Splitcoaststampers and other craft blogs and decided that i must give one of these cards a try! I used a wonderful YouTube tutorial from Splitcoaststampers to guide me through... here's my attempt (and i have to say i'm very very pleased with the final result!!):


I have used 'Crumb Cake' cardstock for the cardbase. I have used a selection of 'Springtime Vintage DSP' mounted onto 'Always Artichoke' cardstock. I have embellished the card with some butterflies cut using my 'Big Shot' and the 'Beautiful Wings Embosslit Die', some 'Basic Pearls'. I have also used my 'Eyelet Border Punch' and my 'Paper Piercing Tool' on this project. Here's a picture of this card in it's closed form:


The quote is from the 'Occasional Quotes' Level 3 hostess set, inked in 'Always Artichoke' onto 'Very Vanilla' cardstock. I drew around a button lid to create the large circle, used a 'Sponge Dauber' to age the edges and then mounted this onto 'Always Artichoke' cardstock.

I really love this style of card and will definately be making some more cards like this!! I have shown a few friends and they appeared very impressed with my design!!

I'd also like to take this opportunity to welcome some new 'crafty thinkers' to my blog!! I'm very excited that i now have 31 regular followers!! So a big hello to my newest followers: Paramour.d and Lya Thomas!! If you like what you see, please spread the word to all your crafty friends!!!

Wednesday, 27 April 2011

My Very First Step Card!!

Hi all, as many of you may know i'm an avid follower of my upline's blog Blue Angel Crafts. Cate regularly posts her projects and they are always inspiring! Recently Cate posted a stepped card. This is a style of card i have never attempted before but i decided to give it a go!! I took Cate's advice and found a tutorial (on SCS) as it certainly wasn't simple!! Here's my attempt:


The cardbase is 'Pretty in Pink' from the 'subtles' collection. The cupcake and the sentiment are from the 'Crazy For Cupcakes' stampset. I used by 'Blender Pens' to colour in the cupcake and used a '2-way Glue Pen' to apply some 'Dazzling Diamond' glitter! The ribbon featured in this project is the beautiful 'Rose Red' 'Binding Ribbon' from the Mini Catalogue. The final step uses 'Whisper White' cardstock and the large background stamp from 'Baroque Motifs' stampset. The Butterfly has been created using my 'Big Shot and the 'Beautiful Wings Embosslits Die'. I have finished off the butterfly using a string of 'Basic
Pearls'. I'd love to know what you think!

I made this card to give to a very good friend of mine, Ruth. It's her birthday today, so HAPPY BIRTHDAY RUTHIE!!! Hope you have a lovely day!! xxx

Friday, 22 April 2011

More Mini Catalogue Delights...

Hello!! I'm so excited about my Mini Catalogue launch party tomorrow!! Today i'm just putting together all the make and take projects. (It's not too late to join the crafty fun, drop me a quick email to RSVP and i'll make sure that i have a project here waiting for you!!)

To whet your appetite, i have decided to share a couple of projects made with mini catalogue products. The first card  is using the 'Plane and Simple' set. We will be using this set tomorrow to make a card!! The 'Plane and Simple' card is great for constructing cards and gifts for men.


This card was very quick to make, a simple 'Whisper White' card base. With a strip of 'Baja Breeze' and 'Crumb Cake'. I ran a piece of 'Night of Navy' cardstock through my 'Big Shot' using the 'Top Note' Die and then stamped the plane and the happy birthday sentiment from the 'Plane and simple' set using 'Whisper White' ink. Quite literally a 5 miniute make!!!

The second card i have to share with you was also a quick make and showcases most of the Stampin' Up! 'in colours' and the exclusive to Stampin' Up! 'Beautiful Wings Embosslits Die'.


The 'Beautiful Wings Embosslits Die' is brilliant as it not only cuts out the butterflys but embosses them too! It's a great way to use up all your scraps!!! I made several butterflys using scraps of 'in colour' cardstock, i then mounted these butterflys on some 'Whisper White' card.  I used a strip of 'Blushing Bride' cardstock edging it with the 'Eyelet Border' Punch. I embellished this card with some 'Pear Pizzazz' Ribbon, and some 'Basic Pearls'.

I hope you like these cards and that you're looking forward to the craft party tomorrow. If you have any questions or would like to see any of these techniques then tomorrow is your opportunity!! and if you can't make it but would still like to make a Stampin' Up! purchase, both the catalogues are available electronically on the righthand side of this blog. I will be processing the order Sunday evening. So please email me any orders by 7pm: amyjtidd@gmail.com

See you tomorrow! Amyxxx

Monday, 18 April 2011

Happy Birthday Jana!

Today is my little sister Jana's birthday!! She is 9 today!! We're off to London for a day out to help her celebrate (and then, as we are already in London we have decided to go to the theatre tonight to see Chicago!), so before we get going i thought i'd share with you the card that i made for her:

This card is known as an 'easel card', i got the tutorial to constuct it from SCS. The stampsets used for this project are 'Four Frames' (to make the bunting) 'Just Perfect Alphabet' (to personalise the card with Jana's name) 'Plane and Simple' (for the 'happy birthday') sentiment, 'Sweetheart' (for the little birdy!!) and although you can't really see it on the photo i used the large stamp from the 'Baroque Motifs' stampset as a background. The 'stopper' for this card was created using a piece of 'Rose Red' cardstock edged with the 'Eyelet Border' Punch, embellished with a piece of 'Whisper White' 'Satin Ribbon' and a little pink butterfly created using my 'Big Shot' and the 'Beautiful Wings Embosslits Die'. I could resit using a couple of 'Basic Pearls' to add a bit of bling!!