Showing posts with label Labels Collection Framelits Dies. Show all posts

Thursday, 27 September 2012

Goodbye Cupcakes :(

The 'Crazy for Cupcakes' stampset retires this month, but you won't have to go without cupcakes for long because the 'Create a Cupcake' stampset and coordinating punch that featured in the Spring mini catalogue earlier this year will be back in the new main catalogue which is released on 1st October!! woo hoo!

So today i have a card to share with that we made at Jades card class a week or so back. For this card we used some remains of DSP (papers) to create the icing, by stamping the image onto the paper and then cutting it out and fixing it onto a stamped image.  I'd like to that Jade for this idea because i hadn't thought about doing this - fab idea Jade!  We colored the cupcake using a 'Blender Pen' and inks and cut them out using the 'Big Shot' using the 'Framelits Die':


Sadly the Eyelet Border punch that we used on this card was on the retiring list aswell but it has already sold out, but don't worry there are plenty of other border punches in the new catalogue.

The colours on this card are 'So Saffron' and ' Rich Razzleberry', with some retiring 'Rich Razzleberry' 'Grosgrain Ribbon' and some blingy 'Basic Rhinestones' to finish the card off.
 
Thanks Jade for hosting such a fab card class. Crafting is a real treat for me at the mo, with very little spare time. I had a great time at the class. Why not check out Jades blog for class dates and join us for some crafty fun!

Wednesday, 8 August 2012

Waterfall Album!

Last month my crafty friend Jade attended a craft class held by another fellow demonstrator and learnt how to make beautiful waterfall albums! Unfortunately due to being heavily pregnant i was unable to attend however Jade kindly shared this technique with me at a recent crafty sesh at her house and i made one for my friends Jen and Andy for a wedding gift!!

Here's the front of my completed 'Waterfall Album':


The colours are 'Pool Party', 'Island Indigo' 'Crumb Cake' and 'Whisper White'. You can just see in the photo there is a panel of 'Pool Party' which has been run through the 'Big Shot' using and then the 'Stripes Embossing Folder. I have also used some 'Crumb Cake' 'DSP'.

To create the image on the front i (well ... if i'm honest, Jade) printed the 'Congratulations Jen & Andy, 21st july 2012 on the computer and then stamped the image from the 'Apothecary Art' stampset in 'Island Indigo' ink - i had to carefully line this up using my trusty 'Stamp-a-ma-jig'. I cut this image out using the 'Big Shot' and the 'Labels Collection Framelits Die' and then mounted it onto a larger 'Island Indigo' label! Here's a close up:


Here is the inside of the album:


I kept the pages inside treasonably simple with the view that Jen and Andy could add some photos from their wedding reception and some captions in themselves. I simply embellished the album with 'Crumb Cake' DSP', 'Island Indigo' card which has been punched using the 'Eyelet Border Punch' and the beautiful butterfly from the 'Clearly For you' stampset inked in 'Island Indigo'.

The other pages fold out like a 'waterfall' when you pull the tab (which was created from a 'Decorative Label Punch')


The mechanism to create this card is very technical and difficult to explain - i suggest you google waterfall cards/ albums and you'll find a range of tutorials to guide you though it! I was lucky enough to have Jade's guidance!

I have to admit this project was completely time consuming but i'm thrilled with the final product - although i think it is fair to say  special people will receive one of these made by me as they are hardwork to complete!!!!

Tuesday, 7 August 2012

It's A Boy Gift Tag!

Hey all! I'd like to share with you today a way of using Stampin' Up! products to gift wrap:


Recently our friends Rob and Iwona went for their 20 week scan and found out they are also having a BOY!! woo hoo! A little playmate for our little man! I couldn't resist buying them a little blue wall hanging for their nursery when i was out shopping and wanted to wrap it - but couldn't not find a suitable gift tag so decided to make my own! I wrapped the gift in tulle and then recycled some ribbon i had lying about.

To create the gift tag i stamped the little feet image from the 'Baby Prints' stampset using 'Bashful Blue' ink and then stamped the 'it's a boy' sentiment over the top using 'Pacific Point' ink. I then cut this image out using my 'Big Shot' and a die from the 'Labels Collection Framelits Die'. I then punched a hole in the corner using my trusty 'Crop-a-Dile' and threaded it through the ribbon!! Making the perfect gift tag!!!

Monday, 23 July 2012

Crafty Boots Challenge: Babies!!

This months Crafty Boots Challenge is very relavant to me: Babies!! With Baby Tiddlywink due imminently i thought i'd share with you the baby announcement cards that i have made ready in advance:


These cards were super quick to make (which was just as well as i had to make quite a lot!!) and you will notice that i slightly altered the designs to make creating such large quantities more bearable!!


I started with 'Bashful Blue' cardbases (i managed to make 3 cards from every piece of A4 card) and embossed them using the 'Big Shot' and the 'Stripes Embossing Folder' to create texture and then placed three 'Basic Pearls' in the bottom corner of each card to add some bling!!

I then stamped the super cute baby feet from the 'Baby Prints' stampset onto some 'Whisper White' card using 'Bashful Blue' ink and then stamped the 'it's a boy'  over the feet (also from the 'Baby Prints' stampset) using 'Pacific Point' ink and then ran it through the 'Big Shot' using a die from the 'Labels Collection Framelits Dies', using 'Dimensionals' to attach the image to the cardbase. Here's a close-up:


I finished these cards off by stamping the announcement image from the 'Little Additions' stampset using 'Pacific Point' ink:


I loved making these cards and can't wait to send them out to all our friends and family to announce the arrival of Baby Tiddlywink. If you're expecting your own little arrival why not consider making your own announcement cards - check out the catalogues for suitable materials and feel free to email me for advice and orders: amyjtidd@gmail.com

Thursday, 12 July 2012

It's a Girl!!

Another baby related card i'm afraid!! On the 3rd July my cousin Kirsty gave birth to a little girl - Ellie June! So here is the card that i made for her:


On a 'Blushing Bride' base i embossed the hearts using my 'Big Shot' and the 'Textured Impressions Embossing Folder Adorning Accents' to create texture on the background.

On some 'Whisper White card' i stamped the super cute baby feet from the 'Baby Prints' stampset and then printed the sentiment over it in 'Rose Red' ink. I used the 'Big Shot' and the 'Labels Framelits' to cut it out and then layered it on a larger 'Rose Red' label using some 'Dimensionals' to create a 3D effect!!

Welcome to the world Ellie June!! Not long to wait for your little cousin to arrive and keep you company!! I officially leave work tomorrow for maternity leave so the final countdown is on!!

Saturday, 7 July 2012

For Now You're A Scan Of My Unmade Plans! (2nd Smash* Book Page)!

Hey all! Back today with my 2nd Smash* book page which i'm using as a baby journal to document key moments for baby Tiddlywink! This page records our 30 week 3D scan:


I continued the 'Ed Sheeran' 'Small Bump' theme onto this page printing lyrics from the song onto 'Whisper White' card and glued these into place and the top and the bottom of the page. I printed out two of the 3D scan images and then framed these by using the 'Big Shot' and the 'Labels Collection Framelits Die' to cut a hole from some 'Whisper White' cardstock. I journalled around these images using my Smash* pen. Next i cut a strip of 'Basic Black' card and glued it in the centre, then used the 'Big Shot' and the 'Timeless Type Alphabet Dies' to create the word 'scan' (from 'Pear Pizzazz', 'Real Red', 'So Saffron' and 'Pumpkin Pie' card)

Finally i made some embellishments from 'Pear Pizzazz', 'Real Red', 'So Saffron' and 'Pumpkin Pie' card punched out using the '1/2" Circle Punch' and some coordinating 'Brads'.
I'm really enjoying creating my baby journal - i hope baby Tiddlywink will enjoy reading it in years to come, and i'm loving using my Stampin' Up! stash in a different way to my usual cardmaking!!! So, just to re-cap here's my first double layout:

Friday, 6 July 2012

Happy Anniversary Mum and John!

Today is my Mum and Step-Dads wedding anniversary - so today i have the card i have made them to share with you:


I started off with a piece of 'Cherry Cobbler' card which i embossed along both edges using the 'Textured Impressions Embossing Folder Adorning Accents' (the heart shaped border folder) I wrapped some 'Whisper White' 'Organza Ribbon' around the 'Cherry Cobbler' card and tied a knot before gluing it to a 'Whisper White' cardbase.

Next i ran some 'Whisper White' cardbase through the 'Big Shot' using the 'Labels Framelits Die'. I then punched some hearts out from 'Cherry Cobbler' card and 'Holly Berry Bouquet DSP' using the 'Heart Punch' and glued them in place. Finally i stamped the 'Happy Anniversary' sentiment using 'Cherry Cobbler' ink onto some 'Whisper White' card and punched it out using the 'Word Window Punch'.

Wishing my parents a very lovely wedding anniversary!! xxxxxx

Monday, 2 July 2012

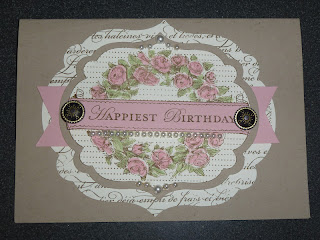
Happy birthday Sis! (An Apothecary Art Card!)

Today is my sisters birthday and i wanted to make a really special card:


I found this design whilst browsing crafty blogs and instantly had to CASE it, i love the vintage style of this card and it showcases the 'Apothecary Art' stampset and coordinating 'Labels Collection Framelits Collection'. Firstly i stamped a piece of 'Very Vanilla' cardstock with the 'En Francais' stampset (using 'Soft Suede' ink) and then ran it through the 'Big Shot' using a 'Label Framelit' and glued this onto the 'Crumbcake' cardbase.

Next up i glued a strip of 'Blushing Bride' card (which i snipped on both ends) I layered a 'Crumbcake' 'Label' ontop and then stamped the reef image from the 'Apothecary Art' stampset, onto 'Very Vanilla' card using 'Soft Suede' ink - i cut this out using the 'Framelits Die' and then coloured it in using 'Regal Rose' and 'Certainly Celery' 'Stampin' Write Markers'. Finally i stamped the banner part of the reef image again onto 'Blushing Bride' card stock and then stamped the 'Happiest Birthday' sentiment inside it before cutting it out, punching some 'Antique Brads' either side and glued this in place. Finally i embellished the card with some 'Basic Pearls' to add some bling to the card!

I hope my sister has a a lovely birthday!! xxxxxxx

Thursday, 28 June 2012

Embossing Tinfoil! A motorcycle card!

I love experimenting with techniques and products. I also love playing with everyday household items!! You may have seen on a previous blogpost i embossed tinfoil and used it on a card. My friend Jade saw this technique and it inspired her to create the card i want to share with you today, which we made at Jades recent craft class!!


Now i have to warn you - although effective - this card is fiddly and not necessarily a card for any perfectionist to attempt! The hardest part is neatly cutting the tinfoil, as it is very delicate, then you run it through the 'Big Shot' in this case using the 'Lattice Square Embossing Folder'. We layered this onto a 'Soft Suede' cardbase.

Next up we stamped the 'happy fathers day' sentiment from 'Teeny Tiny Wishes' (but you could of course use any of the other sentiments to suit the purpose of the card) and the 'it's your day' stamp from the 'Happiest Birthday Wishes' set, using 'Old Olive' ink onto 'Old Olive' card. We placed three silver 'Brads' along the edge and then glued this piece of card to the bottom of the card,

Finally we stamped the motorcycle image (using 'Early Espresso' ink) onto 'Whisper White' card, we coloured in the image using an 'Old Olive' 'Stampin Write Marker' and then cut this out using the 'Big Shot' using the 'Labels Collection Framelits Die' and then mounted it onto a bigger 'Label' cut from 'Old Olive' card.

Don't forget - you can order Stampin' Up! products through me - why not take a peek at the catty's on the righthand side of this blog. Write up your wishlist and email it over: amyjtidd@gmail.com

Wednesday, 20 June 2012

Another Extended Pillow Box!

Hey all! Yesterday i featured an 'Extended Pillow Box' made out of 'Blushing Bride' cardstock... today i have another 'Extended Pillow Box' to share with you, this one has been created from 'Baja Breeze' card:

Created from two 'Baja Breeze' 'Pillow Boxes' cut out using the 'Pillow Box Die' and the 'big shot', glued in place using 'Red Sticky Tape' and then some 'Twitterpated Fabric' wrapped around the centre'. The butterfly has been created from 'Twitterpated Fabric' mounted onto card and then ran through the 'Big shot' using the 'Beautiful Butterflies Dies', with some 'Basic Pearls' glued on to create the butterflys body. The butterfly has been mounted onto 'Whisper White' and 'Blushing Bride' shapes that have been cut out using the 'Labels Collection Framelits Dies'. (you may have noticed that i have ran the 'Blushing Bride' label through the 'Big Shot' using the 'Perfect Polka dot Embossing Folder' to add some texture!

The great thing about handcrafting is that you can make coordinating boxes and cards. You may have noticed that this box coordinates with the card that i shared at my 'Mini catalogue' launch party/ Scrapbook Crop demo last month:


(Click on the card image above to see how to make this card!!)

If you'd like to make an order email me today: amyjtidd@gmail.com You can view the catalogues online - see the links on the righthand side of this blog!!

Tuesday, 19 June 2012

Blushing Bride Extended Pillow Box

Today i have an 'Extended Pillow Box' to share with you. 'Extended Pillow boxes' are actually really easy to create and are perfect gift boxes - especially for jewellery gifts.


This box has been cleverly made using two 'Pillow Boxes' which i cut out using the 'Pillow Box Die' and my 'Big Shot' from some 'Blushing Bride' cardstock! I glued them together using some 'Red Sticky Tape' and then wrapped some stripy 'Twitterpated Fabric' around the middle to hide the joins!

Next i used the 'Big Shot' and the 'Labels Collection Framelts Die' to cut out some labels using 'Baja Breeze' and 'Whisper White' card. I ran the 'Baja Breeze' label through the 'Big Shot' using the 'Perfect Polka Dot Embossing Folder' to add some texture.

I mounted some 'Twitterpated Fabric' onto some cardstock (using 'multipurpose adhesive sheets') and then ran it through the 'Big Shot' using the 'Beautiful Butterflies Die' to create the butterfly, finishing it off by placing some 'Basic Pearls' down the centre of the butterfly!!

Wednesday, 13 June 2012

A Baby Card and 3D pic of Baby Tiddlywink! x

Babies, Babies everywhere!! At the moment i seem to (unsuprisingly) be making lots of baby related projects! Today i have a card to share with you that i made to pop some pics of baby Tiddlywinks 3D scan to send to my in-laws in Spain (and if you scroll down underneath the card i have posted a scan pic for those of you who are interested!!)


On a piece of 'Whisper White' card i stamped the cute little baby image using the fun stampset: 'All In The Family' which is a 2 step stampset where you can create lots of characters:

A little tip for you - you may benefit from using a 'Stamp-a-ma-jig' tool to line up the different stamp componants!!

I coloured in the baby image using 'Stampin' Write Markers' and then cute him out using the 'Big Shot' and the 'Labels Collection Framelits Dies'. I then mounted it onto a larger label cut from 'Island Indigo' card which i embossed using the 'Perfect Polkadot Embossing Folder' to add some texture and then glued this onto the 'Baja Breeze' cardbase. I then punched out some 'Island Indigo' card using the 'Ribbon Lace Punch' and ran this along the bottom of the card, placing some 'Basic Pearls' to add some bling! Finally i 'Heat Embossed' to sentiment (from the 'Just Believe' stampset) using 'White Embossing Powder'.

Add here's a little peek of Baby Tiddlywink's 3D scan:


He is due on the 31st July and i really can't wait for him to arrive!!

Tuesday, 5 June 2012

Fabric Daisies!

Hey all, hope you're enjoying the long bank holiday weekend! Me and hubby are off to Bath for a couple of days for a 'babymoon'! So i've scheduled this blog - i hope it works!!

Today i have a card to share with you that i CASE'd from my crafty friend http://www.jadedcrafter.blogspot.co.uk/ at a recent crafty session we had!! As soon as i saw her make it i couldn't resist making a copy for myself!!


The daisies have been created from two of the designs from the 'Flirtatious Fabric' that we mounted onto some card using 'Sizzix Multipurpose Adhesive Sheets' and then cut out using the 'Big Shot' and the 'Flower Daisies Die'. I placed an 'Antique Brad' in the centre of them.

Next we used the fab 'Labels Collection Framelits Dies', using 'Melon Mambo' to create the larger one, and then a piece of 'Very Vanilla' to create the smaller one, which we then ran through the 'Big Shot' using the 'Perfect Polkadot Embossing Folde'r to add some texture. We mounted these onto a 'Very Vanilla' cardbase and then secured the fabric daisies into place using some 'Red Sticky Tape'.

Finally we stamped the sentiment, using the 'Teeny Tiny Wishes' stampset (in 'Melon Mambo' ink, onto a piece of 'Pink Pirouette' card) and the punched it out using the fab 'Word Window Punch'. We placed two teeny tiny 'Basic Pearls' either side of the sentiment and secured it in place using some 'Dimensionals' to create a 3D effect!

Thanks Jade for the inspiration! If you would like to order any of the products featured why not drop me an email: amyjtidd@gmail.com

Friday, 25 May 2012

Jades Pinata Card!

Hey all, sorry i didn't post last night but i have a good excuse! Last night we went for a 3D scan and saw our beautiful baby boy!! I'll post a pic soon!

Anyway today has also been a very busy day. Today my upper sixth students left college and on top of that i went to Jades this evening and we made this card:


Onto a 'Whisper White' cardbase we layered a piece of 'Pool Party' card that has been ran throught the 'Big Shot' using the 'Stripes Embossing Folder'. We then edged a piece of 'Calypso Coral' using the 'Scallop Trim Border Punch' and then glued it into place. We ran some 'Calypso Coral' and 'Whisper White' card through the 'Big Shot' using the 'Labels Collection Framelits Die' and layered them.

On another piece of 'Whisper White' card we stamped the pinata image from the 'Packed For Birthday' stamp using 'Indigo Island' ink, we coloured in the image using 'Calypso Coral' and 'Pool Party' 'Stampin' Write Markers', which we cut out and then secured it into place using 'Dimensionals' to create a 3D effect. Finishing it off with a handtied bow of 'Linen Thread' glued into place!

Finally the sentiment has been stamped using the 'Teeny Tiny Wishes' set - using 'Calypso Coral' ink. We punched it out using the 'Word Window Punch' and secured it using 'Dimensionals'.

The new 'Packed for Birthday' stamp is AMAZING! It's such a useful stamp which can be used in so many ways! And the great thing is that it retails at just £8.95!!!

 You can use the stamp as a whole or alternatively selectively ink individual images using 'Stampin' Write Markers'! If you'd like to order this stamp drop me an email: amyjtidd@gmail.com

Monday, 21 May 2012

Happy Anniversary!

Today is a day for anniversaries! Not only is it my Dad and Step-Mum's anniversary, it is also our friends Rob and Iwonas first anniversary today too! (Click here to view the card i made them - it featured on my Saturday blogpost)

So today i have the card i made for my Dad and Marg to share with you:


I made this card at Jades bird punch class a couple of weekends ago, so i can't take any credit for this beautiful card. Here's the details:

Firstly we folded a 'Bashful Blue' cardbase. We placed three 'Basic Pearls' down one side to add a bit of bling! Next up we ran some 'Island Indigo' and 'Bashful Blue' card through the 'Big Shot' using the 'Labels Collection Framelits Dies'. We ran the smaller frame throught he 'Big Shot' using the 'Perfect Polka Dot Embossing Folder'. We punched two birds out of some 'Whisper White' card using the 'Two Step Bird Punch' (notice we raised the wings using 'Dimensionals' to create a 3D effect! We glued the birds into place, resting them on two 'Island Indigo' branches (also created from the 'Two Step Bird Punch'. Finally we stamped the sentiment, from the 'Teeny Tiny Wishes' set and punched it out using the 'Word Window Punch'.

I hope my Dad and Step-Mum have a lovely anniversary - i'm sure they will as they're off on holiday to Malta - lucky things!!

If you wanna order any of these lovely products then email over your order today: amyjtidd@gmail.com

Saturday, 12 May 2012

The much 'Twitterpated' Mini Catalogue Card!!

Hey everyone! I have had a completely enjoyable day today, hosting my crafty open house to celebrate the launch of the Summer Mini Catalogue!! I had advertised 11am - 2pm but most of the ladies stayed until 4.30 and we had lots of fun chatting and crafting! Thankyou very much to Poppy, Lucy, Audrey, Suzanne and Jade for making today so much fun!

The card that i provided for my make and take project was designed by the lovely Julie and featured several products from the fab new mini catalogue, including the beautiful (Kath Kidston style) 'Twitterpated Fabric'. So here it is:


On a 'Baja Breeze' cardbase we embossed the lovely hearts from the 'Textured Impressions Embossing Folders: Adorning Accents' - i completely LOVE these folders and they are a welcomed addition to my craft stash!:
Next up we used the 'Big Shot' to cut some 'Blushing Bride' and 'Whisper White' card using the 'Labels Collection Framelit Dies', embossing down the centre with the hearts die!

Next up we created the beautiful fabric butterfly! We mounted some of the 'Twitterpated Fabric' onto some card using 'Big Shot Multipurpose Adhesive Sheets' and then used the 'Big Shot' and the 'Beautiful Butterflies Die to cut the butterfly out. Before gluing him into place we tied some 'Wisteria Wonder Bakers Twine' around him to create the antennae.

I just love the 'Twitterpated Fabric' - such a beautiful colour combo and i love the idea of using fabric on card - something i intend to do A LOT of in future, here's a close up of the three beautiful designs:

We finished off the card by adding the sentiment from the 'Apothecary Art' stampset (which coordinates with the ''Labels Collection Framelit Dies'):

We inked the sentiment using 'Red Riding Hood' ink and then very cleverly used the 'Heart Punch' to create the unusual sentiment banner - i love a new way of using an old punch!!!

I hope you like this card and it has inspired you to have a peak through the mini catalogue - you will find an electronic versions of this on the righthand side of my blog - let me know if you would like to make an order: amyjtidd@gmail.com

Thursday, 10 May 2012

Need For Speed!!

Hey all, today i have another masculine card to share with you, featuring the brilliant stampset from the main catalogue - 'Need For Speed':


 I created the background by running a piece of aluminium foil through the 'Big Shot' using the 'Square Lattice Embossing Folder', tearing it a little and then mounting it onto a 'Night Of Navy' cardbase.

On a piece of 'Real Red' card i stamped the car image using 'Night of Navy' ink. I cut this out using one of the 'Framelits Label Collection' and then mounted it onto a larger label from 'Night of Navy' card (also cut with the 'Label Framelits' Die) and secured it into place using 'dimensionals' to create a 3D effect.

I stamped the sentiment from the 'Happiest Birthday Wishes' set using 'Real Red' ink (onto 'Whisper White' card, snipped this into a flag shape, then mounted this onto 'Real Red' and then 'Night Of Navy' card. I punched two hole using a 'Crop-a-dile' and placed 'Real Red' 'Brads' through them, before securing it in place also using 'dimensionals'.

I just love this stampset - a perfect set for Father Day!!
If you would like to order this set or anything else from the main or summer mini catalogue drop me an email: amyjtidd@gmail.com

Tuesday, 8 May 2012

Another Apothecary Art Card!

Hey all, hope you all survived work today! Been a bit stressful?! Then why not get your crafty kit out?

Today i have another card created using the 'Apothecary Art' card to share with you - you'll notice the colours are very similar to the card shared yesterday as i made it at the same time and was quite taken with the 'Calypso Coral' and 'Old Olive' colour combo!!


A crafty friend of mine Fiona taught me how to make cards of this layout. The cardbase has been create from a piece of 'Calypso Coral' with several pieces of 'Calypso Coral' and 'Old Olive' strips of card that have run through the 'Big Shot' using the 'Vintage Wallpaper Embossing Folder'.

The shapes in the middle of the card have been created using the 'Framelits Dies: Labels Collection' from the new Summer Mini Catalogue, created from 'Calypso Coral' and 'Old Olive' card:

I just love this range of Dies and they're so easy to use!! Notice that i rotated the smaller pieces and also ran them through the 'Big Shot' using the 'Vintage Wallpaper Embossing Folder'.

Finally i stamped the image for the centre of the card from the 'Apothecary Art' stampset (using 'Calypso Coral' ink and cut it out with the smallest die in the collection!

I'm completely in love with this stampset and die - if you are too and would like to make an order - drop me an e-mail today!!: amyjtidd@gmail.com

(I will be using these Dies as part of the make and take project at my Crafty Open House this Saturday - so if you live near Aldershot and would like to come along and craft for FREE drop me an email for details!!)

Monday, 7 May 2012

Introducing Apothecary Art!

Hi all. I hope you have all had a fab Bank Holiday weekend. I have had a great time, catching up with friends and family and even managed to get some crafting in!!

I have completely fallen in love with the beautifully vintage stampset: Apothecary Art and the coordinating 'Framelits Dies: Labels Collection'. So today i have a card to share with you that i have made with these fab new products:


On a 'Calypso Coral' cardbase, i layered a large label (cut using the 'Big Shot' using the largest 'Framelits Die') which i then ran through the 'Big Shot' using the 'Vintage Wallpaper Embossing Folder'. I layered an 'Old Olive' label ontop. Onto a piece of 'Whisper White' cardstock i stamped an image from the 'Apothecary Art' set in 'Soft Suede' colouring it in with 'Calypso Coral' and 'Certainly Celery' 'Stampin' Write Markers'. On a seperate strip of 'Whisper White' i stamped the sentiment (also from the 'Apothecary Art set', trimming the edges with my 'Paper Snips' and then gluing it in place using 'Dimensionals' to create a 3D effect. I finally distressed the edges using a 'Sponge Dauber' and 'Soft Suede' ink.

I just love this stampset, it has a completely vintage feel to it and so versatile for cardmakers and scrapbookers:


The 'Labels Framelits' are a wonderful, welcomed addition to the stampset:

These are MUST HAVES for your crafty stash. So if you would like to make an order then email it over today: amyjtidd@gmail.com

Tuesday, 1 May 2012

Hello Summer Mini Catalogue!!

Eeeeeeeeeeeeeeeeeekkkkkkkkkkkk! I'm so excited to share with the Summer Mini Catalogue! Which will be available from today until the end of the August!


Anyway i MUST show you a project i made a couple of weekends ago with some Stampin' Up! demo pals of mine using some of these fab new products:a lovely giftbox (designed by Diane) using the new tool 'Simply Scored':  

It is quite simply a fantastic tool that helps you to score evenly and precisely. It is the ideal tool for making boxes, embossing cards, mini books and handmade embellishments. So here you are... the beautiful 'pizza box' we made:


This type of box is known as a 'pizza box' and there are lots of tutorials online with various dimensions if you want to make one. The great thing about these boxes is that it has been made from one piece of card ('Blushing Bride' cardstock') that has not been cut at all just carefully scored and folded using the 'Simply Scored' tool!!

Before constructing the box we randomly stamped all over it a flower image from the beautiful 'Bordering on Romance' stampset (see page 11 of the mini catty) using 'Blushing Bride' ink. We also punched an opening tab using the '3/4" Circle Punch'.

We constructed the box using 'Red Sticky Tape' and then placed a square of 'Island Indigo' card on the top - which we ran through the 'Big Shot' using the 'Perfect Polka Dot' stampset.

Next up we stamped a stamp from the beautifully vintage looking 'Apothecary Art' stampset (see page 17 of the new Summer mini catalogue) using 'Island Indigo' ink and coloured in the flowery image using a selction of 'Stampin' Write Markers'.  Heres the 'Apothecary stampset in full:

 
The great thing about this stampset is that you can purchase a set of 'Labels Collection Framelits Dies' which coordinate completely with this set! and this is what we used to cut out the label!! Perfect for all you scrapbookers out there!!
 
Before gluing this label onto the top of the box we inked on the sentiment from the 'Just Believe; stampset carefully using the 'Stamp-a-ma-jig' to ensure it was nice and straight!
 
 
Finally we made a 'belly belt' for the box. Made from a strip of 'Island Indigo' card (scored accurately using the 'Simply Scored' tool) and a strip of the beautiful 'Twitterpated DSP' (See page 13 of the mini catty) edged using the 'Scallop Trim Border Punch'. We cut two butterflys from this 'DSP' using the 'Big Shot' and the 'Beautiful Butterflies Die' and glued them into place embellishing them with a few 'Basic Pearls'!! Here's a :
 
 
I hope i have tempted you to have a sneaky peek inside the new mini catalogue - there is such a range of brilliant products in there i'm sure you won't be disappointed!! If you would like your own copy of the mini catalogue just email over your postal address and i'll pop one in the post. Equally if you'd like to make an order don't hesitate to email me: amyjtidd@gmail.com
 
Also just to let you know...
 
I'm planning on hosting a Summer Mini Catalogue Launch Open House - I will be holding it on the Saturday 12th May (11am - 2pm) at my home (GU12) and you're most welcome to come and join me and have a play with some of the new products - including the beautiful 'Twitterpated Fabric' (see page 13)  - then just email me for details: amyjtidd@gmail.com