Showing posts with label Square Lattice Embossing Folder. Show all posts

Saturday, 11 August 2012

Happy Birthday Nan! A bookmark card!

Yesterday i shared with you a beautiful bookmark we created at Jades 'Big Shot' craft class last month:

See yesterdays blog for details on how to create this bookmark!

Jade showed us how to transform this lovely bookmark into a card, which i intend to give to my Nanny Hazel as today is her birthday!!


We began with a square 'Whisper White' base which we folded along the top. On which we mounted a piece of 'Early Espresso' card and then a piece of 'Whisper White' card which we ran through the 'Big Shot' using the 'Square Lattice Embossing Folder'. We wrapped the bookmark around the card, securing it in place with a couple of glue dots (allowing the recipient to remove the bookmark with ease and make use of it!!) Finally we embossed the 'happy birthday' sentiment' from the 'For My Family' stampset using 'Versamark', 'White Embossing Powder' and a 'Heat Gun'. We punched the sentiment out using the 'Word Window Punch' and then secured it in place using 'Dimensionals' to create a 3D effect.

I love this idea! A fab way of incorporating a gift and a card - don't you think?! Thankyou to Jade for sharing this idea with me! I will most definately be making more of these cards in the future!!

Thursday, 2 August 2012

Punchart: Beer Mug Card!

Hey everyone! Yesterday was my step-dad Johns birthday. So i thought today i would share with you the punchart card that i made for him.

I have to be honest it is not an original idea. I followed a tutorial by Tami White change a couple of the punches and the embossing folder Tami used as i didn't have them to hand! So here's the card:


The cardbase is 'Whisper White' on which i layered a piece of 'Early Espresso' card which i ran through the 'Big Shot' using the 'Square Lattice Embossing Folder' to create texture. The beer much has been made from 'Very Vanilla card (find the dimensionals by following Tami's tutorial - link above) and rounded the corners using the 'Corner Rounder', the handle is also made from 'Very Vanilla' card punched using '1-3/4" Circle Punch' (and i had to use a button lid to draw around as i didn't have the larger punch that Tami used) Next cut some strips of 'So Saffron' card and round the edges and glue them into place to make the beer!

The sentiment has been stamped from the 'Happiest Birthday Wishes' set onto some 'Whisper White Card and then mounted onto some 'Early Espresso' and glued into place.

Finally i had to make the beer froth! This was created by punching shapes out of some 'Very Vanilla' cardtsock using the '1-3/8" Circle Punch', '1-1/4" Circle Punch' and '1/2" Circle Punch', which i edged using a 'Sponge Dauber' loaded up with some 'So Saffron' ink and then arranged them into place. (Note i used some 'Dimensionals' to raise some of the froth bubbles!!)

If you would like to make this card and would like to order the products to make it then drop me an email: amyjtidd@gmail.com

Tuesday, 10 July 2012

I Heart You Hubby!

Hey all! I cannot quite believe that it is 10 whole years since me and hubby had our first date!! Time flies when you're in love!! I couldn't let today pass without some recognition (although it is our official wedding anniversary a week today) So i made hubby this card:


On a 'Cherry Cobbler' cardbase i layered some 'Basic Grey' squares of card. On which i layered some smaller squares made from 'Very Vanilla' card, which i ran through the 'Big Shot' using the 'Square Lattice Embossing Folder' to add some texture.

I then ran some 'Cherry Cobbler' card though the 'Big Shot' using the 'Timeless Type Alphabet Die' (the hearts also come from the die set!) and glued them onto the squares. I ran the smallest heart though the 'Big shot' using the 'Perfect Polkadot Embossing Folder' to create more texture and raised it using a 'Dimensional'.

I finally added a sentiment to the card, by stamping 'Happy Anniversary' from 'Teeny Tiny Wishes' set using 'Cherry Cobbler' ink onto 'Very Vanilla' card and punched it out using the fab 'Word Window Punch', raising it using some 'Dimensionals'.

I LOVE this card almost as much as i LOVE my hubby!! If you like the look of any of the products i have used and would like to order them then feel free to drop me an email!! amyjtidd@gmail.com

Thursday, 28 June 2012

Embossing Tinfoil! A motorcycle card!

I love experimenting with techniques and products. I also love playing with everyday household items!! You may have seen on a previous blogpost i embossed tinfoil and used it on a card. My friend Jade saw this technique and it inspired her to create the card i want to share with you today, which we made at Jades recent craft class!!


Now i have to warn you - although effective - this card is fiddly and not necessarily a card for any perfectionist to attempt! The hardest part is neatly cutting the tinfoil, as it is very delicate, then you run it through the 'Big Shot' in this case using the 'Lattice Square Embossing Folder'. We layered this onto a 'Soft Suede' cardbase.

Next up we stamped the 'happy fathers day' sentiment from 'Teeny Tiny Wishes' (but you could of course use any of the other sentiments to suit the purpose of the card) and the 'it's your day' stamp from the 'Happiest Birthday Wishes' set, using 'Old Olive' ink onto 'Old Olive' card. We placed three silver 'Brads' along the edge and then glued this piece of card to the bottom of the card,

Finally we stamped the motorcycle image (using 'Early Espresso' ink) onto 'Whisper White' card, we coloured in the image using an 'Old Olive' 'Stampin Write Marker' and then cut this out using the 'Big Shot' using the 'Labels Collection Framelits Die' and then mounted it onto a bigger 'Label' cut from 'Old Olive' card.

Don't forget - you can order Stampin' Up! products through me - why not take a peek at the catty's on the righthand side of this blog. Write up your wishlist and email it over: amyjtidd@gmail.com

Tuesday, 22 May 2012

Punch-Art Cat! (Featuring the amazing 'Owl Punch')

Hey all! Hope you;re having a good week! Today i have a card to share with you that i made at a recent 'Bird Punch' class that Jade hosted:


You will notice this card is very similar to the piggy card i shared with you last week! (Click here to view this card)
The card base is 'Whisper White' and we cleverly used a 'Crop-A-Dile' to punch holes down the left hand side of the card and then weaved a length of 'Early Espresso' 'Grosgrain Ribbon' through the holes and then back again and tied in a knot. I just love this technique - even if it is a little fidderly!!

Next we punched a 'Scallop Circle', from the 'Halloween DSP' (with the black cats) and then mounted a 'Whisper White' '1'3/8" Circle, which we embossed with the 'Square Lattice Embossing Folder' using the trusty 'Big Shot'
Next up we created the punch-art cat:

His head  has been created using the 'Owl Punch' - the owls body, with its feet chopped off, created from 'Soft Suede' card! His features have been punched also from the 'Owl Punch' and handdrawn using a 'Basic Black' 'Stampin' Write Marker'. Clever huh?!
Finally the friend sentiment (from the 'For My Family' set) has been stamped in 'Early Espresso' in onto a strip of 'Soft Suede' cardstock - which we handsniped into shape!
I just LOVE this card and the fabulous 'Owl Punch' - it is super versatile!! I can't stop using it!! If you want to order it for yourself then email over your order today: amyjtidd@gmail.com

Sunday, 13 May 2012

Many Ways To Use An Owl Punch! A Pig Card!

Hey all! I have had an amazingly crafty day today!! This morning i attended Jades 'Owl Punch' card - where she shared a range of ways you can use the punch alternatively to the typical owl creation!!! I just LOVE this punch, it's certainly very versatile!!:
So today i have a card to share with you that we made in Jades class, a Pig card!!:


We started with a 'Whisper White' square cardbase. Using a 'crop-a-dile' we punched holes down the spine of the card and double weaved a piece of 'Early Espresso' 'Grosgrain Ribbon' through and finished it off with a bow.

Next we punched a 'Scallop Circle' from some 'Soft Suede' card and then mounted a '1-3/8 Circle' of 'Whisper White' card embossed with the 'Big Shot' using the 'Square Lattice Embossing Folder'.

The pig was cleaverly created using the 'Owl Punch' (from 'Blushing Bride' cardstock). The head was created from the owl (with its feet chopped off). His eyes and nose also created using the punch. The pigs trotters were created from the owls belly (turned upside down). We glued all of this into place - using 'dimensionals' to create a 3D effect. We added in some detail using a 'Basic Black' 'Stampin' Write Marker'. Here's a close-up of the little porker:


Finally we stamped the sentiment from the 'All In The Family' stampset, which we handsnipped to create a banner.

I loved this punch already - but now utterly obsessed with this punch!!! I didn't realise how many things you could do with it!!

After the class i stayed and crafted with Jade all afternoon - coming up with even more 'Owl Punch' cards and lots more - i can't wait to share these with you! Thanks Jade for a completely enjoyable day!

If you want to add this punch to your crafty stash then why not make an order. Email me over your order today: amyjtidd@gmail.com

Thursday, 10 May 2012

Need For Speed!!

Hey all, today i have another masculine card to share with you, featuring the brilliant stampset from the main catalogue - 'Need For Speed':


 I created the background by running a piece of aluminium foil through the 'Big Shot' using the 'Square Lattice Embossing Folder', tearing it a little and then mounting it onto a 'Night Of Navy' cardbase.

On a piece of 'Real Red' card i stamped the car image using 'Night of Navy' ink. I cut this out using one of the 'Framelits Label Collection' and then mounted it onto a larger label from 'Night of Navy' card (also cut with the 'Label Framelits' Die) and secured it into place using 'dimensionals' to create a 3D effect.

I stamped the sentiment from the 'Happiest Birthday Wishes' set using 'Real Red' ink (onto 'Whisper White' card, snipped this into a flag shape, then mounted this onto 'Real Red' and then 'Night Of Navy' card. I punched two hole using a 'Crop-a-dile' and placed 'Real Red' 'Brads' through them, before securing it in place also using 'dimensionals'.

I just love this stampset - a perfect set for Father Day!!
If you would like to order this set or anything else from the main or summer mini catalogue drop me an email: amyjtidd@gmail.com

Monday, 30 April 2012

Crafty Boots Challenge: Yellow!

Another fortnight has been and gone - and yes - it is time for another Crafty Boots Challenge. This months theme is 'Yellow' - so we want to see your projects featuring all shades of yellow!!

Here is my DT offering for this challenge using the beautiful 'So Saffron' shade of yellow!:


The cardbase is 'So Saffron' on which i layered a another piece of 'So Saffron' card which i have run thorugh the 'Big Shot' using the 'Square Lattice Embossing Folder' to create some texture, as well as some 'Beyond the Garden DSP' (which is FREE for just one more day if you make an April order! Email amyjtidd@gmail.com to make your order!) Along the middle i have wrapped some 'Calypso Coral' 'Ruffled Ribbon' as well as bow made from the same ribbon. On a small square of 'So Saffron' i have layered a square of 'Whisper White' card which i have stamped the 'happy birthday wishes' sentiment (from the 'Petite Pairs set) in 'Calypso Coral' ink. Finally i have stamped the flower image from the 'Button Buddies' stampset three times onto 'Whisper White' card using 'Calypso Coral' ink and then cute these out and layered them ontop of one another, finishing off the design with a coordinating 'So Saffron' 'Designer Button'!

Hope you like the card - i don't often use yellow - so this was a real challenge for me! If you like any of the materials used within this project you can order Stampin' Up! products through me! The catalogues are on the righthand side for you to view - and today is the last day of the 'Spring Mini Catalogue' and the April DSP Promotion - so get your order emailed over to me ASAP: amyjtidd@gmail.com

Saturday, 14 April 2012

Happy Wedding Day Kim and Stu!

Today is our friends Kim and Stus wedding day! So today i have the card that i have made to give them:


This card uses a beautiful stampset from the Spring Mini Catalogue called 'You Are Loved'. It is the most perfect stampset to create cards for engagements, weddings, anniversarys, valentines day and plenty more occassions too:


Isn't it just stunning!! I couldn't resist making a card with this set!! To create Kim and Stus wedding card i 'Heat Embossed' the heart image using 'White Embossing Powder' onto some 'Pool Party' card. I mounted this onto a piece of 'Early Espresso' card. Then on a piece of 'Whisper White' card i embossed the bottom of the card using the 'Big Shot' and the 'Square Lattice Embossing Folder'. I ran a piece of 'Pool Party' 'Ruffled Ribbon' and then glued the heart image onto it. I heat embossed the sentiment (from the 'Teeny Tiny Wishes' set) onto some 'Pool Party' card and punched it out using the 'Word Window Punch'. I finished this card off by mounting it onto an 'Early Espresso' cardbase!!

I hope Kim and Stu like this card and have a fantastic wedding day!!

Thursday, 12 April 2012

Natures Nest Card!

Hey all, hope you're having a good week! I've had a lovely time catching up with lots of friends and family - and been out for lunch a lot!

Today i have a card to share with you created by my Sister Jamie, using the beautiful 'Natures Nest' stampset:


I think you'll agree this stampset is simply stunning and could be used in so many different ways - i can't wait to get playing with it!!

Anyway here is the card that Jamie made with this set:


She stamped the tortoise image using 'Basic Black' ink onto 'Whisper White' card, she mounted this onto 'So Saffron' and the 'Pool Party' card. Onto a card base she layered some 'Domestic Goddess DSP', then some 'So Saffron' card and then some 'Pool Party' card (ran through the 'Big Shot' using the 'Square Lattice Embossing Folder' to create a textured effect.) She used 'Dimensionals' to raise each layer. Finally she punched some '1/2" Circles' from some 'Pool Party' card, punched a hole in the centre of each one and placed a 'Brad' through each one, positioning them at the bottom of the card.

I love this card and design. I think it is a fab way of showcasing a beauriful image and with the addition of a sentiment could almost suit any occasion!

If you would like to purchase this stampset or anything else in the Stampin' Up! catalogue why not email over an order: amyjtidd@gmail.com and don't forget if you make an order of £45 or more you will also recieve a pack of DSP for FREE!!

Monday, 9 April 2012

Bank holiday Crafty Session!!

Hey all!!! I have had a last-minute fabulously crafty afternoon with my sisters and my friend Hannah!! I quite literally emptied most of my crafty stash onto the dining room and we just played all afternoon - i have so many creations to share with you over the next few days!!

Now the sign of a good crafty session is a completely messy workspace - so here is us busy crafting away:


Just look at that mess! Hehe! impressive hey?! And here we are showing of some of our finished creations:


So before i go here's a few of the cards that were made today. First up a fab cupcake card created by Hannah:

A 'Very Vanilla' cardbase. Hannah embossed some 'Pink Pirouette' card using the 'Big Shot' and the 'Square Lattice Embossing Folder', which she glued in place. She stamped the cupcake (from the 'Crazy For Cupcakes' set) painted it in using 'a range of Stampin Up! inks and 'Blender Pens', cut it out by hand and attached it to the card using 'Dimensionals' to create a 3D effect. She punched out several '1/2" Circles' from some 'Rose Red' card and glued them randomly in place. She wrapped some 'Grosgrain Ribbon' around the front and finally printed the sentiment (also from the 'Crazy For Cupcakes' set) punched out using the 'Decorative Label Punch'. I love this design!!

Hannah also couldn't resist playing with the rest of 'Sale-a-bration' stash... i'm gonna miss those papers :( As well as some retired sets of mine as well as  the fabby 'Butterfly Punch' to create this card:


She also CASE'd my window idea that i shared last week to create this card using the 'Patterned Pets' stampset:

Finally i have a fun little card my little sister made for me - a windmill card created using 'Brights DSP' to create the main building and strips of  'Big Top Birthday DSP' to make the sails'. She used a 'Stampin' Write Marker' to draw on the door and some 'Bright Brads' in coordinating colours! I'm pretty impressed with this - it's a completely original design and not bad at all for a 9 year old!! So proud of her!!


Well i think that is enough from me for today - so check back tomorrow to see some more creations from our crafty session!

If you live in the Aldershot area and fancy coming along and having a play with some of the Stampin' Up! products then email me to make some arrangements: amyjtidd@gmail.com You're more than welcome!

Wednesday, 4 April 2012

A Chirpy Easter Card!

Hey everyone! Eeeeeeeeeeekkkkkkk! So excited! It's almost Easter and you know what that means?! CHOCOLATE!! hehe!

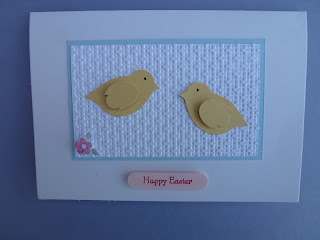
A couple of weekends ago i went around to my crafty friend Jades house to partake in her Easter Card class! It was lots of fun and here is one of the cards that we made:


Onto a 'Whisper White' cardbase we layered a rectangle of 'Bashful Blue' card, onto which we layered a piece of 'Whisper White' which has been run through the 'Big Shot' using the 'Lattice Square Embossing Folder'. The two Easter chicks have been punched out of 'So Saffron' cardstock using the fab 'Two Step Bird Punch':
This punch is FANTASTIC and SO versatile! Now you will notice that we have done something very clever with these little chicks wing, we use the 'Scallop Circle Punch' to create a feathery effect! I glued this birds into place and used a 'Dimensional' to raise the wings and create a 3D effect!

I stamped the little flower (from the 'Create a Cupcake' stampset) using 'Melon Mambo' and 'Pear Pizzazz' 'Stampin' Write Markers' onto a little scrap of card and then cut it out and popped it in place using a 'Dimensional'. 

Finally the sentiment is from the wonderful 'Teeny Tiny Wishes' set, inked in 'Melon Mambo' onto some 'Pink Pirouette' card and then punched out using the 'Word Window Punch' (which you may notice i have become a bit obsessed with recently!)

Have you made your Easter cards yet? Why not get your stash out and make a few before Sunday!!

Don't forget if you would like to make an order then email it over today: amyjtidd@gmail.com (If your order is over £45 you will also be entitled to a FREE pack of DSP!! Check the Springtime April Promotion leaflet on the righthand side of my blog for details!!

Saturday, 31 March 2012

Good Bye Sale-A-Bration :(

Hi everyone, just to let you all know today is the LAST day you can make a sale-a-bration order. So you must get your order in ASAP if you want to earn an exclusive stampset or pack of paper for FREE.

Today i have one final card to share with you using the products:


Onto a 'Pear Pizzazz' cardbase, i layered a piece of 'Whisper White'. Onto this i layered a piece of the beautiful 'Everyday Enchantment DSP' and then a smaller piece of ' Calypso Coral' card that has been ran through the 'Big Shot' using the 'Square Lattice Embossing Folder'. I then ran a piece of 'Calypso Coral' 'Ruffled Ribbon' along the centre.

Next onto a piece of 'Whisper White' card i stamped the thanks sentiment from the fab 'Sale-a-bration' stampset 'Outlined Occassions' set (using 'Pear Pizzazz' ink), i mounted this onto a piece of 'Calypso Coral' card and then a piece of 'Pear Pizzazz' card that has been embossed using the 'Big Shot' and the 'Square Lattice Embossing Folder'. Before securing this into place using  some 'Dimensionals' to create a 3D effect, i stamped the 'so very much' sentiment (also from the 'Outlined Occassions' set) onto some 'Pear Pizazz' card, which i punched out using the 'Decorative Label Punch' and glued this into place!

I gave this card to a fab friend and colleague Hannah who has been wonderfully supportive over the last couple of weeks. I hope she has a very restful Easter holiday!!

If you're desperate to make a sale-a-bration order and you're a regular customer best of calling/ texting me to ensure i get your message. New customers email me (with your contact details) and hopefully i will get it in time and process your order before this evening: amyjtidd@gmail.com

But don't you worry - tomorrow i have a very exciting April promotion to share with you!! Check back tomorrow!!

Tuesday, 28 February 2012

Who is for cupcakes?!

Who doesn't like a cake or two?! Well this is the most perfect birthday card for all you cake lovers out there!!


I made this card whilst i was having around Jades house on Friday night. Jade invited me and Kat around for a fab night crafting and Jade even cooked us an amazing Chinese meal!

Jade had a cupcake template which i used to cute out a cardbase from 'Whisper White' card. I cut out some 'Pink Pirouette' card in the shape of the cupcake and ran it through the 'Big Shot' using the 'Square Lattice Embossing Folder' to create the icing for the cupcake! The cherry on the top was stamped using the 'Button Buddies' stampset and some 'Rose Red' ink, placing it on the top with a 'Dimensional'. I then cut out some 'Melon Mambo' 'DSP' to create the cupcake case and used the 'Scallop Trim Border Punch' to edge it! (Before gluing it down i wrapped some 'Very Vanilla' 'Seaming Ribbon' around the base!

Finally i stamped the sentiment from the 'Teeny Tiny Wishes' using 'Melon Mambo' ink, punching it out with the 'Word Window Punch' and then gluing it onto the card with some 'Dimensionals' to create a 3D effect!!

I just love this card and will most definately be keeping my eye out for some different shaped cardbases to use as templates to make other fun designs!!

Don't forget if you like the look of any of the products that i have used in this creation (or any others on my blog) email over your order today: amyjtidd@gmail.com and if you make an order of £45 or more you'll recieve an extra stampset or paper pack for FREE! See the Sale-a-bration leaflet on the righthand side of my blog for more details!!

Friday, 17 February 2012

Hot Air Balloon Birthday Card!

Hi all, today i have a birthday card to share with you that i made for my Grandad-in-laws birthday, which was a couple of days ago. February is a completely busy birthday month for hubby's side of the family so i have had a very crfaty few weeks!!

This card shows another fab way of using the 'Create-a-Cupcake' stampset and 'Cupcake Punch' to create this fab hot air balloon:


The cardbase is 'Marina Mist' on which a square of 'Bashful Blue' card was placed on the base. The 'happy birthday' sentiment is from the 'Teeny Tiny Wishes' which has been inked in 'Marina Mist'. The clouds have been created using the icing part of the 'Cupcake Punch' from 'Whisper White' card, which i ran through the 'Big Shot' using the 'Square Lattice Embossing Folder' to give them a bit of texture.

On a piece of 'Whisper White' card i stamped (in 'Chocolate Chip' ink) the cupcake base (from the 'Create a Cupcake' stampset) and punched out using the 'Cupcake Punch', i glued this into place to create the balloons basket!

 Next i punched four '1-3/4" Circles' from 'Big Top Birthday DSP' folded each of them in half and then glued them all toegther to create the 3D hot air balloon. Here's a close up:


Finally using a ruler and a 'Real Red' 'Stampin' Write Marker' i drew on by hand some ropes and bows to connect the balloon and basket!

I just love finding fresh ways of using my punches and the 'Cupcake Punch' is proving to be so versatile!!! Why not get your punches out and have a go at creating something less conventional with your punches!! Punchart is so fun - give it a go today! And if you don't have many punches why not take a look at pages 116 - 119 of the Stampin' Up Catalogue and pages 20 and 22 of the Spring Mini catalogue to update your collection!!

Don't forget at the moment with all Stampin' Up! orders over £45 you also get a free sale-a-bration stampset or paper!! Email me over your order today: amyjtidd@gmail.com

Friday, 9 December 2011

Sponge Dauber Robin Card!

It's Friday everyone!! woo hoo! and it is starting to feel like christmas! Tonight is my work christmas party!

Today i have another crimbo design for you that has been created using the 'Two Step Bird Punch' to create a 'Sponge Dauber' robin!!


I punched the bird out using the punch from some 'Whisper White' card. I used a 'Sponge Dauber' to colour the robin in with some 'Soft Suede' and 'Real Red' ink. I used a 'Dimensional' to raise the wing and used a 'Basic Black' 'Stampin' Write Marker' to draw on his eye. I also punched two branches out from some 'old Olive ink.

Next i got a rectange of 'Whisper White' card. I stamped the 'Merry Christmas' sentiment from the 'Contempo Christmas' stampset, in 'Real Red' ink on the bottom right corner. I ran this through the 'Big Shot' using the 'Square Lattice Embossing Folder', mounted it onto some 'Real Red' card, glued the robin and branches onto this and then placed it all onto an 'Old Olive' cardbase.

I hope you're getting all organised for christmas! I have lots of shopping still to get, as well as wrapping up lots of gifts!! I'm really starting to look forward to it! How are you getting on with all your preperations?!

Have a fab weekend! Amyxxx