Showing posts with label Ruffled Ribbon. Show all posts

Thursday, 9 August 2012

Creating butterflies from the 'Mixed Bunch' stampset!!

As soon as i got my hands on the 'Mixed Bunch' stampset i HAD to have a go at creating butterflies from the stampset!!


I made this card for my good friend (and crafty partner in crime) Jade, as it is her birthday today!! HAPPY BIRTHDAY JADE!!

This is how i made the card:
I used the 'rock and roll' technique using 'Daffodil Delight' and 'Pumpkin Pie' ink to stamp three flowers from the 'Mixed Bunch' stampset and punched them out using the 'Blossom Punch'. I snipped two petals off of each one to create some butterflies and then placed three 'Basic Pearls' down the centre of each one to create the butterfly bodies!!

The cardbase is 'Pumpkin Pie' which i folded over the top and ran through the 'Big Shot' using the 'Stripes Embossing Folder'. I stamped the sentiment from the 'Happiest Birthday Wishes' set using 'Lucky Limeade' ink on the top of the cardbase, then wrapped some 'Lucky Limeade' 'Ruffled Ribbon' around the base and tied a bow and then glued the three butterflies in place!!

I just love the idea of using the stampsets and punches in an alternative way and just love the way these butterflies have come out!! I can't wait to make some more!!

Don't forget if you LOVE this 'Mixed Bunch' stampset and coordinating 'Blossom Punch' as much as me then make sure you get your order in ASAP as they're in the summer mini catalogue and there is NO guarantee that they will be in the the new catalogue that will be launching next month - so email your order over today: amyjtidd@gmail.com

Tuesday, 26 June 2012

Tag Scrapbook Tutorial!

Hey all, today i have a fab scrapbook idea to share with you - that a very talented crafty friend of mine, Kerry shared with me!! It's a brilliant 'Tag Mini Scrapbook':


Here's how you make one of these:

Stage 1:

Find three or more toilet rolls.

Stage 2:

Next squash them down flat!!
Stage 3:

Wrap these in coordinating 'DSP' - i have used 'Cheerful Treat DSP'
Stage 4:

Next punch a hole in the bottom of each tube using the 'Crop-a-dile' and then tie some ribbon to attach them!! (I used 'Pear Pizzazz' 'Ruffled Ribbon')

Stage 5:

Next make some tags from cardstock (I used 'Melon Mambo' card) and edged them with a strip of coordinating 'DSP'
I just think this is fabulous idea and really want to thank Kerry for sharing it with me... i think this design would be a lovely gift to give to friends and family - you can place some photos in them to make a beautiful personalised gift!! If you don't fancy making one for yourself why not check out Kerrys blog as she sells them at a really reasonable price and her designs are beautiful!!!

Monday, 30 April 2012

Crafty Boots Challenge: Yellow!

Another fortnight has been and gone - and yes - it is time for another Crafty Boots Challenge. This months theme is 'Yellow' - so we want to see your projects featuring all shades of yellow!!

Here is my DT offering for this challenge using the beautiful 'So Saffron' shade of yellow!:


The cardbase is 'So Saffron' on which i layered a another piece of 'So Saffron' card which i have run thorugh the 'Big Shot' using the 'Square Lattice Embossing Folder' to create some texture, as well as some 'Beyond the Garden DSP' (which is FREE for just one more day if you make an April order! Email amyjtidd@gmail.com to make your order!) Along the middle i have wrapped some 'Calypso Coral' 'Ruffled Ribbon' as well as bow made from the same ribbon. On a small square of 'So Saffron' i have layered a square of 'Whisper White' card which i have stamped the 'happy birthday wishes' sentiment (from the 'Petite Pairs set) in 'Calypso Coral' ink. Finally i have stamped the flower image from the 'Button Buddies' stampset three times onto 'Whisper White' card using 'Calypso Coral' ink and then cute these out and layered them ontop of one another, finishing off the design with a coordinating 'So Saffron' 'Designer Button'!

Hope you like the card - i don't often use yellow - so this was a real challenge for me! If you like any of the materials used within this project you can order Stampin' Up! products through me! The catalogues are on the righthand side for you to view - and today is the last day of the 'Spring Mini Catalogue' and the April DSP Promotion - so get your order emailed over to me ASAP: amyjtidd@gmail.com

Saturday, 14 April 2012

Happy Wedding Day Kim and Stu!

Today is our friends Kim and Stus wedding day! So today i have the card that i have made to give them:


This card uses a beautiful stampset from the Spring Mini Catalogue called 'You Are Loved'. It is the most perfect stampset to create cards for engagements, weddings, anniversarys, valentines day and plenty more occassions too:


Isn't it just stunning!! I couldn't resist making a card with this set!! To create Kim and Stus wedding card i 'Heat Embossed' the heart image using 'White Embossing Powder' onto some 'Pool Party' card. I mounted this onto a piece of 'Early Espresso' card. Then on a piece of 'Whisper White' card i embossed the bottom of the card using the 'Big Shot' and the 'Square Lattice Embossing Folder'. I ran a piece of 'Pool Party' 'Ruffled Ribbon' and then glued the heart image onto it. I heat embossed the sentiment (from the 'Teeny Tiny Wishes' set) onto some 'Pool Party' card and punched it out using the 'Word Window Punch'. I finished this card off by mounting it onto an 'Early Espresso' cardbase!!

I hope Kim and Stu like this card and have a fantastic wedding day!!

Saturday, 31 March 2012

Good Bye Sale-A-Bration :(

Hi everyone, just to let you all know today is the LAST day you can make a sale-a-bration order. So you must get your order in ASAP if you want to earn an exclusive stampset or pack of paper for FREE.

Today i have one final card to share with you using the products:


Onto a 'Pear Pizzazz' cardbase, i layered a piece of 'Whisper White'. Onto this i layered a piece of the beautiful 'Everyday Enchantment DSP' and then a smaller piece of ' Calypso Coral' card that has been ran through the 'Big Shot' using the 'Square Lattice Embossing Folder'. I then ran a piece of 'Calypso Coral' 'Ruffled Ribbon' along the centre.

Next onto a piece of 'Whisper White' card i stamped the thanks sentiment from the fab 'Sale-a-bration' stampset 'Outlined Occassions' set (using 'Pear Pizzazz' ink), i mounted this onto a piece of 'Calypso Coral' card and then a piece of 'Pear Pizzazz' card that has been embossed using the 'Big Shot' and the 'Square Lattice Embossing Folder'. Before securing this into place using  some 'Dimensionals' to create a 3D effect, i stamped the 'so very much' sentiment (also from the 'Outlined Occassions' set) onto some 'Pear Pizazz' card, which i punched out using the 'Decorative Label Punch' and glued this into place!

I gave this card to a fab friend and colleague Hannah who has been wonderfully supportive over the last couple of weeks. I hope she has a very restful Easter holiday!!

If you're desperate to make a sale-a-bration order and you're a regular customer best of calling/ texting me to ensure i get your message. New customers email me (with your contact details) and hopefully i will get it in time and process your order before this evening: amyjtidd@gmail.com

But don't you worry - tomorrow i have a very exciting April promotion to share with you!! Check back tomorrow!!

Friday, 9 March 2012

Pip's 'Ornate Flower' card!

Today i have a card to share with you that was designed by another fellow demonstrator Pip (AKA Queen Pip!) We made this at Jades crafty day last Saturday:


Although not visable in this photo the cardbase has been created from some 'Confetti White' cardstock (see page 95 of the main catalogue). We ran a piece of 'Pumpkin Pie' 'DSP along the bottom with a strip of 'Lucky Limeade' 'Ruffled Ribbon'. The 'get well soon' sentiment is from the 'Sincere Salutations' stampset, inked using 'Lucky Limeade' and 'Pumpkin Pie' Stampin' Write Markers' onto some 'Whisper White' card, punched out using the 'Decorative Label Punch' and then bordered with a 'Lucky Limeade' 'Decorative Label Punch'.

On the card base we stamped four of the images from the 'Ornate Flowers' set in 'Pumpkin Pie' ink to create a background. On a seperate piece of 'Whisper White' we stamped the framed flower image from the 'Ornate Flowers' set in 'Lucky Limeade' ink. We bordered this onto a piece of 'Lucky Limeade' card and glued this to the card using 'Dimensionals' to create a 3D effect!!

I love the colour combo Pip has used in this design! Don't you?!

Saturday, 3 March 2012

Jades Crafty Catchup! My minibook project! (with tutorial!)

Today i have had a fabulously crafty day!! Jade hosted a wonderful Stampin' Up! crafty session. There was six attendees and we all designed and demo'd a project to one another. So at the end of the day we had six different creations to take home!! It was a brilliant idea of Jade's to arrange a day like this because everyone had a completely different style and used a complete range of Stampin' Up! products - it was SO MUCH FUN!

So tonight i want to share with you the project that i designed and shared with my crafty friends. It's a folded minibook, with little pockets that you can place little momentos and photos in and it features some of my most favourite Stampin' Up! projects. So here it is:

The front of the mini-book!
The mini-book is made from a piece of 'Lucky Limeade' card. A4 length x A5 width. With a few clever folds, one cut with the guillotine and a bit of 'Red Sticky Strip' you can create this cute little project in no time at all!!

Here's a little demo of how it is done:

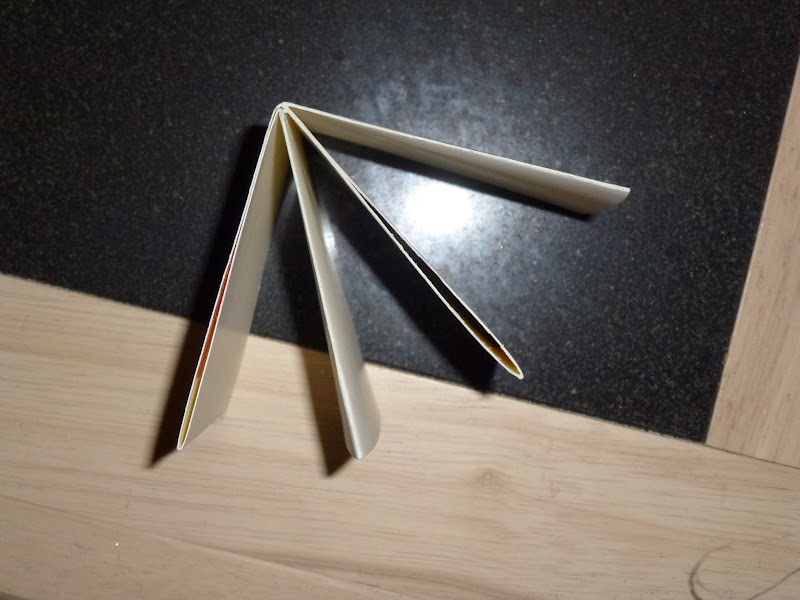
As i said before, you will need one piece of card. A4 length x A5 width. Fold it into 8 equal squares with your 'Bone Folder' (take a bit of time doing this and do it neatly!) Then made a cut with your guillotine as shown in the diagram above and then place the 'Red Sticky Tape' as show above.
Then you have to fold it like this:


And stick everything into place to create your mini-book:


Then it's time to decorate it!!

Once you have created the structure and folded it into place, run a piece of 'Red Sticky Tape' along the front and then run a piece of ribbon along it (in this instance i used a piece of 'Pool Party; 'Ruffled Ribbon'. Over that i glued two piece of the beautiful 'Everyday Enchantment DSP' squares on the front and the back. On the front i glued a 'Lucky Limeade' 'Scallop Circle' and then a butterfly punched using the 'Butterfly Punch' out of 'Everyday Enchantment DSP', with a couple of 'Basic Pearls' running down the centre!
Here's the inside (Please ignore my greasy fingerprints!!):

Notice that i used the '1.2" Circle Punch' to create some little tabs. You could then place little momentos/ photos etc easily in them!!
So there you go!! Hope this little tutorial makes some sense! It really is easy to make and the fab thing is it really doesn't use hardly any cardstock!! I think this would be a lovely project to make for mothers day! Why not give it ago!

Don't forget the beautiful paper i have used for this project you can get for FREE if you make a qualifying Sale-A-Bration order by the end of the month!! So get your order in now. Email me at: amyjtidd@gmail.com and for this month only i will give you FREE P&P on all sale-a-bration orders (usually £4.95)

Friday, 2 March 2012

Another Everyday Enchantment Card!!

Hey everyone! It's Friday!! Woo hoo! I'm so ready for the weekend! I'm really looking forward tomorrow as i'm meeting up with lots of crafty ladies to share our creative ideas and have some lunch! I'm looking forward to sharing all of these with you!

Now some of you committed daily followers may have noticed a bit of a theme in the last few days blogposts - my obsessive use of 'Everyday Enchantment DSP' - i actually LOVE these papers and hope you do too!

Todays project also uses this beautiful collection of paper:


On a 'Crumb Cake' cardbase i layered a strip of 'Pool Party card' and a strip of 'Everyday Enchantment DSP', along the centre i ran a piece of 'Calypso Coral' 'Ruffled Ribbon'. I ran a piece of 'Lucky Limeade' card through the 'Big Shot' using the 'Textured Impressions Designer Frames'. I cut this out by hand and glued this on the top of the card and in the centre placed a punched out butterfly from some DSP, raising it with 'Dimensionals' and placing some 'Basic Pearls' down the centre!

Finally i stamped the 'happy birthday' sentiment from the 'Create-a-Cupcake' set in 'Pool Party' ink onto a strip of 'Pool Party' card, which i handsnipped down one edge and placed three 'Basic Pearls' down the side!

Don't forget you can earn this collection of papers for FREE and they're only available until the end of this month! So get a qualifying order email over today: amyjtidd@gmail.com

Check back tomorrow because i have another project using the 'Everyday Enchantment DSP' to share with you!

Sunday, 19 February 2012

Just For You Nan...

Sometimes it is important for someone to know that you're there for them and there is no better way than making them a handmade card to let them know you're there for them no matter what... and that's exactly why i made my Nan this card:


I created an 'Elegant Eggplant' cardbase (folded at the top) and embossed the bottom half of the card using the 'Big Shot' and the 'Vintage Wallpaper Embossing Folder'. I ran a piece of 'Lucky Limeade' 'Ruffled Ribbon' along the middle of the card. On a piece of 'Very Vanilla' card i stamped the flower image from the 'Charming' stampset using 'Lucky Limeade' and 'Elegant Eggplant' 'Stampin' Write Markers'. I stamped the 'just for you' sentiment from the 'Teeny Tiny wishes' stampset, using 'Elegant Eggplant' ink. I mounted this onto 'Elegant Eggplant' card and then onto a piece of 'Lucky Limeade' card. before sticking it to the cardbase using 'Dimensionals' to create a 3D effect.

There's nothing quite like a handmade card to show someone you care. So why not get your craft stash out and make someone you love a card! And if you like any of the products you see featured on this card then ehy not email over an order: amyjtidd@gmail.com (Don't forget if you make an order of £45 or more before 31st March you're entitled to a free Sale-a-bration' stampset or pack of papers - and i'll throw in FREE P&P - usually £4.95 - free P&P is an exclusive CraftyThINKer customer deal!!)