Showing posts with label Holly Berry Bouquet. Show all posts

Tuesday, 25 September 2012

Retiring Stampset: Clearly For You

I have another card to share with you that my friend Jade designed. I made this card at her craft class last weekend. It features the the retiring ' Clearly for You' stampset and the seasonal 'Holly Berry DSP' which is also going at the end of the month. :(


The frame is from the 'Designer Frames', embossed using the 'Big Shot', and then we stamped the 'bird' image and sentiment from the 'Teeny Tiny Wishes' stampset inside the frame using the trusty  'Stamp-a-ma-jig'.

I love this stampset - it is such a shame it's going - isn't the ladybird cute!


If you;d like to order this or any other items drop me an email: amyjtidd@gmail.com

Saturday, 4 August 2012

Engagement Wishes for Lloyd and Katie!

July was a super busy month and i made so many cards i didn't have time to feature on my blog! Exciting news my cousin Lloyd popped the question to his girlfriend Katie and she of course said YES! So i made this engagement card to send to them:


On a 'Very Vanilla' base i layered up a strip of 'Cherry Cobbler' card and then a piece of 'DSP' from the 'Holly Berry Bouquet' collection, whih i embellished with some 'Basic Pearls'. I then cut a square of 'Cherry Cobbler' card and glued that onto the 'DSP'. I punched a 'Heart' from some 'Very Vanilla' card, which i ran through the 'Big Shot' using the 'Adorning Accents Embossing Folders' to create the cute heart texture!! and then glued it into place using some 'Dimensionals' to craete a 3D effect. Finally i stamped the congrats sentiment from the 'Tagtastic' stampset onto some 'Very Vanilla' card using 'Cherry Cobbler' ink, mounted it onto a slightly larger piece of 'Cherry Cobbler' card and then finally embellished the sentiment with some of the teeny 'Basic Pearls'.

Wishing Lloyd and Katie all the best for the future! Congratulations guys! xxxxxx

(And don't forget if you would like to order any of the products used to create this card drop me an email: amyjtidd@gmail.com - you can view the catty online via the link on the righthand side of this blog!)

Friday, 6 July 2012

Happy Anniversary Mum and John!

Today is my Mum and Step-Dads wedding anniversary - so today i have the card i have made them to share with you:


I started off with a piece of 'Cherry Cobbler' card which i embossed along both edges using the 'Textured Impressions Embossing Folder Adorning Accents' (the heart shaped border folder) I wrapped some 'Whisper White' 'Organza Ribbon' around the 'Cherry Cobbler' card and tied a knot before gluing it to a 'Whisper White' cardbase.

Next i ran some 'Whisper White' cardbase through the 'Big Shot' using the 'Labels Framelits Die'. I then punched some hearts out from 'Cherry Cobbler' card and 'Holly Berry Bouquet DSP' using the 'Heart Punch' and glued them in place. Finally i stamped the 'Happy Anniversary' sentiment using 'Cherry Cobbler' ink onto some 'Whisper White' card and punched it out using the 'Word Window Punch'.

Wishing my parents a very lovely wedding anniversary!! xxxxxx

Monday, 25 June 2012

Crafty Boots Challenge: Sports! My Baseball Owl!

Hey all, back again with another Crafty Boots Challenge - this one has been set by Zoe and i have to be honest - i found it quite a tricky one. The theme for this fortnights crafty challenge is SPORTS! I looked through my craft stash and realised i had NO sports related stamps, so had to think outside the box... and heres what i came up with:


I have to be honest - i'm quite proud of this card - a completely original design it did take me some time to come up with!!

On a 'Very Vanilla' cardbase i mounted some glittery 'DSP' from the 'Holly Berry Bouquet' collection. I created two baseballs by punching some 'Whisper White' card using the '1-3/8" Circle Punch' on which i drew on some stitching using a 'Cherry Cobbler' 'Stampin' Write Marker', i raised these up on the cardbase using 'Dimensionals' to create a 3D effect. The sentiment is from the 'Teeny Tiny Wishes' set, inked in 'Cherry Cobbler' ink and then punched out using the fab 'Wrod Window Punch' (again raised up using 'Dimensionals')

Next i created the baseball owl using the amazing 'Owl Punch'! Here's a close-up:


I punched the owl out using 'Early Espresso' card, his eyes created from scraps of 'Whisper White' and 'Basic Black' card. His body has been punched out using 'Real Red DSP'. I punched some wings out using the 'Two-Step Bird Punch'. His baseball bat has been create from 'Crumbcake' cardstock which has been stamped using the 'Woodgrain' stamp (using 'Early Espresso' ink) I handsnipped it into a baseball bat shape. The baseball was created using the eye part of the 'Owl Punch' from some 'Whisper white' card, and then i drew on the stitching using a 'Real Red' 'Stampin' Write Marker'. Finally owls baseball cap was made using some scraps of 'Real Red' card cut into two semi-circles, on which i glued a small 'Whisper White' circle (eye from the 'Owl Punch') and the 'w' emblem is a 'Real Red' owl foot!

I mounted the baseball owl onto a couple of 'Scallop Circles' ('Whisper White' and 'Cherry Cobbler'.

I hope you like my baseball owl as much as i do!! I'm very proud of him!! I can't wait to see your sporty creations! Don't forget - if you would like to own the fab 'Owl Punch' for yourself you can order it through me!!
Email me you Stampin Up order today: amyjtidd@gmail.com (FREE UPS P&P on orders over £40 - usually £4.95 - if you mention CRAFTY BOOTS CHALLENGES when ordering!!) Online catalogues are available to view on the righthand side of this blog!

Thursday, 21 June 2012

Crafty Meal Planner

As many of you probably know next month Baby Tiddlywink is due!! It's our first baby and i'm very keen to get into good organised routines before his arrival. One thing i have been trialing is bulk cooking and planning meals ahead so i customised a notepad to allow me to note down meal plans:


This was a pretty quick crfaty project. I simply covered a cheap notepad (from Wilkinsons) in 'Holly Berry Bouquet' and glued a strip of 'Cherry Cobbler' card along the top. Next up i used the 'Broadsheet Alphabet Stampset' to stamp the letters in 'Cherry Cobbler' and 'Pear Pizzazz' ink onto 'Very Vanilla' card. I punched them out using the '1-1/4" Circle Punch' and then mounted them onto '1-3/8" Circles'. Finally i glued a very strong magnet (brought on e-bay) to the back so i can pop it on my fridge and scribble meal plans and recipes in it. Fingers crossed it'll make me more organised! We'll see!!!

Monday, 18 June 2012

Anniversary Wishes!

June and July are always very popular wedding months - and so i have had lots and lots of anniverary cards to make. Today is Dave and Sarahs first wedding anniversary and here is the card that i made for them:


I embossed the bottom of a cardbase using my 'Big Shot' and the 'Adorning Accents Embossing Folder'. Next i glued a strip of 'Cherry Cobbler' card and 'DSP' from the 'Holly Berry Bouquet' collection. I stamped the 'Happy Anniversary' sentiment from the 'Teeny Tiny Wishes' stampset using 'Cherry Cobbler' ink (which i lined up using the fab 'Stamp-a-ma-jig' tool. Finally i punched two hearts out of 'Very Vanilla' and 'Cherry Cobbler' cardstock, using the 'Heart Punch', which i ran through the 'Big Shot' using the 'Perfect Polka Dot Embossing Folder'. I glued the 'Cherry Cobbler' heart onto the base and then raised the 'Very Vanilla' heart using 'Dimensionals' to create a 3D effect!

Sunday, 1 January 2012

Happy New Year!

Hi everyone! I hope you celebrated the end of 2011 well! Can you believe it is 2012! Wishing you all a very happy new year! I have a feeling that this year is going to be a good one!!

Today i have a lovely birthday card to share with you, where i have used up some of the remains of 'Holly Berry Bouquet DSP' i still have lying around - it's such a versatile 'DSP' and not just for Christmas!!


This card is a 'Very Vanilla' card base. I have layered some 'Holly Berry Bouquet DSP' over half of the card base. I punched a strip of 'Cherry cobbler' card using the 'Eyelet Border Punch'. On a seperate piece of 'very Vanilla Card' i stamped two butterflies using the 'All in A Flutter' 'A la Carte' stamp, using 'Cherry Cobbler' ink. I stamped the birthday sentiment (from a retired stampset' in the corner).  layered this onto some 'Cherry Cobbler' card and then glued this onto the cardbase.

Why not dig out your Christmas stash and see if there are any alternative ways of using your Christmas crafty goodies!!

Don't forget if you was lucky enough to get some crimbo money from friends and family why not save it to spend on the upcoming sale-a-bration promotion - details to follow on this blog very, very soon!!

Monday, 19 December 2011

Christmas Cards From My Crafty Friends!!! Part 1!

Grrrrrrrrrrrrrrrrrrrrrrrrrrrrrrrrrrrrrr.... i'd actually scheduled this for last night, but for some reason the post didn't materialise?! So you'll get two posts today to compensate!!

I'm so lucky to have so many crafty friends and some them have put some time aside to craft some beautiful christmas cards to send to me!! I love recieving Christmas cards - and they're one of my most favourite christmas decorations! They instantly makes a room look beautifully christmassy!!

So i thought over the next couple of blog posts i'd share these with you!!! So here you go:

Card from Sally:

Sally is a fellow Stampin' up! demo and very good friend of mine and she sent me this beautiful card. I just love Sal's style!! She has started with a 'Cherry Cobbler' cardbase, she has made a beautiful bow from some Stampin' Up! 'Crochet Trim Ribbon' along the bottom. The N,O,E,L have been stamped using the 'Broadsheet Alphabet' stampset using 'Cherry Cobbler' ink onto 'Whisper White' card. She punched them out using the '1-3/8" Circle Punch' and then layered them onto some 'Scallop Circles' punched out of 'Holly Berry Bouquet DSP'. I just love this design! Thankyou so much Sally!!

Card from Ruth:


Ruthie is a really good friend of mine (and Stampin' Up! customer) and she made me this beautiful card! She used a 'Whisper White' cardbase. She stamped the bauble from the 'Contempo Christmas' in 'Cherry Cobbler' ink, she punched it out using the 'Ornament Punch'. She layered it on a piece of 'Very Vanilla' and then on a piece of 'Tempting Turquoise' card. She stamped the christmas sentiment (also from the 'Contempo Christmas' set in 'Tempting Turquoise' ink. She finished off the card by punching a strip of 'Tempting Turquoise' using the 'Ribbon Lace Punch'.

I think you'll agree that these cards are amazing!! It's lovely to have such talented crafty friends that give me inspiration!!

Keep a look out for my other post of today, where i will share with you even more the handcrafted cards i have recieved!!

Monday, 12 December 2011

Christmas Candle Gifts: Crafty Boot Challenge!

Hi all, it's that time again! Another Crafty Boots Challenge and this fortnights theme is CHRISTMAS!!! Before i share with you my project for this challenge i have the honour of announcing the winner of the bloghop competition that has been running over the last two weeks. Lots of people commented on my loast DT post and one lucky crafter has been selected at random to win some crafty goodies! The lucky winner is:

KATIE!
To claim your prize please email Stephanie-Emma your delivery details!! Her email address is: stephanie-emma@craftyboots.co.uk

Congratulations!!!!

Anyway... here is my DT offering, a couple of tealight candle gift packs:


These have been made very easily! I punched out some '1-3/4" Circles' using my punch from some 'Holly Berry Bouquet DSP'. I punched a small hole out of the centre using my trusty 'Crop-a-Dile' and threaded it over the wick of the tealight. I placed a piece of 'Cherry Cobbler' in a 'Cello Bag' and placed all four candles in the bag. Next i ran some 'Cherry Cobbler' card through the 'Big Shot' using the 'Top Note Die', i folded it in half and glued a strip of 'Holly Berry Bouquet DSP'. I stamped the 'a gift for you' stamp from the 'Beautiful Season' set, in 'Early Espresso' ink onto 'Whisper White' card. I coloured the holly in using some 'Old Olive' ink and a 'Blender Pen', as well as a 'Cherry Cobbler' 'Stampin' Write Marker'. I punched the stamp out using the coordinating punch and glued it on!

Here is another example with a topper made using some 'Pear Pizzazz' Card:


Hope you like my christmassy creation - why not make some for stocking fillers or gifts for work colleagues?! Don't forget to enter the challenge this week and make sure you check out all the Design Teams blogs to see if you are a lucky winner!!

Thursday, 8 December 2011

Elegant Dasher!!!

Hi all, hope you're all having a good week. I've had a super busy one - with 2 parents evenings - i'm so tired and most definately on the countdown to the Christmas hols!

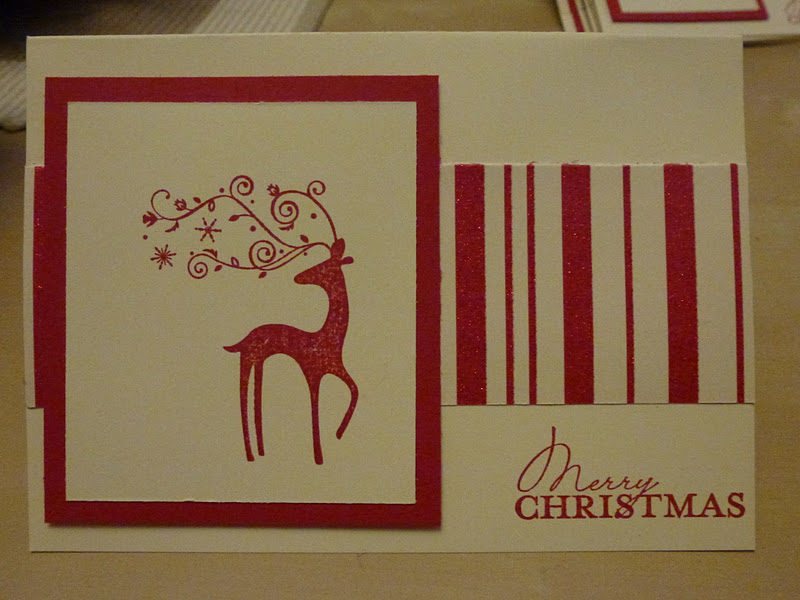
Today i have another christmas card design to share with you created using the lovely 'Dasher' stamp:


A 'Very Vanilla' cardbase stamped with the 'Merry Christmas' sentiment (in 'Real Red' ink) from the 'Contempo Christmas' stampset, with a strip of the lovely, glittery 'Holly Berry Bouquet DSP' across the middle. On a seperate piece of 'Very Vanilla' i stamped the 'Dasher' stamp in 'Real Red'. I mounted this onto 'Real Red' card and then glued that over the strip of 'DSP'.

Another super quick design to make. It's not too late to get crafting and make some crimbo cards!! I'd love to see what you come up with!!

Sunday, 27 November 2011

Christmas Countdown: An advent Calender Project!

Hi all, i hope you are all having a fab weekend! Mine's been very crafty! Kim, a friend of mine texted me yesterday with a picture of a fantastic advent calender she had designed and made. As soon as saw it i knew i just HAD to make one for myself, so before the ladies arrived yesterday afternoon for some Christmas crafting i got to work, and here is the final result:


Started with a piece of 12x12 thick card, i pasted a piece of the 'Holly Berry Bouquet DSP' to create the backing. The 24 pockets were created from 8x8cm squares of 'Cherry Cobbler' and 'Pear Pizzazz' card clever folded and fixed in place using 'Red Sticky Tape'. I typed the numbers using my laptop - and printed them out onto a sheet of 'Whisper White' - i tried to match the font colour as best as i could to 'Cherry Cobbler' and then punched them out using the 1/2" Circle Punch':


I stuck each of the pockets to the background board using 'Red Sticky' tape! I finished off the project by gluing two '1/2" Circles' punched from 'Cherry Cobbler' card to the top of the advent calender, punched a hole through each one using my 'Crop-a-dile' (and i'm just waiting for my stampin' Up! order to arrive and then i will thread some scrummy 'Cherry cobbler' ribbon through the top!

That just leaves the most important bit - the chocoloate!!  I finished it off with a little santa in each pocker (available from Morrisons - 16 for 99p!)


So have you got your advent calender yet? Why not make one like this you can use again and again!!! You can put any sort of choc you like into it!! Thanks Kim for the idea!!

Just before i go, as i mentioned earlier in my post, yesterday i had some lovely ladies around for some Christmas crafting!

We had a great time and everyone went away with a batch of Christmas cards!! Thankyou to everyone who attended. If you couldn't make it, it's not too late to get crafty this Christmas! Why not have a flick through the catalogue on the righthand side of this blog and email over an order: amyjtidd@gmail.com

I will be hosting more classes and open houses in the new year - so keep an eye on the blog!!!

Sunday, 20 November 2011

Jolly Santa Punch-art!!

Hi all, hope you're having a great weekend. It's been a pretty chilled one for me and it has been kinda nice. Today i have a fabby Santa punchart card to share with you!


This jolly Santa was made from a '1-3/8" Circle' of 'Blushing Bride' cardstock for his face and a 'Whisper White' 'Scallop Circle' for his beard! This hat was made from some 'Real Red' cardstock trimmed to size (as was the 'Whisper White' trim) The little pompom on his hat and his nose was made using the 'Owl Punch' (what would be the owls eyes!) I drew on his eyes with a 'Basic Black' 'Stampin' Write Marker' and made his rosy cheeks from some 'Regal Rose' ink and 'Blender Pen'. I layered Santa onto a piece of 'Old Olive' and then a piece of 'Holly Berry Bouquet DSP'

The cardbase used is 'Real Red'. I ran a piece of 'Old Olive' through the 'Ribbon Lace Punch' and then layered that onto the cardbase and then popped Santa ontop! Finally i stamped the Merry Christmas sentiment from the 'Contempo Christmas' set onto some'Old Olive' card using 'Whisper White' ink and then punched it out using the 'Decorative Label Punch' and then layered it on another 'Decorative Label' punched from some more 'DSP'.

There you go a lovely jolly Santa! This is such a fun card and so easy to make batches of! It is also the perfect card to make this children as there is very little stamping involved!!

It's not too late to get an order in. Drop me an email to make an order: amyjtidd@gmail.com