Showing posts with label Butterfly Punch. Show all posts

Saturday, 3 March 2012

Jades Crafty Catchup! My minibook project! (with tutorial!)

Today i have had a fabulously crafty day!! Jade hosted a wonderful Stampin' Up! crafty session. There was six attendees and we all designed and demo'd a project to one another. So at the end of the day we had six different creations to take home!! It was a brilliant idea of Jade's to arrange a day like this because everyone had a completely different style and used a complete range of Stampin' Up! products - it was SO MUCH FUN!

So tonight i want to share with you the project that i designed and shared with my crafty friends. It's a folded minibook, with little pockets that you can place little momentos and photos in and it features some of my most favourite Stampin' Up! projects. So here it is:

The front of the mini-book!
The mini-book is made from a piece of 'Lucky Limeade' card. A4 length x A5 width. With a few clever folds, one cut with the guillotine and a bit of 'Red Sticky Strip' you can create this cute little project in no time at all!!

Here's a little demo of how it is done:

As i said before, you will need one piece of card. A4 length x A5 width. Fold it into 8 equal squares with your 'Bone Folder' (take a bit of time doing this and do it neatly!) Then made a cut with your guillotine as shown in the diagram above and then place the 'Red Sticky Tape' as show above.
Then you have to fold it like this:


And stick everything into place to create your mini-book:
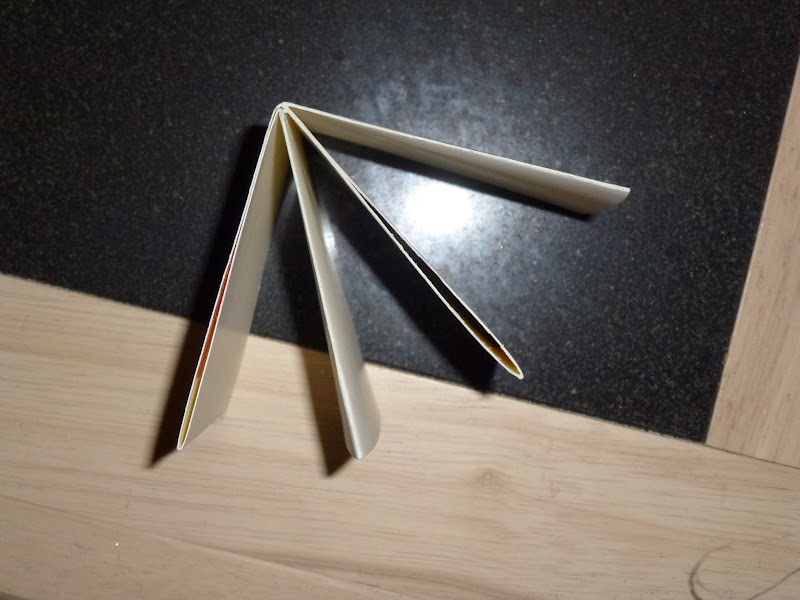


Then it's time to decorate it!!

Once you have created the structure and folded it into place, run a piece of 'Red Sticky Tape' along the front and then run a piece of ribbon along it (in this instance i used a piece of 'Pool Party; 'Ruffled Ribbon'. Over that i glued two piece of the beautiful 'Everyday Enchantment DSP' squares on the front and the back. On the front i glued a 'Lucky Limeade' 'Scallop Circle' and then a butterfly punched using the 'Butterfly Punch' out of 'Everyday Enchantment DSP', with a couple of 'Basic Pearls' running down the centre!
Here's the inside (Please ignore my greasy fingerprints!!):

Notice that i used the '1.2" Circle Punch' to create some little tabs. You could then place little momentos/ photos etc easily in them!!
So there you go!! Hope this little tutorial makes some sense! It really is easy to make and the fab thing is it really doesn't use hardly any cardstock!! I think this would be a lovely project to make for mothers day! Why not give it ago!

Don't forget the beautiful paper i have used for this project you can get for FREE if you make a qualifying Sale-A-Bration order by the end of the month!! So get your order in now. Email me at: amyjtidd@gmail.com and for this month only i will give you FREE P&P on all sale-a-bration orders (usually £4.95)

Friday, 2 March 2012

Another Everyday Enchantment Card!!

Hey everyone! It's Friday!! Woo hoo! I'm so ready for the weekend! I'm really looking forward tomorrow as i'm meeting up with lots of crafty ladies to share our creative ideas and have some lunch! I'm looking forward to sharing all of these with you!

Now some of you committed daily followers may have noticed a bit of a theme in the last few days blogposts - my obsessive use of 'Everyday Enchantment DSP' - i actually LOVE these papers and hope you do too!

Todays project also uses this beautiful collection of paper:


On a 'Crumb Cake' cardbase i layered a strip of 'Pool Party card' and a strip of 'Everyday Enchantment DSP', along the centre i ran a piece of 'Calypso Coral' 'Ruffled Ribbon'. I ran a piece of 'Lucky Limeade' card through the 'Big Shot' using the 'Textured Impressions Designer Frames'. I cut this out by hand and glued this on the top of the card and in the centre placed a punched out butterfly from some DSP, raising it with 'Dimensionals' and placing some 'Basic Pearls' down the centre!

Finally i stamped the 'happy birthday' sentiment from the 'Create-a-Cupcake' set in 'Pool Party' ink onto a strip of 'Pool Party' card, which i handsnipped down one edge and placed three 'Basic Pearls' down the side!

Don't forget you can earn this collection of papers for FREE and they're only available until the end of this month! So get a qualifying order email over today: amyjtidd@gmail.com

Check back tomorrow because i have another project using the 'Everyday Enchantment DSP' to share with you!

Wednesday, 29 February 2012

Sale-a-Bration: Everyday Enchantment DSP!

Reminder: You have one month left of Stampin' Up's Sale-a-Bration promotion!

So make sure you get your qualifying orders of £45 in to recieve your FREE stampset or DSP. To see further details of this promotion check out the leaflet on the righthand side of this blog!!

Now i have to be honest - my most favourtite Sale-a-Bration product is the beautiful vintage looking 'Everyday Enchantment DSP':


So today i have a card to share with you using these papers:


On a 'Poppy Parade' cardbase i layered some 'Lucky Limeade' and 'Everyday Enchantment DSP' to create a background. I then cut out a smaller square of 'DSP and bordered it onto some 'Lucky Limeade' card. I punched a butterfly out of 'Poppy Parade' and glued it to the centre of the DSP and then layered a 'Lucky Limeade' butterfly ontop, and blinged it up with two 'Basic Pearls' down the centre! Finally i stamped the birthday sentiment from the 'Create a Cupcake' stampset onto a strip of 'Lucky Limeade' card and handsnipped each end, raising it from the card using some 'Dimensionals' to create a 3D effect!

Soooooooooooooo ... have i made you love this DSP as much i love it?! Want a pack of it for yourself?! Then email over your order now: amyjtidd@gmail.com

Thursday, 23 February 2012

For my lovely customer Jane!

Today i have a card to share with you that i made for a lovely customer of mine Jane. (I have featured some of her work on my blog before.)

A couple of weeks ago i dropped Jane's order around to her house and with it i popped in a little thankyou card. Here it is:


For those of you who are regular Crafty ThINKer blog followers will recognise this card layout as being very similar to that of the card i demo'd earlier in the month for the Aldershot WI group.

The cardbase is 'Crumb Cake' card. I ran some 'Pool Party' card through the 'Big Shot' using the 'Perfect Polka Dot Embossing Folder'. Next i glued a strip of the 'Sale-a-bration' 'Everyday Enchantment DSP' (which i handsnipped at the end). I then ran a piece of 'Very Vanilla' card through the 'Big Shot' using the 'Textured Impression Embossing Set' and cut out the oval by hand. I punched a butterfly from some 'Pool Party' card using thr 'Butterfly Punch', drew on the antennae using a 'Lucky Limeade' 'Stampin' Write Marker' and placed a couple of 'Basic Pearls' down the centre of the butterfly.

Finally the sentiment (from the 'Teeny Tiny Wishes' set), stamped using 'Pear Pizzazz' ink onto 'Pear Pizzazz' card. Punched out using the 'Word Window' punch and a couple of teeny tiny 'Basic pearls' placed either side!

Jane really liked her card. It's important to me that each of my customers feels valued because they really are!! In fact i owe Jane a second thankyou card as she kindly gave me two tickets to the Make-it show next weekend!! Looking forward to going and most probably spending lots of money!!!

Wednesday, 16 November 2011

Mary, Joseph and Baby Jesus Punch-art!

Hi guys, another punch-art special for you today! I'm really getting into punch-art crafts - it is so fun to get all my punches out and have a play. The great thing is if you're not feeling overly creative there are some AMAZING punch-art tutorials online and most of these are posted by lovely generous crafters who post these free of charge!

As soon as i saw this tutorial online on a website called Punch Art Addiction - i just knew i had to have a go. So over half-term when i was away with my friend Ruth we dedicated an afternoon to making this Mary, Joseph and Baby Jesus card:

The cardbase is 'Very Vanilla' (6"x6") with some 'Early Espresso' and 'Crumb Cake' layered ontop. The Mary, Joseph and Baby Jesus are made out the following colour card: 'Night of Navy', 'Not Quite Navy' 'Baja Breeze', 'River Rock', Chocolate Chip' and 'Pirouette Pink' and have been created using the following punches: 'Ornament Punch', 'Wide Oval Punch, 'Large Oval Punch', 'Full Heart Punch' , 'Round Tab Punch', 'Butterfly Punch', 'Word Window Punch', '1/2" Circle Punch' 
'1/4" Circle Punch', 'Scallop Circle Punch', 'Owl Punch' and 'Boho Blossom Punch'. I drew the facial features on with a 'Basic Black' 'Stampin' Write Marker' and some 'Dimensionals' to raise their noses. Finally i wrapped a little bit of 'Chocolate Chip' 'Grosgrain Ribbon' to create Josephs belt! I decided not to put a sentiment on the front, opting instead to put the lovely 'Merry Christmas' sentiment from 'Contempo Christmas' in the centre of the card.
Here are both mine and Ruths creations together:
If you would like to have a go at this card pop over to  'Punch Art Addiction' to access the full tutorial! And if you want to purchase any punches to get creating your very own punchart why not put through an order with me! Have a look at pages 116 - 119 of the catalogue on the right to view the full range. Write out your wish list and email it over to me: amyjtidd@gmail.com Happy creating!!

Friday, 1 July 2011

Butterfly Bookmark

Hi guys!! It's FRIDAY!! Woo hoo!! and i have a very busy weekend planned! Firstly it's my sisters birthday tomorrow, so i'm looking forward to celebrating it with her!! It is also my last weekend in the UK before i disappear off to Tanzania for a whole month!!! Now don't worry, i have been very, very busy scheduling lots of projects ( i think you will still be getting a daily post!!!) so please make sure you visit and leave me lots of comments, so it all feels worthwhile!!

All though my Tanzania trip is going to be a very busy one i'm hoping i'll get some down time and get some reading done! and so i thought i'd make myself a little bookmark to take with me. Here it is:


This bookmark started life as a strip of 'Bashful Blue' card, next layer is 'Marina Mist' and the top layer is a strip of 'DSP' from the 'Elegant Soiree' collection. The topper is a 'Bashful Blue' 'Scallop Circle', a '1-3/8" Circle' punched from 'Marina Mist' and finally a '1-1/4" Circle' of 'DSP'. I have stamped  a butterfly from the Level 1 stampset: 'Punch Potpourri', punched him out using the 'Butterfly Punch', placed some 'Basic Pearls' down the centre of the butterfly!

A very quick make and it's lovely to be able to take something a little crafty with me to Africa! I think i'm going to miss my crafting whilst i'm away. But i think i will get my crafting fix - some jewellery making with a Masai tribe and also making some elephant dung paper!!

Please keep checking back on this blog regularly to see all my crafty creations!!  and check back tomorrow especially as i have a very cute little card to share with you, i made it ages ago for my sisters birthday and have been keeping it a secret for ages!!

Saturday, 26 March 2011

Getting my craft gear in order!!!

Hiya all! IT'S THE WEEKEND!! Woo hoo!!! and what a lovely Saturday i've had!!

This morning i went to my upline Cate's (Blue Angel Crafts) for some team training!! It was lovely to catch up and get some tips on how to run workshops!! We also had an opportunity to have a sneaky play with products from the soon to be released mini catalogue!! Here's a pic of me and some of the team. Diane (Crafty Ducks) and Katie (Deep Blue Crafting) having a crafty moment:


Unfortunately i cannot show you anything we made quite yet - you will have to be patient and wait until the 1ST APRIL!! (I plan to hold a launch party in April and everyone is welcome - check back at the blog for details!!)

This afternoon i have been have been organising all my Stampin' Up! gear!! I couldn't resist having a play with a new stampset of mine 'Broadsheet Alphabet' to make some labels for my craft storage boxes!!! Here they are all together:

The inks used are all from the 'brights' collection and the mounted cardstock is the lovely 'Tempting Turquoise'


And i couldn't resist punching out some butterfly's using the wonderful 'Butterfly punch'!!

I love the quirky font!! Some of the letters i have slightly masked using a simple little post it note) This has prevented the stamps from overlapping and looking messy. (I learnt this technique recently at Cate's craft retreat!!) You may be wondering how i managed to keep it all straight and neat - well i used the AMAZING 'Stamp-a-ma-jig' which i simply cannot craft without!! (If you would like a demo of how to use the 'Stamp-a-ma-jig' tool, which will allow you to do two-step stampin and lots of other wonderful things why not book a workshop!!)

Well anyway, i'm planning to continue with the craftiness and have a play with some of the mini catalogue products! I can't wait to share these with you!!! Have a great weekend! x